Black73Cat wrote: Mon Apr 10, 2017 8:24 pm
Just finalising design and waiting for groundwork to be done...Hope to get it delivered in around a month. Fingers crossed!
If it doesn't have a figure in green tights and a pointy hat on the roof I will be very disappointed.
May I suggest the following:
Brilliant!
Re: Lets see your modelling work areas
Posted: Tue Apr 11, 2017 8:31 am
by Fridgy
Alrighty
Spent some more time organising my shed and tinkering.... and ended up with a home made spray booth... score
Re: Lets see your modelling work areas
Posted: Tue Apr 11, 2017 4:04 pm
by Twokidsnosleep
Resourceful is the first work that comes to mind. Make the best with what you have
I love it, man
Re: Lets see your modelling work areas
Posted: Tue Apr 11, 2017 4:36 pm
by Lysus
Re: Lets see your modelling work areas
Posted: Tue Apr 11, 2017 7:47 pm
by Astaroth
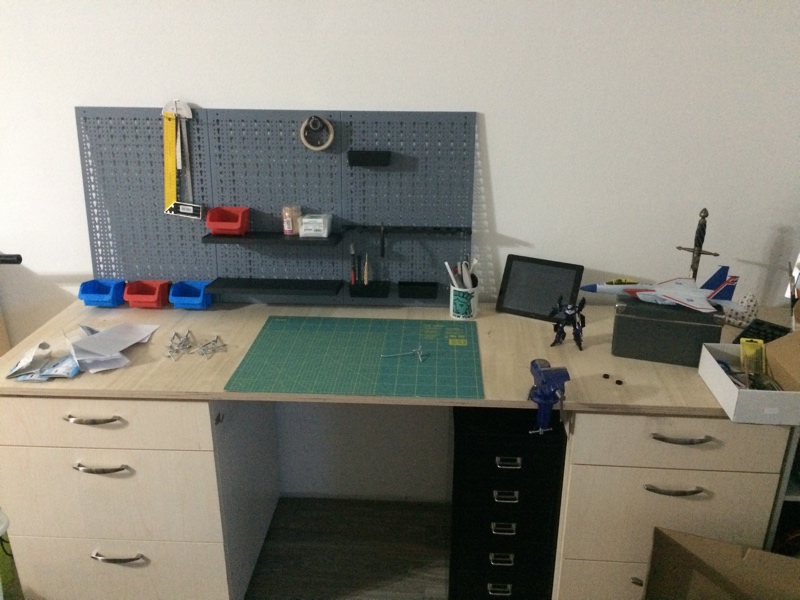
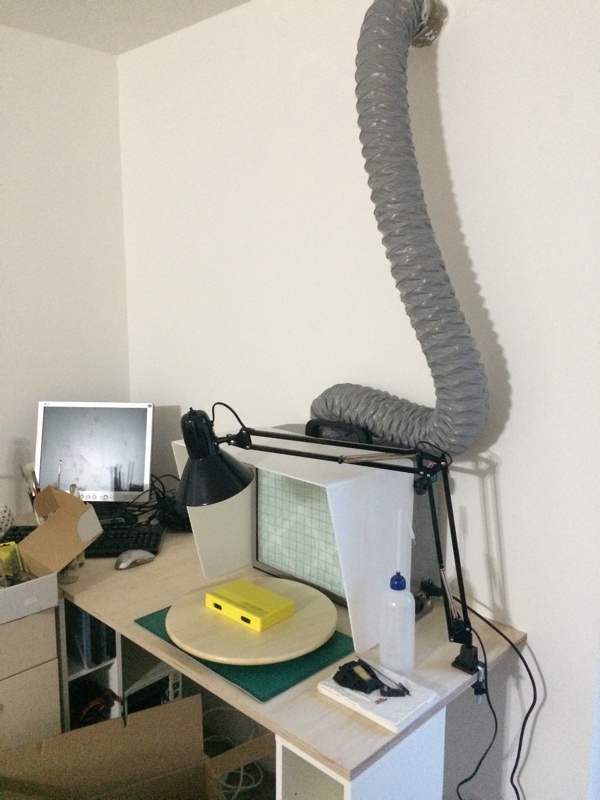
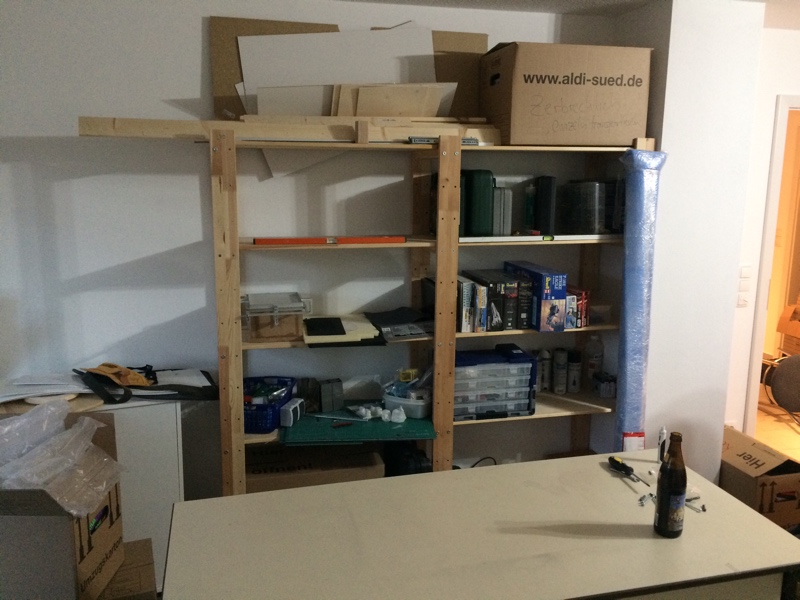
Update on my new workshop.
Got a tool rack with a variety of tool holders. I still have to mount that to the wall.
I also finally connected my new spray booth to the outside vent and installed an additional lamp (11W daylight LED).
And I started to organize my wooden shelf. Yeah, those few boxes are my "stash". Minus the big Revell F15 box, that only contains spare parts.
Re: Lets see your modelling work areas
Posted: Tue Apr 11, 2017 8:15 pm
by Twokidsnosleep
Coming along very nicely, very nicely indeed
You know how I am about that forethought for your venting
Re: Lets see your modelling work areas
Posted: Wed Apr 12, 2017 1:04 am
by digger303
From mere beginnings greatness is forged....
For the airflow purposes it maybe a idea to shorten the vent hose a tad straight lines are always best.
Re: Lets see your modelling work areas
Posted: Fri Apr 14, 2017 11:31 am
by Fridgy
And now that I have my spare room back.....
I have spent some time tonight pottering about
And before I knew it!
Now all I really need is an airbrush compressor......
No matter how I tried to spin my argument, I could get the compressor inside
So the compressor and spray booth are still living in the garage.... for now.....
Re: Lets see your modelling work areas
Posted: Fri Apr 14, 2017 5:05 pm
by Twokidsnosleep
Looking good bud
That carpet DOES look hungry...maybe just scatter some extra parts onto it now as a sacrifice and see if it appeases the carpet monster god.
I can't laugh too hard as with my workshop floor and it's funky paint chips.
If I drop a bolt or nut on it, it is full on chameleon camouflage action going on....until my foot finds it later
Re: Lets see your modelling work areas
Posted: Fri Apr 14, 2017 5:27 pm
by Lysus
Chair mats help.
But honestly, if it's in your power to do so, now is an excellent time to make that carpet monster go bye-bye.
Re: Lets see your modelling work areas
Posted: Fri Apr 14, 2017 6:56 pm
by Astaroth
Twokidsnosleep wrote: Tue Apr 11, 2017 8:15 pm
Coming along very nicely, very nicely indeed
You know how I am about that forethought for your venting
In hindsight, I should have moved that vent a little to the left, it doesn't sit straight above the outlet of the booth.
Sorry Scott.
digger303 wrote: Wed Apr 12, 2017 1:04 am
From mere beginnings greatness is forged....
For the airflow purposes it maybe a idea to shorten the vent hose a tad straight lines are always best.
Twokidsnosleep wrote: Tue Apr 11, 2017 8:15 pm
Coming along very nicely, very nicely indeed
You know how I am about that forethought for your venting
In hindsight, I should have moved that vent a little to the left, it doesn't sit straight above the outlet of the booth.
Sorry Scott.
digger303 wrote: Wed Apr 12, 2017 1:04 am
From mere beginnings greatness is forged....
For the airflow purposes it maybe a idea to shorten the vent hose a tad straight lines are always best.
I'll do that when the setup is final.
I would take a little too far to the right vent anyway over an non existent vent
Twokidsnosleep wrote: Tue Apr 11, 2017 8:15 pm
Coming along very nicely, very nicely indeed
You know how I am about that forethought for your venting
In hindsight, I should have moved that vent a little to the left, it doesn't sit straight above the outlet of the booth.
Sorry Scott.
digger303 wrote: Wed Apr 12, 2017 1:04 am
From mere beginnings greatness is forged....
For the airflow purposes it maybe a idea to shorten the vent hose a tad straight lines are always best.
I'll do that when the setup is final.
I would take a little too far to the right vent anyway over an non existent vent
In hindsight, I should have moved that vent a little to the left, it doesn't sit straight above the outlet of the booth.
Sorry Scott.
I'll do that when the setup is final.
I would take a little too far to the right vent anyway over an non existent vent
could draw a circle on the wall and dream!
Funny you mention that...got the spot scoped out.
We have to have a final inspection from the city for final occupancy permit, so was told to wait until after that passes
Then I could do a low vent hole below the desk and have it vent outside
? Does the vent location have to be above the spray booth unit??
I would think it doesn't matter since the blower is doing all the work and we place the vents high by convention rather than necessity
I would take a little too far to the right vent anyway over an non existent vent
could draw a circle on the wall and dream!
Funny you mention that...got the spot scoped out.
We have to have a final inspection from the city for final occupancy permit, so was told to wait until after that passes
Then I could do a low vent hole below the desk and have it vent outside
? Does the vent location have to be above the spray booth unit??
I would think it doesn't matter since the blower is doing all the work and we place the vents high by convention rather than necessity
High vents is usually to use the natural mechanics of heat. A powered vent should not be any problem where you put it. More the routing of vent piping as here regulations usually prohibit sharp bends. But I'm don't even think that is a problem over such a short length for our requirements.
Shame the benchvent doesn't have built relocation in the cabinet point for the vent pipe. I would like to have it venting out the back instead of the side (top).
Do have any idea what this filter material in the benchvent is called...besides expensive.
I would take a little too far to the right vent anyway over an non existent vent
could draw a circle on the wall and dream!
Funny you mention that...got the spot scoped out.
We have to have a final inspection from the city for final occupancy permit, so was told to wait until after that passes
Then I could do a low vent hole below the desk and have it vent outside
? Does the vent location have to be above the spray booth unit??
I would think it doesn't matter since the blower is doing all the work and we place the vents high by convention rather than necessity
So you got it sorted? No more teasing you?
Re: Lets see your modelling work areas
Posted: Sun Apr 30, 2017 8:46 am
by Fridgy
My ever evolving work space....
Re: Lets see your modelling work areas
Posted: Sun Apr 30, 2017 8:51 am
by Twokidsnosleep
That set up is a bit off all right, that is
I am liking those bike models I spy in your cabinet as well
Re: Lets see your modelling work areas
Posted: Sun Apr 30, 2017 9:23 am
by Fridgy
Twokidsnosleep wrote: Sun Apr 30, 2017 8:51 am
That set up is a bit off all right, that is
I am liking those bike models I spy in your cabinet as well
Good old Lego technics
Re: Lets see your modelling work areas
Posted: Tue May 09, 2017 12:14 am
by modeller
This is my sanctuary.... it's called Tír na nÓG... I hope you enjoy the tour.
What is "Tír na nÓg" I hear you ask... In Irish mythology it is the Land of eternal youth
Re: Lets see your modelling work areas
Posted: Wed May 10, 2017 7:25 pm
by CraigPetterson
Here's my new, well only set up really. I'm pleased with it.
Re: Lets see your modelling work areas
Posted: Wed May 10, 2017 7:43 pm
by Lysus
Looks like a great space to me! And clean...
Seems to me like you need this poster opposite the CoD one:
Re: Lets see your modelling work areas
Posted: Wed May 10, 2017 10:34 pm
by CraigPetterson
Lysus wrote: Wed May 10, 2017 7:43 pm
Looks like a great space to me! And clean...
Seems to me like you need this poster opposite the CoD one:
Ha Ha 'These aren't the posters your looking for...'
Re: Lets see your modelling work areas
Posted: Sun May 14, 2017 1:09 am
by DougvH
Good evening all. Its not fancy, but it works for me.
When i decided to get back into the hobby, I needed a space to build in so i decided to use my Grandfathers old workbench in the basement. It had basically become just a collection point for "stuff"
So i totally cleared it off, and found the top was not in a condition that it could be saved. So basically stripped the bench down to the frame, replaced the peg board, the the worktop itself. This time however I made the trim 1/4" (6mm) taller than the work surface. For modelling I took a sheet of 1/4" plywood, added a light stain, and 4 coats of varnish. That now sits on the bench top under the cutting mats. If i need to use it as a work bench I simply remove the 1/4" ply, and put down a 3/8" (9.5mm) piece of plywood.
The Hobby Boss P-38 on the bench I just started this morning and is my Warring Weather build. I'll create a thread when i actually make some progress
UPDATE: changed to Flickr so i could embed the images
Re: Lets see your modelling work areas
Posted: Tue Jun 13, 2017 8:55 pm
by Pistol
Great job Doug. All very neat and orderly. I like the pegboard - was it easy to get the shelves for the paint?
Pete
Nice one - it seems to do the job well!
cheers Doug
Re: Lets see your modelling work areas
Posted: Wed Jun 14, 2017 1:32 am
by digger303
Nice one !
Re: Lets see your modelling work areas
Posted: Sat Jun 24, 2017 2:49 pm
by BuzzyRabbit
A couple of photos of my small workbench.... top of my list of purchases is some better lighting
I put paper up at the windows to try and stop the sun earlier in the week
paint station, yes the Revell pain(t) is going. I have a complete set of Mr Hobby on order and I am going to try the lacquers
Temporary lighting
Some of the artwork (my Phillip West prints will move from the house too) The canvas print was a prize from Airfix in their advent calendar a couple of years ago. I could pick any Airfix box art
Re: Lets see your modelling work areas
Posted: Sat Jun 24, 2017 3:29 pm
by Twokidsnosleep
Great looking space for modelling
I am liking all those posters...especially that Sea King
Re: Lets see your modelling work areas
Posted: Sat Jun 24, 2017 4:43 pm
by BuzzyRabbit
I have a spare one, unsigned pm me your address and I will post it to you
Re: Lets see your modelling work areas
Posted: Fri Jul 07, 2017 4:07 am
by aussiejuggalo
Slowly organising my modelling area. Have to squeeze everything into my bedroom which is already pretty full, only got a tiny little corner to work with which is frustrating.
Work area, 450mm deep, 1200mm wide. Originally I planned on having the work area in an L shape and not have a cupboard but it was going to be to much of a hassle to build.
Lights are 2 strips of 5630 LED's in aluminium channels with diffusers, got them running on a dimmer to a 12v 3 amp supply.
Having the aircon right in front of me is a bit of a problem sometimes when I work.
10L air compressor, it's pretty quite and 10L is massive so it's not kicking on all the time plus it only cost me $250 AUD and the compressor is rated to 550w so it fills quick. My other little storage cupboard is to the right of it, bins to the left and power board is Velcroed under the bench.
Can't have the compressor and air conditioner running at the same time because I run my bar fridge and vacuum charger from the power board to. Yes I know I shouldn't run the compressor and air conditioner from a power board but I don't have a choice, PC takes up the other plug in the wall.
Into the cupboard we go, bottom to top. Still have to sort out a few of the shelves, probably going to have to add more .
That's my area so far, getting those paint racks a few days ago was a god send, use to have everything in desktop drawers which was a nightmare, now I've just got to sort everything else out. Think I'll add some LED strips into the cupboards as well because it's pretty dark.
Re: Lets see your modelling work areas
Posted: Fri Jul 07, 2017 8:02 am
by digger303
Those led strips are a good idea and I can see how the AC might be a nuisance. The painting area is going to cut into your usable space a lot. I ran into the same problem and my bench is 1.8m. BUT it is so nice to have any sort of dedicated work space. Keep at it, it looks great ! ...keep posting pic's
ps.
These are useful and on rollers https://www.officeworks.com.au/shop/off ... -mini10dbk
Re: Lets see your modelling work areas
Posted: Fri Jul 07, 2017 9:17 am
by aussiejuggalo
Yeah the LED strips are the best way to go especially the 5630 ones that I used (thought I used 5050 ones) because there stupidly bright and pretty cheap, can get 10m of the non waterproof ones for $25 or waterproof for $30 off eBay, only problem for most people would probably be wiring them up like how mine are, I soldered wires between the 2 strips.
The aircon is a little annoying, would be nice to have it on while I work but it'll blast me in the face and as I said, cant have it and the compressor on or I'll come close to blowing the power board. I now have a ghetto "spray booth", in the first pic of my cupboard the white and red thing next to the airbrush stand .
I seen those drawers before, may thing about it once I organise all my electronic stuff which is a massive mess still (or maybe I should get one for my electronic stuff ). Really need to get a place of my own instead of living with mum .
Re: Lets see your modelling work areas
Posted: Fri Jul 14, 2017 9:37 pm
by 63bp
I've nearly finished the hobbie corner of the shed.....
Resized_20170713_194412-360x270.jpeg
Now to get some time to try a couple.
Re: Lets see your modelling work areas
Posted: Sat Jul 15, 2017 12:21 am
by NorthernModeller
Hopefully this video will work I did a bench tour
[youtube]w5nqXy3PelI[/youtube]
Re: Lets see your modelling work areas
Posted: Sat Jul 15, 2017 10:17 am
by Paul
Inspired by Ivan and tim I did a bench tour too
[youtube]N3G8yZkX6Kg[/youtube]
Re: Lets see your modelling work areas
Posted: Mon Jul 31, 2017 10:12 pm
by Paul
Spent the afternoon with Hanna painting the paint shelves in the cave, wanted to do this since the day i built the cave but never got around to doing it. 2 bottles of Ultimate Gloss black primer (Yes Ultimate primer did a great job, brushed on and sprayed (outdoors) through the Mr hobby Ps-290 airbrush.\ IMG_4178 by paul bretland, on Flickr IMG_4180 by paul bretland, on Flickr
Re: Lets see your modelling work areas
Posted: Mon Jul 31, 2017 11:23 pm
by Twokidsnosleep
Nice work Paul and Hanna
Black Ultimate looks bad ass
I have extreme paint rack and display cabinet envy
I am supposed to be building those for my space(s) and am just a lazy sod
Re: Lets see your modelling work areas
Posted: Sat Sep 02, 2017 12:58 pm
by Wolfman63
Here are some pictures of my "Hobby Cave". I remodeled it a few years ago. These are from when I first completed it. Now the display shelves are nearly full. I also have about a dozen aircraft hanging now.
Re: Lets see your modelling work areas
Posted: Sat Sep 02, 2017 6:40 pm
by Lysus
And a game table! I'll see your bet, and raise you a jet!
Re: Lets see your modelling work areas
Posted: Sun Sep 03, 2017 12:56 am
by digger303
Paul wrote: Mon Jul 31, 2017 10:12 pm
Spent the afternoon with Hanna painting the paint shelves in the cave, wanted to do this since the day i built the cave but never got around to doing it. 2 bottles of Ultimate Gloss black primer (Yes Ultimate primer did a great job, brushed on and sprayed (outdoors) through the Mr hobby Ps-290 airbrush.\ IMG_4178 by paul bretland, on Flickr IMG_4180 by paul bretland, on Flickr
Obviously needing a shed extension.....
Re: Lets see your modelling work areas
Posted: Sun Sep 03, 2017 12:58 am
by digger303
Wolfman63 wrote: Sat Sep 02, 2017 12:58 pm
Here are some pictures of my "Hobby Cave". I remodeled it a few years ago. These are from when I first completed it. Now the display shelves are nearly full. I also have about a dozen aircraft hanging now.
That's pretty cozy...fireplace an all. Very nice.
Re: Lets see your modelling work areas
Posted: Sun Sep 03, 2017 11:54 am
by 7foot9
A few pics of my little workshop. The wallpaper was not my choice. Unfortunately there is a built in bed that takes up a lot of room in there, but it does make handy storage. I do try and keep it very clean in there too.
My large collection of diecast airliners which are all boxed waiting for the move.
Re: Lets see your modelling work areas
Posted: Sun Sep 03, 2017 3:56 pm
by Twokidsnosleep
Hey that is a great space, wall paper aside, but you have dealt with it well
You are fully stocked for hobby tools and supplies!
Kicker in a TET brush jar....brilliant
Like the commercial airline kit stash, good to have another who builds those
Make sure we see some of your work on the forum
? You have a move coming up???
Re: Lets see your modelling work areas
Posted: Sun Sep 03, 2017 9:27 pm
by 7foot9
Twokidsnosleep wrote: Sun Sep 03, 2017 3:56 pm
Kicker in a TET brush jar....brilliant
? You have a move coming up???
Yeah it makes working with kicker so much better and less messy.
If things go to plan I'll soon be moving in with my partner. So with have to build an new work space for short while. Before we have have a large 2 story garage built so all my hobby stuff will be going up there. I'm really looking forward to that.
Twokidsnosleep wrote: Sun Sep 03, 2017 3:56 pm
If things go to plan I'll soon be moving in with my partner. So with have to build an new work space for short while. Before we have have a large 2 story garage built so all my hobby stuff will be going up there. I'm really looking forward to that.
Brilliant...a new space and a new beginning and hopefully a new interior designer...that wallpaper !



 I am about that forethought for your venting


 ). Really need to get a place of my own instead of living with mum
 I did a bench tour


