Good morning all
Hope you all remain safe, well looked after, and in touch with family members wherever they are in the world.
Well, what a weekend, I was up at the excess wind of a Sparrow and at 07:00 on the Saturday, I was in the Garden, plotting out Veg Patch for this year. We have gone for Tomato’s, Purple Kale, Peas, Onions (Shallots), and Courgettes or Zucchini to our Brothers over the Pond.

I finished off with some Grass cutting and edging of lawns Front and Back, and by this time, Mrs DW was up and about with the "Thuggery Cats"

, so I could finish off 2nd Coat of Gloss on Stairs.
I am pleased to report, finally

, that the Stairs have been finished with Paint, Caulk and other details. All decorating kit, washed, cleaned, dried and re-stored in garage.
All the time, my nervousness creeping for the up coming FA Final. Good golly I was nervous

.
In all my nervousness, and after a hearty lunch, it was toss up of watch all the prelim on the TV or go and do a bit of work on Panzer 1 in Man Cave.
Toss came down on M/C
Off I went, into my silent retreat, with smells that let me know that I’m safe and happy in my favourite place.
I thought the first thing to do on the now Glossed Tank was a bit of Oil Dot works. I load dots of Oil on to scrap card to wick away excess Oils and used a mix of Prussian Blue, Lamp Black, Chalk White and Yellow. When applying, I try to get the lighter colours on the top of the panel being applied to, and darker in lower areas.

It’s a wee bit scary as you draw the moistened Flat Brush down, but if you keep working at it, and bear in mind, You cannot mess this up, because you can just remove if your not happy with result. The Prussian Blue left a very pleasing effect and toned everything down.
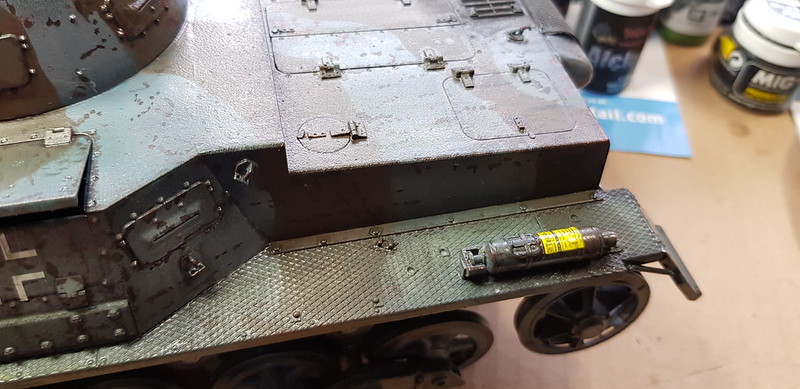


I also have been working on the rear Tail-Light for a while, that has required lots of Web studying to get some detail on colours used. Boy is their a lot of discussion on this, probably more than the mutterings on Panzer Wire Cutter Handle Colours.
As a lot of images are in B&W, its difficult to get accurate info, as I have seen images of Panzer 1 in Museums with incorrect Lamps, US Army Lamps, and so on and so on. All very confusing. I have decided to go for a General Consensus of Orange over Red. The Silver under and the Red Clear / Orange Clear is giving a nice effect. To my eyes anyway.

I used a little of this to dust around the Exhaust Outlet and on the Top Engine Grill, to give a blackened, Oily staining. This product is super long lasting as a little on the tip of a Bud is all that’s needed.


So with Blackening and Oil Dots, Voila
Next, out with the wonderful product that is Tamiya Panel-Line Accent Colour, Dark Brown. I have the Brown and Black and absolutely love the product. I always used to mix oils in past, but either to thin or to dark. This product is spot on.


Next, and nerves absolutely in bits by now as I have switched on TalkSport to listen to commentary of my beloved Leicester City take on the mighty Chelsea. Mrs DW asking why I’m in M/C and not watching 1st half. I am an absolute nightmare watching stuff like this live, best to stay put and busy my mind with this tank. I keep on Panel Line work, every Panel Line and every recessed Screw and bolt. But, finally, at ½ Time with Panel Line works completed, I go back inside as its 0 – 0 and I do want to watch the 2nd half.
What a second half, the FA Cup has always, in my mind, had a mystery, Giant-Killers, small teams taking on big teams………you get it if you follow Football. Mrs DW captured the moment her husband who spent most of the 2nd Half pacing around sofa, biting remnants of nails, scaring the bejesus out of the two cats when we let out the biggest shout as Tielmans scored with an absolute belter. The cats were found under the bed, absolutely petrified.
Well, I don’t have to say anymore really. What a result. Sublime. Mrs DW captured the moment we won on her Video and I was unaware she was filming. It will remain treasured footage.
Sunday, I was awake at 02:00 reading every write up on match and glowing inside with pride. Unable to sleep, I ventured out to M/C in the early morning.
I got out this product, another product that really is amazing and amazes how little gives effect. MIG / Modelling Pigment / Gun Metal. Again, a Q-Tip dipped into powder and rubbed around the Towing Hawser, brings up a lovely colour and accuracy. I also rubbed the MG Barrels with the powder, very gently and very little needed. I also rubbed along the Textured Exhaust pipe that runs along the side.


Moving on, next product, AK Interactive / Rust Streaks. A few localised dabs applied, and then a Flat Brush dipped in Thinners and dragged down surface. Not to much, just on front Glacis Plate and some areas at rear of Turret and Crew Side Access Hatch


I added a little more Tamiya Clear Orange X26 & Tamiya Clear Red X27 to Rear Light to bring out colour. The first applications look quite wishy washy and dull, as the coats are applied, the colours increase and the effect starts to build.

I wanted to get the Lower Hull a little dirty so with Tracks not yet fitted and not yet fitting the Front Drive Sprocket, Drive Sprocket installed (No Glue), I could apply straight out of Tub my first time with Wilder / Textured Earth / Light Europe / Stoney / TE12, Wow! Amazing stuff. Its so easy to apply. Quite wet in tub, and dries quickly, but with a wet Brush, reactivated to move it around. I didn’t go heavy, just light dusting all around Lower Hull and under Fenders.

I have prolonged this for a while, but as the Lower Hull is gonna get some weathering, I need to get the Individual Tracks on the vehicle. The instructions called out for a 96 links, but on trying this, I found it was a little to tight. So I added for each side 97. Perfect.
I had four Links over for Spares which I intend to use on Tank, but I didn’t for no reason I can think of, have enough of the Plastic Pins. No probs, I’ll use a length of Brass Rod.

I cut about an inch worth in length, to give strength when pulling the tracks around Wheels, Idler and Sprockets. I pushed the Rod through and used a dab of Jarvis Extra Thick C/A to secure each end of Track. Once dried, the extra length was snipped off with pliers.


The sag was perfect for tracks, some fettling required but the sag was spot on. No worries.
I then added some Wilder / Textured Earth / Dark Brown / Fine / TE03. Again, slop on and swirl around mostly front and Rear Idler, then correct with a wet brush.
Sunday evening, I had a few hours to finally add the Tools that I have been painting separately for so long.
The Axe. Really chuffed with Wood effect.

The Shovel.

Hook and Starting Handle.

Wooden Jack Box.

Whilst in the mood, using the Lifecolour Set, I used the Colonial sand / LPW05, with a brush and Cocktail Stick, and light flicking across the Front Glacis Plate, Fenders and up the sides, gradually lessening the effect as I travelled back. The Rear Plate was similarly treated the same.

This is the overall effect so far after this weekend. I’m really, really pleased with how its come together. I freaked out when I mucked up the Lifting Jack and the whole E Sprue debacle, but honestly, its really come together. Its in need of a bit more weathering and tweaking but its not far off completion.


A little bit of Aftermarket, the Metal Bucket, that has been weathered and such, requires some water in it. So this was mixed with some Brown Paint, and the effect will hopefully dry clear and coloured. I do need a chain from somewhere?


I thought I had some, but realised I’d run out, so ordered some MIG Engine Staines and some Wet Fluids effects.
Over the weekend,
www.emodels.co.uk got me with their advertising, when I saw a 1/35 Centurion Tank MK 5 with Metal Barrel and loads of goodies / PE by AFV. Bought.
Its all going very well with this model now. I can glimpse the end product and just some more fettling, weathering and things like lights to go.
Hope you're enjoying the ride?
As always Mon Ami, stay safe, take care.
DW


 . It still needs lots of attention and thought and the scale really does not give any margin for error. Cock-Up in this scale and it shows big style. 1/48 or 1/72 its just not noticeable, well not to anyone else, and its a secret with yourself.

 Im a big fan of the Realcolors and they thin down with MLT a dream. I think you have every reason to be very pleased with yourself, I know I would be!


 And all the details are so realistic.


 [/url]


