Page 2 of 3
Re: Italeri 1/35 LVT Landing Vehicle Tracked (X2)
Posted: Sun Jun 26, 2016 9:00 am
by OneSmallStep1966
How did I miss this build

I've come to expect outstanding work from you and this is no exception. Looking forward to seeing the final reveal.
Re: Italeri 1/35 LVT Landing Vehicle Tracked (X2)
Posted: Sun Jun 26, 2016 11:56 am
by HamilkarBarkas
Tremendously awesome project sir! These tracks alone...wow

Re: Italeri 1/35 LVT Landing Vehicle Tracked (X2)
Posted: Mon Jun 27, 2016 12:51 am
by OliveDrab
OneSmallStep1966 wrote:How did I miss this build
I've come to expect outstanding work from you and this is no exception. Looking forward to seeing the final reveal.
HamilkarBarkas wrote:Tremendously awesome project sir! These tracks alone...wow
Thanks a bunch guys, just love the work going on with the Barkas Panzer III build!
Very well deserved Hamilkar 
Just wish I could join the fun with a Panzer III build also, but I'm afraid I'll be busy on these LVTs. I'm starting to get concerned about finishing both LVTs by the due date

Re: Italeri 1/35 LVT Landing Vehicle Tracked (X2)
Posted: Mon Jun 27, 2016 4:13 pm
by HamilkarBarkas
OliveDrab wrote:
Thanks a bunch guys, just love the work going on with the Barkas Panzer III build!
Very well deserved Hamilkar Just wish I could join the fun with a Panzer III build also, but I'm afraid I'll be busy on these LVTs. I'm starting to get concerned about finishing both LVTs by the due date
No worries, we keep doing this until december 31st and nothing can keep you from building a lovely PIII next year, because they are so awesome

Re: Italeri 1/35 LVT Landing Vehicle Tracked (X2)
Posted: Thu Jun 30, 2016 5:29 am
by rwsmith14
Re: Italeri 1/35 LVT Landing Vehicle Tracked (X2)
Posted: Sat Jul 02, 2016 3:48 am
by OliveDrab
Re: Italeri 1/35 LVT Landing Vehicle Tracked (X2)
Posted: Sat Jul 02, 2016 5:34 am
by OliveDrab
LVT (A) 4 update time!
This LVT (A) 4 is really begging to be painted the 3-tone camo scheme as used on Iwo Jima and Okinawa

However, the Italeri kit depicts a early LVT (A) 4 with no additional armor plate on the front hull and side pontoons. The kit also does not include the very prominent 50 cal. machine gun ring and shield as seen on the turrets of the Iwo Jima and Okinawa LVT (A) 4.
Notice the 50 cal. turret ring and shield on the turret:

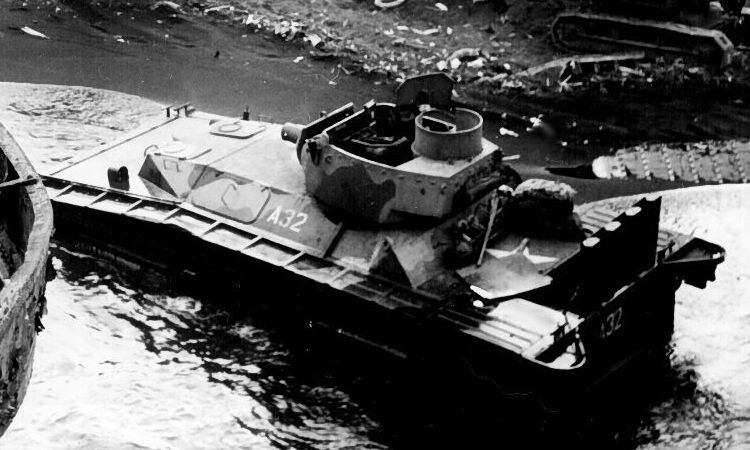
Now I'll just have to live with the missing armor plate on the side pontoons and front hull, but something really needs to be done about the missing 50 cal. turret armor. The turret simply looks
naked without the 50 cal. turret armor
I'll have to use a bit of "artistic license" to scratch build these parts as my only reference for these parts are the photos shown above.
To make the turret ring, a piece of plastic card stock was cut to size, and wrapped around a socket. Then the socket was placed in steaming hot (not boiling) water for 8-10 minutes. Be sure to fully submerge the plastic in the hot water. Let the plastic cool and it should retain its new shape. I say "should" because it took three attempts before I had a good part.


The third times a charm! The good part on the left, the first two attempts on the right. The center part was taken out of the hot water too soon, and the part on the right was left in the hot water too long and I also used the wrong diameter socket


For the gun shield, I turned to a sheet of .010" brass.

The shield was cut from the brass with a small metal shear. I found using the shear much easier than trying to 'cut' the brass with the Stanley knife.


The completed turret


And with the turret complete, construction was completed on the hull.


And here she is with the base-coat on. More of the Testors enamels, first was an even coat of flat olive over the entire LVT. Then came some shadows with some flat black added to the flat olive for the darker shade, and lastly some highlights with a lightened olive drab by adding flat light tan to the flat olive paint.
Much of this base-coat will get covered with the camo paint, so I wasn't too concerned about the looks of the shadows and highlights, I just randomly airbrushed them in.


 Model On my friends
Re: Italeri 1/35 LVT Landing Vehicle Tracked (X2)
Posted: Sat Jul 02, 2016 10:21 am
by Novorus
Loving the scratch build on this, really amazing work.
really enjoying this build, and making me miss my bench even more.

Re: Italeri 1/35 LVT Landing Vehicle Tracked (X2)
Posted: Sat Jul 02, 2016 10:58 am
by gustavlekstal

wow
perfect read and most enjoyable!!!

Re: Italeri 1/35 LVT Landing Vehicle Tracked (X2)
Posted: Sun Jul 03, 2016 4:25 pm
by Gav0909
Both these two builds are coming on really nicely. The modifications done to them are superb, excellent work!
Re: Italeri 1/35 LVT Landing Vehicle Tracked (X2)
Posted: Mon Jul 04, 2016 1:31 am
by OliveDrab
Novorus wrote:Loving the scratch build on this, really amazing work.
really enjoying this build, and making me miss my bench even more.
gustavlekstal wrote: wow
perfect read and most enjoyable!!!
Gav0909 wrote:Both these two builds are coming on really nicely. The modifications done to them are superb, excellent work!
Thank you so much, your comments are keeping me motivated to keep plugging away at these builds!
Re: Italeri 1/35 LVT Landing Vehicle Tracked (X2)
Posted: Mon Jul 04, 2016 2:41 am
by OliveDrab
With the LVT (A) 4 set aside to let the basecoat cure for a few days, the LVT-4 made its way onto the bench.
The upper hull and cargo area plates have now been permanently glued in place on the LVT-4. The large upper plates had a bit of warp to them, so they were glued in three separate sections. [The same scenario as the LVT (A) 4]. One section was held tight and glued, and once dry I could move to the next section to hold and glue.
Of course I managed to have some Tamiya extra thin cement seep between my finger and side hull plate while gluing the rear section...on both sides of the hull
I was wearing a rubber glove, so the finger prints were not as bad as they could have been, and most of the blemish sanded out O.K.


A .020" plastic strip filled a gap between the top plate and cargo wall.

Next I began adding some of the larger details to the LVT-4. Now the instructions would have you mount the visions blocks (part 67C) as shown with the yellow tape, however it just seemed odd to me to have the vision block angled towards the sky??? I had already glued the left side vision block upside down before I noticed that the instructions suggested to mount them as shown with the tape, so I frantically googled some photos looking for an answer without finding something totally conclusive. It seems Italeri molded the vision blocks at the wrong angle and
NEITHER position looks accurate!


So I chose to mount them upside down from what the intsructions suggest, right or wrong its too late to flip them now

 Thats all for now,
Re: Italeri 1/35 LVT Landing Vehicle Tracked (X2)
Posted: Wed Jul 06, 2016 5:19 pm
by privatepete
Re: Italeri 1/35 LVT Landing Vehicle Tracked (X2)
Posted: Mon Jul 11, 2016 12:03 am
by OliveDrab
More LVT-4 stuff!
The Italeri LVT-4 rear ramp can built in either the open or closed position. I thought having it open would add some interest to the LVT, unfortunately the detail in the kit is very lacking for the cable mounting details.
Italeri provides some string to use for the ramp cable. The kit supplied string is shown on the left compared to nylon thread shown on the right.

I think the nylon thread is a better representation of cable, so the nylon thread is the winner for this LVT.

The ramp cable should mount through the slot in the rear plate as shown:

I added a small diameter rod to the backside of the plate, then super-glued one end of the thread to the backside of the plate also.

With the plate mounted, the cable looks good enough for me!
(Note: the seams around the plate needed filling, the gaps were HUGE)

The ramp should have a pulley mechanism mounting the other end of the cable as shown:

Italeri only provides a hole in the ramp tube to glue the cable end into.

Some digging through some spare parts turned up these little guys...miniature pulleys! (Well, I guess they'll need some work before I can call them pulleys)

And after some cutting and sanding I had something that could maybe pass for a pulley. The hole in the tube intended for the cable was filled, and while I was at it I added the small "U" brackets made from copper wire.

The LVT-4 construction was then finished with the addition of the small kit details and machine guns!
Up next will be the olive drab base coat on all the previously unpainted upper hull areas.


Italeri supplied decal options for 3 LVTs, one World War II US Army version, and two post war versions (French and Italian army).

I think this guy would look so cool in a camo scheme, I ordered this Bison Decals set for the LVT-4. The plan is to model an LVT-4 from Okinawa in a camo scheme.
(I just can't seem to take the easy route and leave it painted in straight olive drab)

That will do for this time!
Re: Italeri 1/35 LVT Landing Vehicle Tracked (X2)
Posted: Thu Jul 14, 2016 3:40 am
by OliveDrab
Re: Italeri 1/35 LVT Landing Vehicle Tracked (X2)
Posted: Thu Jul 14, 2016 9:15 pm
by rwsmith14
Awesome work.. she looks superb !!

Re: Italeri 1/35 LVT Landing Vehicle Tracked (X2)
Posted: Thu Jul 14, 2016 9:41 pm
by privatepete
Hi Curt, exhalant example of shadow work well done,can you tell me if you can brush paint with Testsors Enamels?
Re: Italeri 1/35 LVT Landing Vehicle Tracked (X2)
Posted: Thu Jul 14, 2016 9:45 pm
by Lysus
When I started back in the bronze age I only had Testor's enamels to work with, from what I remember most brushed fine--if a bit thick, gotta work with them--but maybe some of the gloss and brighter flat colors were finicky. Grey and olive drab always worked like a charm off my brush.
Maybe things have changed since then, but that's how I remember it.
Re: Italeri 1/35 LVT Landing Vehicle Tracked (X2)
Posted: Thu Jul 14, 2016 11:58 pm
by OliveDrab
rwsmith14 wrote:Awesome work.. she looks superb !!
Thanks RW, keep up the good work on the Hornet

Re: Italeri 1/35 LVT Landing Vehicle Tracked (X2)
Posted: Fri Jul 15, 2016 12:28 am
by OliveDrab
privatepete wrote:Hi Curt, exhalant example of shadow work well done,can you tell me if you can brush paint with Testsors Enamels?
Lysus wrote:When I started back in the bronze age I only had Testor's enamels to work with, from what I remember most brushed fine--if a bit thick, gotta work with them--but maybe some of the gloss and brighter flat colors were finicky. Grey and olive drab always worked like a charm off my brush.
Maybe things have changed since then, but that's how I remember it.
Thanks guys

Pete - Yes Testors enamels work quite well for brush painting. One advantage they have over say Tamiya is a slower dry time, which can help reduce the dreaded visible brush strokes and make it a little easier to blend the paint from one painted section to the next if that makes sense.
I
ALWAYS thin the Testors paints for brush painting. The flats only need a few drops of thinner, but the Testors gloss paints are thick as molasses and require more thinning (as Lysus pointed out). I only have used Testors own brand for thinning, #1789 for all airbrush work, and #1156 for general brush painting work. Use caution with the #1156 thinner though, it is very strong and will eat right through any previously painted enamels. It may be safer to thin with the #1789 thinner when brush painting over previous layers of enamel, but the #1789 is much more expensive than the #1156 thinner.
I just tend to use #1156 thinner for brush painting (cuz I'm cheap
) while being careful to minimize the brush strokes if I am brush painting over any other enamels, so as not to "re-wet" the previously painted surface.
Hope that helps some, let me know if you have other questions,
Re: Italeri 1/35 LVT Landing Vehicle Tracked (X2)
Posted: Sun Jul 17, 2016 6:23 am
by OliveDrab
Time for some camo on the LVT (A) 4. The LVTs sported hard edge camo, so they'll be lots of masking involved.
After watching Pauls amazing work on an F-16 using the new Tamiya tape for curves (Thanks for the review, Paul!), I ordered some to try out for the camo scheme on the LVT.

As advertised, the tape is easy to curve. It has a low tack adhesive, so it tends to lift shortly after application around very tight corners, and of course uneven surfaces also. I don't think the dead flat paint the tape was applied over helped with adhesion, due to the "rough" surface of the flat paint.


All masked and ready for the first camo color! (The masking took forever
)

For the light sand color, I chose Tamiya paints - Buff for the base coat, Flat Earth for the shadows and Deck Tan for the highlight coat.

Then the masking was nervously removed to see how the first color looked
I ended up having some overspray that needed cleanup because I used the wrong airbrush for spraying the camo. Note to self: DO NOT USE your Paasche single action siphon feed airbrush to paint camo, even if you think you have everything masked well. In reality, the single action siphon feed needs higher air pressure to spray well, which in turn causes too much overspray. Much better to use a gravity feed double action (and lower air pressure) for spraying the camo!
So after about an hour of cleaning up the overspray, the light sand camo is done

The same masking techniques/materials were used to mask for the second color. The paints used - Model Master Military Brown enamel for the base coat. Some flat black was added to the Military Brown to paint shadows, and some Light Ivory was added to the Military Brown to paint the highlights. This time I used the Iwata Neo (gravity feed double action) which worked much better then the Paasche single action for this job. There was NO overspray and NO cleanup needed on any of the camo edges (lesson learned!)

A few shots with the camo painting complete


 So thats all for this update, Model On!
Re: Italeri 1/35 LVT Landing Vehicle Tracked (X2)
Posted: Tue Jul 19, 2016 5:27 am
by Madmattmodels89
Wow that camo job looks superb!!! Way to go my friend!
Re: Italeri 1/35 LVT Landing Vehicle Tracked (X2)
Posted: Tue Jul 19, 2016 2:55 pm
by PrivateMansoor
That is one really good looking camo scheme mate..... good work.
Re: Italeri 1/35 LVT Landing Vehicle Tracked (X2)
Posted: Tue Jul 19, 2016 4:05 pm
by HamilkarBarkas
Utterly amazing and the best high quality thread i have ever seen on ISM. Such a good round thing you did there
Re: Italeri 1/35 LVT Landing Vehicle Tracked (X2)
Posted: Tue Jul 19, 2016 4:13 pm
by privatepete
Hi Curt nice choices in the colors for the camo some to me are to hard,in your face.This on the other hand tick's all the right boxes ,light to dark nice clean edges brilliant
Re: Italeri 1/35 LVT Landing Vehicle Tracked (X2)
Posted: Wed Jul 20, 2016 1:51 am
by rwsmith14
Re: Italeri 1/35 LVT Landing Vehicle Tracked (X2)
Posted: Wed Jul 20, 2016 4:14 am
by OliveDrab
Very humbled by the wonderful comments my friends

There are SO MANY spectacular builds and talented modelers, all posting such great models and techniques. I'm just honored to be able to take part
Thank you All!
Re: Italeri 1/35 LVT Landing Vehicle Tracked (X2)
Posted: Wed Jul 20, 2016 6:55 am
by WMH
Excellent thread , great pictorial
Re: Italeri 1/35 LVT Landing Vehicle Tracked (X2)
Posted: Fri Jul 22, 2016 3:02 am
by OliveDrab
WMH wrote:Excellent thread , great pictorial
Thanks and thanks for stopping by
Re: Italeri 1/35 LVT Landing Vehicle Tracked (X2)
Posted: Fri Jul 22, 2016 3:25 am
by OliveDrab
What! NO star decal???
With the camo painting of the LVT (A) 4 complete, the next step was an oil paint filter over the dead flat camo paint. I mixed about equal parts yellow ochre and white and thinned heavily with Turpenoid for the filter color. I went with the light color thinking it would give subtle fading and blending of the camo colors.

After the filter dried, I clear coated the LVT with Model Master gloss acryl in preparation for the decals. That is when I realized the Marine LVTs had a large allied star on the rear deck. A star decal was not provided with the kit decals. I did not find a suitable sized decal in the spare decal box either, so if I wanted to add the star I'd have to paint it. Had I noticed this earlier, I would have painted the star before the gloss coat, not after. Oh well, not a huge blunder.
No decal, but the large star on this template is just the right size!

Templates work great...when they fit the area you need to paint. Not so lucky this time, as the template is too large for the rear deck.

Time to improvise. Using the template for the pattern and a new X-Acto blade, a template of the star was cut into a strip of tape.

The "new" star template cut into the tape.

Then carefully placed on the rear deck of the LVT.

Then lots of tape...think cheap insurance from overspray or any other 'accident' while painting.

Then the paint. I went much too heavy with the paint
When it looks like it needs just one more coat of paint STOP! I didn't stop and added one more coat of paint and the star is
VERY bright. I'll need to tone it down when weathering the LVT.
And then we have a star (a very bright star
)

With the star painted, the decals were next. The Italeri kit decals were used to depict LVT A23 from Iwo Jima 1945.

The decals went on fine with the use of Micro Set and Micro Sol. The Micro Sol was needed to nestle the decals over the weld seam and rivets on the upper hull. Just needed to be patient and let the Micro Sol do its job, and the decal conformed to the detail fine.

After the decals dried for a day, they were given a top coat of the Model Master gloss acryl to seal and protect them from the upcoming weathering.
 Till next time, take care everyone!
Re: Italeri 1/35 LVT Landing Vehicle Tracked (X2)
Posted: Fri Jul 22, 2016 5:40 am
by rwsmith14
How do you think the filter came out? Really can't tell from the pics. Just asking because I'm getting to use a filter on an armor build using similar camo colors as you used.
Re: Italeri 1/35 LVT Landing Vehicle Tracked (X2)
Posted: Fri Jul 22, 2016 9:44 am
by Willem
Astounding build thread and outstanding modelling. Just spent a very happy 15 minutes or so reading through. Both of these beasties are going to look superb.
Re: Italeri 1/35 LVT Landing Vehicle Tracked (X2)
Posted: Fri Jul 22, 2016 1:30 pm
by OliveDrab
rwsmith14 wrote:How do you think the filter came out? Really can't tell from the pics. Just asking because I'm getting to use a filter on an armor build using similar camo colors as you used.
Hi RW,
I liked the effect, it is VERY subtle, and your right its difficult to see in the pictures, but is more prominent when viewed with the naked eye. Over the light sand color it is nearly invisible, it is more noticeable over the olive drab and military brown. The gloss coat could be hiding some of the effect in the pictures also.
Take a close look at the rear deck below the star. The filter is evident on the olive drab and military brown with the subtle fading and shading of the base coat.
Re: Italeri 1/35 LVT Landing Vehicle Tracked (X2)
Posted: Fri Jul 22, 2016 1:32 pm
by OliveDrab
Willem wrote:Astounding build thread and outstanding modelling. Just spent a very happy 15 minutes or so reading through. Both of these beasties are going to look superb.
Thank you Will, glad to hear I didn't bore you to death
Re: Italeri 1/35 LVT Landing Vehicle Tracked (X2)
Posted: Fri Jul 22, 2016 1:34 pm
by Liamcraven666
looking good , the camouflage scheme is very eye catching.
Re: Italeri 1/35 LVT Landing Vehicle Tracked (X2)
Posted: Fri Jul 22, 2016 5:18 pm
by Lysus
Maybe it's bright (I don't know much about armor), but I think that's a slick way to make a star. Awesome.
Re: Italeri 1/35 LVT Landing Vehicle Tracked (X2)
Posted: Sun Jul 24, 2016 6:57 pm
by OliveDrab
Liamcraven666 wrote:looking good , the camouflage scheme is very eye catching.
Lysus wrote:Maybe it's bright (I don't know much about armor), but I think that's a slick way to make a star. Awesome.
Thanks a bunch guys
Re: Italeri 1/35 LVT Landing Vehicle Tracked (X2)
Posted: Sun Jul 24, 2016 7:11 pm
by demarcation
Great work mate, looks fantastic!!
Re: Italeri 1/35 LVT Landing Vehicle Tracked (X2)
Posted: Sun Jul 24, 2016 7:55 pm
by OliveDrab
After the decals were given a coat of clear and allowed to dry, the next step applied to the LVT (A) 4 was an oil paint "dot" filter.
"Dots" of oil paint were applied to the LVT. I like to work in logical sections of the model with the dot filter, that is I'll complete one section before moving on to the next. I used burnt umber, yellow ochre, olive green and white oil paints, and all the blending was done with Turpenoid.
The burnt umber was concentrated on outer edges and along seams, the olive green was placed everywhere, and the yellow ochre and white was concentrated in the open areas/center panels.

A few pics with the completed dot oil filter. Much like the initial oil paint filter done before the decals, the effect is subtle. The basecoat is slowly having its tone varied and blended by the oils. I think the oils also unify the camo a bit; toning down the contrast between the different camo colors.
(The LVT-4 in the background snuck into the pics, yup its getting its camo worked on
)


Next up was some chipping. All of the chipping was done by sponge. I started with the Vallejo Russian Uniform WWII, and then applied the German Camo Black Brown over the Russian Uniform color. The goal was to go light with the chipping, so I concentrated on keeping the chips rather small.


 Thanks for stopping by, Model On my friends,
Re: Italeri 1/35 LVT Landing Vehicle Tracked (X2)
Posted: Tue Jul 26, 2016 5:20 am
by rwsmith14
Very well done !!!
Re: Italeri 1/35 LVT Landing Vehicle Tracked (X2)
Posted: Fri Jul 29, 2016 3:14 am
by OliveDrab
Thank you RW
Re: Italeri 1/35 LVT Landing Vehicle Tracked (X2)
Posted: Fri Jul 29, 2016 3:21 am
by PrivateMansoor
Man that is realy nice weathering / chipping with the sponge... so suttle yet very realistic!
Re: Italeri 1/35 LVT Landing Vehicle Tracked (X2)
Posted: Fri Jul 29, 2016 3:53 am
by OliveDrab
More weathering on the LVT (A) 4:
Next up was a panel line wash with Mig Wash for German Dark Yellow.

The wash was applied to all edges, seams, rivets, etc. I let the wash dry for about 10-15 minutes, then blended the edges of the wash with a damp brush and turpenoid (The brush should be almost dry). The pic shows the wash before blending as I was waiting for the wash to dry.

Another pic of the panel line wash applied to the pontoons before blending the edges:

After the panel line wash, I tried something new for me; paint speckling.
I mixed two colors, a light olive green and a rust color using oil paints and turpenoid to the consistancy of a very thin paint. (about the same as would be used for airbrushing, maybe even slightly thinner).
The paint was splattered onto the LVT with a stiff bristled brush by dragging my finger over the bristles. Remove most of the paint from the brush onto paper first, then apply to the model. I didn't get that part right at first and some areas of olive paint are overdone, at least I learned something

A few pics where some of the paint speckling is evident. I liked the effect and will be experimenting with it more on future builds


And this is where the LVT (A) 4 stands today with the panel line wash and paint speckling complete.
 Thanks for Viewing, Model On my friends,
Re: Italeri 1/35 LVT Landing Vehicle Tracked (X2)
Posted: Fri Jul 29, 2016 3:57 am
by Lysus
That speckling looks good. Like, really good. Going to have to bookmark this one so I can try it myself.
Re: Italeri 1/35 LVT Landing Vehicle Tracked (X2)
Posted: Fri Jul 29, 2016 11:49 am
by Willem
Spectacular stuff. Beautiful, subtle weathering.
Re: Italeri 1/35 LVT Landing Vehicle Tracked (X2)
Posted: Sun Jul 31, 2016 7:20 pm
by OliveDrab
Lysus wrote:That speckling looks good. Like, really good. Going to have to bookmark this one so I can try it myself.
Willem wrote:Spectacular stuff. Beautiful, subtle weathering.
Thank you guys and thanks for stopping by,
Re: Italeri 1/35 LVT Landing Vehicle Tracked (X2)
Posted: Sun Jul 31, 2016 8:22 pm
by OliveDrab
LVT-4 Camo painting:
Many of the same masking materials, painting techniques and weathering steps will be used on the LVT-4 as were used on the LVT (A) 4, so I won't repeat all the details here, I'll probably just show the highlights of the work done on the LVT-4.
I wanted a lighter sand color on the LVT-4 than what was used on the LVT (A) 4, just to have some variation.
I used the same Tamiya colors as was used on the LVT (A) 4, but lightened each color just a bit. The base was Buff lightened with some Deck Tan, the dark shadows is Flat Earth lightened with some Deck Tan, and the highlight color is Deck Tan with a few drops of Flat White.


Then came the Military Brown. Nothing new here, the same paints used here as were used on the LVT (A) 4.


Lastly, the black camo was airbrushushed. Tamiya paints were used, Rubber Black for the base coat, Flat Black for the dark shadows, and Nato Black with a touch of German Grey added for the highlight color.


Here we are with the LVT's as of July 31...one month to go in this GB, I think I'll be able to finish both, but Aug is looking to be a busy month already
 Thanks for viewing, and Model On!
Re: Italeri 1/35 LVT Landing Vehicle Tracked (X2)
Posted: Sun Jul 31, 2016 9:55 pm
by Lysus
Can't wait to see that...
Re: Italeri 1/35 LVT Landing Vehicle Tracked (X2)
Posted: Mon Aug 01, 2016 5:14 am
by rwsmith14
Re: Italeri 1/35 LVT Landing Vehicle Tracked (X2)
Posted: Fri Aug 05, 2016 6:27 pm
by OliveDrab
Lysus wrote:Can't wait to see that...
Thanks guys!


