Page 1 of 1
Academy F-16I SUFA
Posted: Sat Jan 03, 2015 9:50 am
by JediBoer
Hello everyone,
I'm jumping in at the deep end here but I'm here to learn. Going to attempt the Isreali F-16 Sufa. One of my favorite planes. Unboxing pics soon to follow.
Re: Academy F-16I SUFA
Posted: Sun Jan 04, 2015 12:20 pm
by JediBoer
A massive box loaded with plastic! I will have to find some more space as my work bench has to somehow cope with this one and the Airfix 1/24 Typhoon.

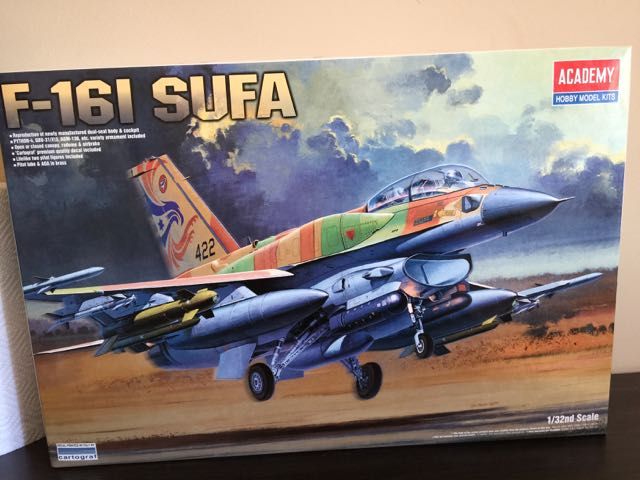
It does look like it has a lot of potential. I hope I can live up to the standard set on the box.

Fully loaded and nicely presented by Academy!

The box is loaded with 15 sprues. I will show more as the build progresses.

Was surprised to find a nice poster of a SUFA included in the box.

Tinted and clear canopy option are provided. Nice!

PE and Brass included.

Large sheets of decals and stencils. There are 4 options included as can be seen on the box.


The instruction booklet is nice... and thick!

I also got a set of acrylic paints from Ammo MIG that is supposed to be good and true to color.

More to come soon.
Re: Academy F-16I SUFA
Posted: Sun Jan 04, 2015 12:29 pm
by Paul
One to watch for me, want this kit myself (well the afv club offering)

Re: Academy F-16I SUFA
Posted: Sun Jan 04, 2015 11:52 pm
by JediBoer
Got started tonight with the SUFA. I decided not to start with the cockpit as I still want to do a little research.
I decided to start at step 6, the rear undercarraige bay and a section of the air intake up to the turbo fans.

Most of the parts come from sprue C. I was surprised to discover that a single seat cockpit tub was on the sprue. Did a bit of research and found out that Academy has another 1/32 F16, the F16CG/CJ Block 40/50. This version is offered as a single seater. Another interesting thing you may notice is that you can see two options for the distinctive air intake of the F16. The SUFA uses the narrower one of the two.

Single seat tub. Nice detail.

Glued on the small bits and bops. I had to fill a couple of injector pin marks on the small parts which was a real pain.

All done except for one part. Fit was of parts were good and there was not a lot of cleaning up to do of the parts.

There were again a couple of ejector pin marks that needed filling.

The thing about building F-16s I hate the most is that all the kits I have, Academy and Tamiya, all have the air intakes in two parts. This is a real pain because nothing bugs me more than looking down the air intake and seeing a seam line there. So, I decided to take extra care with this build and get it right. The parts needed almost no cleaning up. I glued one side and made sure the fit was flush and waited for it to dry before glueing the other side. It turned out pretty good but there is still a little bit of seam visible but I'm happy there are no gaps. I will use a little Tamiya Surface Primer White (unfortunately, Mr Surfacer is not available here in South Africa) to fill the seems and sand till they are gone, gone, gone.


Something else I discovered tonight is that there are quite a few extra parts in the kit. There are 3 pilots, two on the double sprue I and one on another which I can't remember right now. But as you can see from sprue I, there are also ground crew figures in this kit and they look pretty good.

That is where I stopped tonight with the SUFA as I'm also busy with this...

Re: Academy F-16I SUFA
Posted: Wed Jan 07, 2015 7:04 pm
by JediBoer
Some progress today,
Getting rid of the seam line in the air intake was a bugger. I had to apply Tamiya Surface Primer about 3 times to cover up the seam line and sand it back.

Sanding was quite tricky but I improvised with some Tamiya sanding sponge cut into this strips and using a small file.
But after all the trouble, I was quite pleased with the end result.


I also painted the rear under carriage bay. I used a black primer to tone down the bright white a little.

Its hard to see in the photo but it already has a bit of a weathered look with some darker areas in some areas. I'll wait for it to dry and hand paint in some other detail.
I also painted the turbo fan which goes at the back of the air intake. Academy's paint call out recommends silver but I decided on Tamiya X-32 Titanium Silver. I am very happy with the way it turned out.

I also started with the cockpit. Cut off the parts and cleaned them up and then primed them, ready for painting.

Last but not least, I also started with the front part of the air intake. Two options are in the kit, one for the F-16 CJ and one for the F-16I SUFA. The SUFA one is narrower (small mouth) than the one for the F-16CJ because the SUFA has no ram air intake.

Re: Academy F-16I SUFA
Posted: Mon Jan 12, 2015 6:05 am
by Tangles
Very nice kit, lots of work involved too by the looks. Great job on the intake!
I'll continue to watch with interest.

Re: Academy F-16I SUFA
Posted: Mon Jan 12, 2015 9:35 am
by JediBoer
I didn't have much time for building the last week as work kept me away from home.
The more I read about the SUFA, the more impressed I am by this plane!
Nicknamed the "Sufa," or thunderstorm, the F-16I is a redesigned and custom modified version of the F-16, adapted to the specifications of the Israeli Air Force (IAF). The F-16I is different from any other F-16, including those of the U.S. Air Force. The celebration of its unveiling off the Lockheed Martin assembly line was held on November 14, 2003. Israel ordered 102 of the fighter jets and the first shipment arrived in Israel in February 2004. The acquisition was the largest Israeli acquisition from Lockheed Martin and was expected to raise the number of the IAF's fleet of F-16s to 362, second only to the United States Air Force.
The F-16I is equipped with both U.S. and Israeli made weapons. The F-16I, with its expanded radius of operation, can reach as far away as Iran and Libya without refueling. Its 23,600-kilogram takeoff weight means that it has a greater capacity for weaponry than conventional F-16s. The F-16I was the first F-16 in the Israeli arsenal armed with the AMRAAM air-to-air missile, given it the ability to shoot down other jets within 50 kilometers. Its radar, the Northrop Grumman APG-68, is also more advanced than any other in the IAF fleet. The F-16I is also equipped with the Synthetic Aperture Radar system and Litening navigation pod, which gives the F-16I all-weather, day and night attack capabilities. It also has internally mounted FLIR (forward looking infrared) viewers and state-of-the-art systems hardware from Lahav - a division of Israel Aircraft Industries. The technology from Lahav allows simultaneous and multi-target engagement and increased survivability. The "Sufa" also contains side fuel tanks, which allow for increased weapons capabilities underwing. A two-seater, an advanced weapons specialist can sit behind the pilot.
Despite the $4.5 billion price tag, the Israelis think their investment in the F-16I is a strong investment. According to one of the three squadron commanders, "This is a jet that doesn't exist elsewhere. We did not buy a jet that has experience in the U.S. air force." He continues, "We don't think about the price of the jet in terms of dollars, but in the defense of the State of Israel."
The three squadrons of F-16Is were fully operational by 2008. They are based in the Ramon airbase in the Negev. The F-16I aircraft replaced aging IAF aircraft, including some, like the A-4 Skyhawks and F-4E Phantom IIs, dating from the 1960s and 1970s.
Here are a couple of other useful links:
http://www.iaf.org.il/645-en/IAF.aspx
http://www.airforce-technology.com/projects/f-16i/
http://www.globalsecurity.org/military/ ... /f-16i.htm
I managed to paint the cockpit in the base color last night. I used AMMO Mig's A.MIG-203 FS 36375 Light Compass Ghost Grey which comes in the AMMO Mig IAF Desert Colors set.

I'll spent some more time this week finishing up the air intake and also doing the side panels of the cockpit.
Re: Academy F-16I SUFA
Posted: Tue Jan 13, 2015 1:23 am
by eightfooticeman
Great choice here. I want this kit really bad, I'll get it one day hopefully. Perhaps your build will force me to pull the trigger on actually buying it. I really need to seek help for this addiction. Thanks for being apart of the BB.
Re: Academy F-16I SUFA
Posted: Tue Jan 13, 2015 7:34 am
by JediBoer
I ordered some AK Interactive goodies to try out for this build and they arrived yesterday. I got some of the new AK Interactive Paneliner enamel washes, paneliner for grey and blue camouflage for the underside and paneliner for sand and desert camouflage for the upper fuselage. I also got some of the AK Interactive True Metal products to try out on some of the bits and bops and the exhaust.

Re: Academy F-16I SUFA
Posted: Wed Jan 14, 2015 2:47 am
by eightfooticeman
Nice addition to the build. You my friend are going to love those paints, remember a little goes a long way.
Re: Academy F-16I SUFA
Posted: Mon Jan 19, 2015 8:07 am
by JediBoer
About time for an update. There was some progress with the SUFA. A lot actually happened but it was all boring stuff as I was sanding and filling to get rid of the seam line in the air intake.
But the air intake was finally completed and and assembled on the lower fuselage.

I've seen online that people were complaining about fit and had issues with this part, but I found that cleaning up properly and taking time to dry fit and test all the parts solved most of the issues so when I cemented it all together there were no real issues.

Just a little filling and sanding still needed.
I can kick myself for pulling a Forrest Gump on myself and forgetting to paint the inside of the fuselage rear under carriage section, "Stupid is as stupid does."

I'll try and sort out the filling and sanding and painting of the bottom fuselage this week.
I'm quite happy with the air intake. There is a very faint seam line visible in the front section but I now know what to do when I build my Tamiya 1/32 F-16 CJ. It just takes time and care. I airbrushed the air intake with Alclad white Micro filler and Primer, followed by Tamiya XF-2.

I also started with the upper fuselage. The dorsal spine avionics compartment was assembled and some minor filling and sanding was needed to get rid of the seam line.

This was then cemented to the upper fuselage without a problem.

Next up is the conformal fuel tanks to give the SUFA it's mean look. I will get to them in the next update.
Also worked on the cockpit a bit. The ejector seats were assembled and primed.

I'm also going to do some detailed painting of the cockpit this week so an update should follow soon!
As always, comments, critique, and/or any suggestions are always welcomed!
Re: Academy F-16I SUFA
Posted: Sun Jan 25, 2015 10:15 am
by Tangles
Great work so far. I see what you mean about your intake, there's a seamline there, but I only noticed it after reading your comment. My eyes were drawn to other things. Good job, enjoying your build.
Re: Academy F-16I SUFA
Posted: Wed Jan 28, 2015 3:11 pm
by JediBoer
Tangles wrote:Great work so far. I see what you mean about your intake, there's a seamline there, but I only noticed it after reading your comment. My eyes were drawn to other things. Good job, enjoying your build.
Thank you Simon! Much appreciated!
Re: Academy F-16I SUFA
Posted: Sun Feb 01, 2015 1:13 pm
by JediBoer
Finally got the cockpit done! Had a couple of fit issues with the sides of the cockpit and also made a booboo while weathering (Mig Productions Neutral wash) but it is now done!
From the front:

And from the back:

Thinking about it now, I should have ordered some goodies to make it look better! Anyway...
Here is the cockpit with the side walls attached. Both sidewalls of the back seat had to be trimmed back to fit!

I'm busy cementing the upper and lower parts of the fuselage together and will post as soon as everything has cured.
Let me know what you think!
Re: Academy F-16I SUFA
Posted: Sun Feb 01, 2015 7:10 pm
by Tangles
I really like it. It's actually a nice change to see an OOB Cockpit once in a while.
And your detail painting is spot on. Looking forward to seeing it going together.
Keep up the good work mate.
Re: Academy F-16I SUFA
Posted: Tue Feb 03, 2015 8:51 pm
by JediBoer
Tangles wrote:I really like it. It's actually a nice change to see an OOB Cockpit once in a while.
And your detail painting is spot on. Looking forward to seeing it going together.
Keep up the good work mate.
Thank you Tangles! Much appreciated mate!
Re: Academy F-16I SUFA
Posted: Tue Feb 03, 2015 9:02 pm
by JediBoer
As promised, there is a small update.
After finishing up most of the cockpit, the upper and lower fuselage came together.

Struggled quite a bit with fit issues here. When the front aligned the back was misaligned. I sanded a bit here and there, cemented one side, section by section, and got it all sorted out but I'm still not happy. The gaps can be sorted out with some filling but the nose cone (radome) does not fit nicely. I'll have to be a bit creative to sort it out.

The wings were dry fitted and sanded, and dry fitter and sanded but some small gaps remained. Some filling will have to be done here too.

Finally, the vertical stabilizer was also cemented into place and I used some Mr Dissolved putty to fill the small gap where it meets the fuselage. My first time trying it and it seems to work quite nicely.

I'm going to give the filler a good couple of days to dry and give it the Mr Surfacer treatment until I'm happy. In the mean time I'll start with a couple of little things.
Let me know what you guys think!
Re: Academy F-16I SUFA
Posted: Wed Feb 04, 2015 7:53 pm
by bluebottle
Small prob, Sufa seat cushions are black....

Re: Academy F-16I SUFA
Posted: Thu Feb 05, 2015 6:47 pm
by JediBoer
rubegoldberg wrote:an impressive kit and you're off to a great start. i'm also tinkering with the ak true metal, and one thing is clear.....it never stops rubbing off, so be advised.
Thanks rubegoldberg! Yes, I have been playing around with the AK True Metal paints on some scrap plastic and yes, they keep on rubbing off. But it seems to be the case with most of the buffable metal paints, I found the same with the Mr Metal ones. I'm going to give this,
http://www.dersockelshop.de/glue-colors ... -only-50ml, a try and see how much shine I lose and see how well it seals up the metalizer paints. But I have to confess that I find the painting and then polishing up quite cathartic!

Re: Academy F-16I SUFA
Posted: Thu Feb 05, 2015 6:55 pm
by JediBoer
bluebottle wrote:Small prob, Sufa seat cushions are black....
You are quite right! Also read recently that the cockpit interiors of the SUFA's are being converted to an all black interior with special paints that do not interfere with NVG just like IDF F15s. The seats in the kit are actually not SUFA seats at all. They are F16CJ seats and the color call-outs for the cockpit is also wrong but I decided to build it OOB and use the color call outs as per the instructions and see how it ends up. I'm also building the kit as a practice run for the Tamiya F16CJ that will come after the SUFA.
Re: Academy F-16I SUFA
Posted: Tue Feb 10, 2015 6:07 pm
by JediBoer
No pics to post at the moment! Just filling and sanding, filling and sanding!
I'll post some pics over the weekend!
Re: Academy F-16I SUFA
Posted: Sun Feb 15, 2015 4:38 pm
by JediBoer
I always get my mojo back over weekends so after all the filling and sanding there was some progress this weekend with this big bird!
It took me a while, but there was a little bit of a gap after attaching the wings tot the fuselage. I sanded and dry fitted until I was in the face but the gap stayed. So I used some Tamiya Grey putty to fill the gaps and then let it dry for a week. After the Tamiya putty, I used some Mr Surfacer 1000. It was my first time using Mr Surfacer. One thing I found strange about the Mr Surfacer 1000 was the bubbles that formed after applying it. This is what led to me having to sand and reapply the Mr Surfacer. I ordered some Mr Finishing Surfacer 1500 Black and will give it a paint over later to see if it is ready for painting.

I also glued on some PE.

And the flaps followed after the PE as can be seen above. Then I tackled the undercarriage. Next time I won't approach it the same way as I did here. I'll cement everything together and only then paint. But we learn from our rookie mistakes.

So that was Saturday! Sunday was a fun day! Lots of firsts. My first jet engine and also my first time using the Mr Metal buffable paints.
Unfortunately I must have deleted some of the photos as I now can't find them anywhere.

The engine "tube" was painted with a 50/50 mix of Tamiya XF-2, Flat White, and XF-57, Buff. It gave the tube a nice off white burned ceramic look. I was quite happy with the way it looked. I airbrushed in some burn effects with Alclad II Jet Exhaust and used some Humbrol Smoke pigment to blend it in a little.

It turned out pretty well. The engine part down there was reworked a little. I used base coated it with Alclad Magnesium and then gave it a dusting of Alclad Engine Exhaust and weathered it with Tamiya Weathering Master Set D and gave it a dusting of the Burnt Blue and Red pigment. I had a nicer picture but it disappeared into the ether.
Then the fun began. I was really looking forward to building and painting the can at the back. I watched a lot of Youtube videos, read a lot on the forums, looked at photos and decided that I'm just going to experiment a little and see how it turns out.
I cemented the internal sections of the exhaust together and then sprayed the inside with my 50/50 XF-2 and XF-57 mix. After giving it an hour to dry, I masked of the inside with some 3 mm Jammy Dog tape.

I then gave it a dusting, or so I thought, of Alclad Jet Exhaust. Unfortunately, the lines formed had an unnatural look and it brought out the ejector pin marks that I could not sand away completely due to the raised details of this section.

So, I decided to use some pigment again to blend it in a little.

I was happier with the look but next time I won't mask it off the same way. Unfortunately, I lost a little of the burnt ceramic look but it was a lesson learnt.
The outside of the exhaust was also painted in Alclad Jet Exhaust but it turned out too "black" to my liking. So I livened it up a little with some AK DArk Steele Pigment which gave the exhaust an almost shiny graphite look.
Before:

And after (much better):

Then came the Mr Metal. I didn't spray it on the plastic directly but primed the plastic first. With my experimentation it gave a more durable finish and there was no deterioration in the finish after buffing.

After buffing, everything was glued together with some CA glue andi gave it a Aqua Gloss cote. I was quite happy with the end result.


Sot that is the weekend progress. Thanks for the kind comments and encouragement! It's great to be on here and learn from all of you!
Re: Academy F-16I SUFA
Posted: Tue Feb 17, 2015 9:52 pm
by Tangles
Great work on the exhaust Jedi, and thanks for the step by step too.
Very informative for someone like me that's done very little in the way of jet exhausts. Nice work!
Re: Academy F-16I SUFA
Posted: Tue Feb 17, 2015 11:07 pm
by Homerlovesbeer
Beautiful work! I'm enjoying your build immensely, thanks for sharing
Re: Academy F-16I SUFA
Posted: Fri Feb 20, 2015 2:43 pm
by JediBoer
Tangles wrote:Great work on the exhaust Jedi, and thanks for the step by step too.
Very informative for someone like me that's done very little in the way of jet exhausts. Nice work!
Thank you Mate! I really appreciate that!
Re: Academy F-16I SUFA
Posted: Fri Feb 20, 2015 2:44 pm
by JediBoer
Homerlovesbeer wrote:Beautiful work! I'm enjoying your build immensely, thanks for sharing
Thank you!
Re: Academy F-16I SUFA
Posted: Fri Feb 20, 2015 3:00 pm
by JediBoer
I won't be able to get to the bench this weekend as I've got a 3-gun match out of town but I have a little update. I have been experimenting with a number of paints over the last couple of months and have had no problems with all of them except one brand and that is the Ammo Mig paints. I struggle with this brand of paint! The problem is that I bought a paint set for the SUFA from Ammo Mig and wanted to figure out why I get such a rough surface after airbrushing with the Ammo paints. I thought it was the weather (>35 degrees C) almost every day over the last month. Then I thought it was the airbrush and so on... But I have no problem with AK, Tamiya, AKAN, Mr Hobby etc. It is just the Ammo paints! DAMN!
Determined to get to the bottom of this problem, I spent a good part of last weekend at the bench experimenting with different dilutions, pressures etc. I came to the conclusion that I should not thin the paint at all and spray at a high, high pressure (25 - 28 psi). This seem to have worked and I tried out my new found wisdom on the horizontal stabilizers of the SUFA.

This is how the camo turned out. Still a little too textured but much better than before. I also learned to wait a day between Aqua Gloss coates.
I then tried out AK's new Paneliner. They worked great!

Finally I gave it a good coat of AK's Ultra Matte varnish which went on like a dream!

So that is the little update for the week. I hope it works when I attempt painting the main fuselage but I may have to wait for this heat wave to pass and for things to cool down a little.
Thanks for following!
Re: Academy F-16I SUFA
Posted: Sat Feb 21, 2015 12:25 pm
by Homerlovesbeer
What's the AK Panel liner and how does it work?
Re: Academy F-16I SUFA
Posted: Sun Feb 22, 2015 7:34 am
by JediBoer
Homerlovesbeer wrote:What's the AK Panel liner and how does it work?
The AK Paneliner is to highlight the panel lines on the model. I've linked a how to doc from the AK Interactive website for you to check out. Hope it helps.
http://www.ak-interactive.com/app/pdf/A ... UFLAGE.pdf
Re: Academy F-16I SUFA
Posted: Sat Mar 07, 2015 6:12 pm
by eightfooticeman
I like this a lot and I hate you for having a kit I want! Take your time and build a winner!
Re: Academy F-16I SUFA
Posted: Sun Mar 22, 2015 3:46 pm
by JediBoer
eightfooticeman wrote:I like this a lot and I hate you for having a kit I want! Take your time and build a winner!

I'll try my best!
Re: Academy F-16I SUFA
Posted: Sun Mar 22, 2015 3:51 pm
by JediBoer
My Leopard 2A5 is finally done and I spent some time on the SUFA.
I painted and dry brushed in some details and then also added the decals and clear parts.


Pretty nice detialed cockpit for an out of the box job! Only things outstanding is the HUD clear parts and the canopy hydraulic "thing"

Re: Academy F-16I SUFA
Posted: Mon Mar 23, 2015 10:09 pm
by fly1ngdutchm4n
Awesome

Really like the cockpit, like you say for a out of the box pit it looks pretty amazing!
Gaat job so far!
Re: Academy F-16I SUFA
Posted: Wed Mar 25, 2015 11:04 pm
by billlarisa
Beautiful work so far,, looking forward to see the colors on it...Sufa is one of my favorites jet,,
Re: Academy F-16I SUFA
Posted: Tue Jun 16, 2015 6:29 pm
by JediBoer
fly1ngdutchm4n wrote:Awesome
Really like the cockpit, like you say for a out of the box pit it looks pretty amazing!
Gaat job so far!
Thank you for the encouragement!
Re: Academy F-16I SUFA
Posted: Tue Jun 16, 2015 6:30 pm
by JediBoer
billlarisa wrote:Beautiful work so far,, looking forward to see the colors on it...Sufa is one of my favorites jet,,
Thank you! The painting will start soon!
Re: Academy F-16I SUFA
Posted: Tue Jun 16, 2015 6:42 pm
by JediBoer
Short update of the build. It has been sitting on the shelf for a couple of months. Work and other builds were distracting me!
I got a masking set from Eduard for the SUFA. Canopy and exhaust were masked. A few more bits and bops were attached and she was ready for priming! Gave her a good coat of AK Interactive's grey primer which works great for me and of which I have a bit of stock!

I also started painting. Nose cone was painted in AMMO Mig Medium Grey FS 36270. I will let the paint cure for a couple of days and then mask it off for the big paint job which is coming!

Couple of fuel tanks and missiles were also primed. The rest still needs to be done!

Just a short update! Now for the panel line shading and then the painting will start over the weekend!
/JB
Re: Academy F-16I SUFA
Posted: Fri Jun 26, 2015 6:22 pm
by Droflet01
This is Awsome. I want one Haha
Re: Academy F-16I SUFA
Posted: Fri Jun 26, 2015 6:35 pm
by Paul
Looking good carlo, this is one kit i would like to add to the stash


