Page 1 of 1

Monogram 1/48 F-4C Phantom Completed!

Posted: Mon Jan 19, 2015 2:44 pm
by UKguyInUSA
Hello Guys,

I've been working on a Monogram 1/48 F-4C Phantom during the last 10 days, but have been too busy up until now, to post my build progress. But, today, while waiting for clear coat to dry- sealing the decals in place, I can sit down and catch up and starting posting my build. So, here goes;

The Box Art:
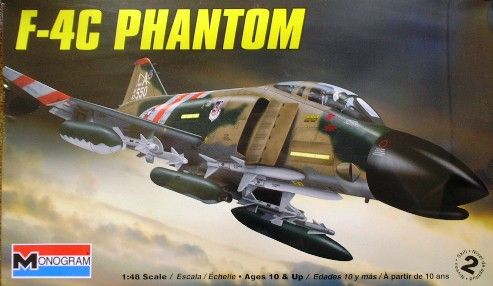
Image

What's in the box?


Image


Two bags of grey sprues, 7 in total- 3 in one bag and 4 in another:


Image


One bag containing a clear sprue consisting of all the canopy pieces:


Image


A black and white instruction booklet and a sheet of Revell Decals which are very glossy, but have zero carrier film overhang and feel reasonably thin:


Image


A total of 14 pages on the booklet:


Image


Image


Image


Image


Image


Image


Image


The Grey Sprues:


Image


Image


Image


Image


Image


The Clear Sprue- the rear canopy has a molded in black speck, so I contacted Revell to send a new one that is clear of contamination:


Image


Parts look pretty good, although they have raised details, no recessed panel lines, and the one clear canopy part with the black contamination. Very little flash, just in a few places. There are some visible ejector pin witness marks on external surfaces; on the missile pylons and the horizontal stabilizers. There's also "Made In china, Revell Inc. 1979" engraved on the portside stabilizer. I filed this down and filled and smoothed the ejector pin marks.

Here is my YouTube "in-Box-Review" video that I did for this model:


[youtube]xKchz6USOuk[/youtube]


That's it for now, next update I'll move onto the build :)

Cheers, :cheers2:
Martin

Re: Monogram 1/48 F-4C Phantom

Posted: Mon Jan 19, 2015 3:07 pm
by UKguyInUSA
Hello Guys,

Here is my "Build Update # 1" report for the Monogram 1/48 F-4C Phantom:

I started off by washing and cleaning the parts and then allowing them to air dry, to remove any mold release agents that might be present on the parts:


Image


I started by assembling/gluing the ordnance- AIM-9 missiles, drop tanks and Gun Pod:


Image


Next, I assembled the Upper Wing halves to the Lower Wing/Fuselage:


Image


I then drilled holes into the parts to enable fitting cocktail sticks for holding them in preparation for airbrushing a grey or black primer coat:


Image


Image


Image


Image


I then airbrushed Tamiya XF-1 Black base coats onto various parts:


Image


And airbrushed Model Masters Grey Primer onto the ordnance,drop tanks, pylons, gun pod ECM Pod and Horizontal Stabilizers;


Image


Followed by airbrushing a light grey onto the insides of the two fuselage halves cockpit areas and the cockpit tub:


Image


When everything was dry, I then moved on to pre-shading the raised panel lines:


Image


Image


I then airbrushed XF-2 Flat White onto the insides of the wheel wells, doors, wheel axles and air-intake covers:


Image


Image


Image


I then worked on detail painting the cockpit tub:


Image


Image


Image


Image


Image


I then dry fitted the fuselage halves to see how they fit together and they seemed okay:


Image


That's "Build Update #1" complete and below is my YouTube "Build Update #1" video discussing the above in detail:


[youtube]onbLEFTzqzA[/youtube]


Thanks for watching and commenting in advance :)

Cheers, :cheers2:

Martin

Re: Monogram 1/48 F-4C Phantom

Posted: Mon Jan 19, 2015 7:01 pm
by Spook
Looking good fella. Are you going to add any extras or is it going to be straight from the box.
Will watch this with interest as it's one I want to add to my f4 collection. :th:

Re: Monogram 1/48 F-4C Phantom

Posted: Mon Jan 19, 2015 7:07 pm
by UKguyInUSA
Hello Simon, thanks for taking a look and glad you like how she looks so far. I'm building this straight from the box; I haven't yet delved into the realms of PE and Resin extras, I'm afraid. I've just come back on-line to upload my "Build Updates #2 and #3" to get this thread up to date.

Cheers :cheers2:

Martin :)

Re: Monogram 1/48 F-4C Phantom

Posted: Mon Jan 19, 2015 7:33 pm
by UKguyInUSA
Hello Guys,

Here is my "Build Update # 2" report for the Monogram 1/48 F-4C Phantom:

I started off by gluing the cockpit tub into the starboard side fuselage, then glued the fuselage halves together, securing with tape until set:


Image


I then glued the fuselage assembly to the wing assembly and again, secured them with tape until set:


Image


Some filler was required along the upper side joint in front of the cockpit and behind it:


Image


More was required at the underside where the wing assembly joins the fuselage assembly:


Image


I then airbrushed parts to be white with Tamiya XF-2 Flat White. This included all missiles, wheel axles, undercarriage bays and doors:


Image


When the filler had set, I smoothed it all down, then glued the Air-Intakes into position:


Image


The Air-Intakes didn't fit too well and gaps were present:


Image


These gaps, on both sides of the plane, were then filled:


Image


Image


Image


Image


When all filled areas were smoothed down, the plane was cleaned with alcohol then masked in preparation for priming:


Image


The undercarriage doors were temporarily located on the underside of the plane, using white tack, to mask the white painted internal bays:


Image


Four cocktail sticks were inserted into Pylon location holes on the underside of the plane to act as a stand to protect the primer from being damaged whilst the plane dries:


Image


The plane was then primed using Model Masters Grey Primer:


Image


Next the ordnance, drop tanks, pylons and horizontal stabilizers were pre-shaded:


Image


The AIM-9 missiles were painted, along with the wheels, engine exhausts, Pilot and Navigator:


Image


Image


Image


Image


Well, that's it so far for the build update #2. Below is my YouTube video showing the above progress in more detail:


[youtube]b6g_P2Io5fM[/youtube]


Thanks in advance for watching and commenting!

Cheers :cheers2:

Martin

Re: Monogram 1/48 F-4C Phantom "Build Update #2"

Posted: Mon Jan 19, 2015 8:11 pm
by rodrant
Hi Martin!

Nice build on this Phantom , must make one ( if all builds on the bench permit :crazy: ) one of these days ,

:cheers2:

Re: Monogram 1/48 F-4C Phantom "Build Update #2"

Posted: Mon Jan 19, 2015 10:06 pm
by patrickroos
Even if its old it looks like a nice kit!
And intakes are intakes new or old kits... :bash: :D
Your doing a great job on it, looking fantastic so far! :th:

:cheers2:

Re: Monogram 1/48 F-4C Phantom "Build Update #2"

Posted: Mon Jan 19, 2015 11:50 pm
by UKguyInUSA
rodrant wrote:Hi Martin!

Nice build on this Phantom , must make one ( if all builds on the bench permit :crazy: ) one of these days ,

:cheers2:
Hey Antonio,

Thanks for taking a look mate, She's progressed quite a bit since this, I'm at Update #4 now, so back on here to post more progress photos.
Every plane builder should have a Phantom in his/her collection!

Cheers :cheers2:

Martin :)

Re: Monogram 1/48 F-4C Phantom "Build Update #2"

Posted: Mon Jan 19, 2015 11:52 pm
by UKguyInUSA
patrickroos wrote:Even if its old it looks like a nice kit!
And intakes are intakes new or old kits... :bash: :D
Your doing a great job on it, looking fantastic so far! :th:

:cheers2:
Hello Patrick,

Thanks for watching and commenting, greatly appreciated! She's progressed further since this update, so I'm on here now to try to catch up with my thread posting!

Cheers :cheers2:

Martin :)

Re: Monogram 1/48 F-4C Phantom "Build Update #2"

Posted: Tue Jan 20, 2015 12:23 am
by UKguyInUSA
Hello Guys,

Here is my "Build Update # 3" report for the Monogram 1/48 F-4C Phantom:

With the plane primed, it was time for pre-shading:


Image


Image


Next. I masked the wings to leave the tips exposed and masked the nose:


Image


I then airbrushed the wing tips white on the top and bottom:


Image


Image


Followed by Airbrushing the nose flat black:


Image


When the white wing-tips were dry, I masked them for the red stripes:


Image


I then air-brushed the stripes red on the top and bottom of the wing-tips:


Image


Image


The masking was removed to check how they turned out and I thought that they looked okay:


Image


I then masked the wing-tips and nose in preparation for airbrushing the underside light grey:


Image


I then airbrushed a color mixed from Deck Tan, Light Grey and White onto the underside, the horizontal stabilizers, the pylons, the drop tanks and the Gun Pod:


Image


Image


The masking was removed and the paint-work was checked, again, it seemed okay, although the pre-shading that showed through whilst the paint was wet almost disappeared when the paint had dried? :


Image


When the grey paint had dried, I applied a clear coat to all painted areas:


Image


Next, was to create full size paper masks from the painting guide by scaling up with the zoom function on the scanner:


Image


Image


Using my home made paper masks, I cut out areas for masking the plane before applying the USAF Tan color:


Image


I then airbrushed Tamiya XF-52 lightened down with Tamiya F-2 White:


Image


The masking was then removed to check how it looked:


Image


Image


More masks were cut out and stuck onto the plane with tape, prior to airbrushing the Medium Green:


Image


I then airbrushed a mix of Tamiya XF-58 Dark Green toned down with XF-2 White:


Image


Again, the masking was removed to check how that looked, and I thought "not too bad":


Image


Image


The last color, the Dark Green was then airbrushed onto the plane:


Image


Image


And onto the drop tanks and Gun Pod:


Image


The exhausts were then painted with a mix of XF-11 Chrome Silver and XF-1 Black and given a blue tint to simulate heat burn:


Image


Image


Image


Image


Image


Image


Image


Well, that's it for build Update #3, but below is my YouTube "Build Update #3" video that includes more details about this update process.


[youtube]YoPDtxK2aPE[/youtube]


Thanks in advance for watching and commenting!

Cheers, :cheers2:

Martin :)

Re: Monogram 1/48 F-4C Phantom "Build Update #3"

Posted: Tue Jan 20, 2015 12:29 am
by chief5437
Great build so far, looks really nice! Figures are excellent, kutgw.

Re: Monogram 1/48 F-4C Phantom "Build Update #3"

Posted: Tue Jan 20, 2015 4:15 pm
by UKguyInUSA
Thanks Chief,

I appreciate you taking a look mate!

Cheers, :cheers2:
Martin :)

Re: Monogram 1/48 F-4C Phantom "Build Update #3"

Posted: Tue Jan 20, 2015 4:51 pm
by UKguyInUSA
Hello Guys,

Here is my "Build Update # 4" report for the Monogram 1/48 F-4C Phantom that brings this build up to date and is where I'm presently at, nothing has been done to her since Sunday:


After finishing the upper camo work, it was time to make her ready for a clear coat to seal the paint and have her ready for decaling;


Image


Model Master Gloss Clear Coat was airbrushed over the camo painted parts:


Image


I then masked the leading edges of the horizontal stabilizers and painted them Chrome Silver XF-11:


Image


Image


I then painted the underside of the tail end of the plane where the exhausts are using Tamiya XF-11 Chrome Silver, XF-11 mixed with a drop of XF-1 black and then put a metallic blue tint wash on to look like heat stained metal. I made the blue tint wash from mixing XF-11 Chrome Silver with X-4 Blue and thinning with Isopropyl Alcohol:


Image


Image


The AIM-7 Sparrow missiles needed some color, so I masked them ready for striping:


Image


I painted a few different colors onto each one- light grey on the tip, followed by a yellow and brown stripe. When dry, I removed the masking tape to see how they looked;


Image


I then masked the tail fin tip and the tips of the horizontal stabilizers and painted them orange;


Image


Followed by masking the leading edges of the Air-Intakes and painting them XF-11 Chrome Silver;


Image


It was now time to start decaling. I began with the Horizontal Stabilizers;


Image


Followed by the plane. In total, there were over 200 decals which took me two full days to apply?!! The largest decal being the central fuselage red and white striped band, which required a lot of patience to get it to sit flat:


Image


Image


Image


Image


With the decals completed, it was now time to seal them in with a gloss clear coat before moving onto the next stage of weathering;


Image


The last items to be decaled were the 8 missiles- 4 AIM-7 Sparrows and 4 AIM-9 Sidewinders;


Image


Next, I assembled the wheels;


Image


With that done, everything was now ready for the final stage of weathering- panel highlighting, bleaching, washes, tonal variations, chipping and then a final assembly to make her ready for a "Final Reveal" when that is all done:


Image


Image


Image


Image


Image


Image


Image


That's it for now guys; my next update will be the "Final Reveal" which, all going well should be by the end of this week.


Here is my YouTube video for the "Build Update #4" that goes into more details:


[youtube]7n8wZhd-ReI[/youtube]


Thanks in advance for watching and commenting! :)

Cheers, :cheers2:

Martin

Re: Monogram 1/48 F-4C Phantom "Build Update #4"

Posted: Tue Jan 20, 2015 4:58 pm
by Hillbilly
Outstanding camo :jd: The weathering around the burner can area came out fantastic also. :clap:

Re: Monogram 1/48 F-4C Phantom "Build Update #4"

Posted: Wed Jan 21, 2015 2:41 pm
by FishBowlMan
Excellent, Martin! :th: I've always loved the Phantom. Interesting colour scheme on this one - especially the red and white stripes. I'm guessing this is the commander's aircraft?

Re: Monogram 1/48 F-4C Phantom "Build Update #4"

Posted: Wed Jan 21, 2015 3:34 pm
by Yevgeny
You make it look easy :)
Nice colours and finish :th:

Re: Monogram 1/48 F-4C Phantom "Build Update #4"

Posted: Thu Jan 22, 2015 8:02 pm
by Nige201980
That is one stunning Phantom mate a really cracking job.

Re: Monogram 1/48 F-4C Phantom "Build Update #4"

Posted: Fri Jan 23, 2015 3:46 am
by UKguyInUSA
Hillbilly wrote:Outstanding camo :jd: The weathering around the burner can area came out fantastic also. :clap:

Hey Steve,

Thanks for watching and commenting, greatly appreciated. I should have this all wrapped up by tomorrow, so my "Final Reveal" should be coming soon. :)

Cheers, :cheers2:

Martin

Re: Monogram 1/48 F-4C Phantom "Build Update #4"

Posted: Fri Jan 23, 2015 7:08 am
by TheWeasel
Great looking Phantom there Martin! Can't wait to see the reveal.

Do you know how it compares to the Hasegawa or Academy kits? I'm planning to do a lot of 1/48th Phantoms in the future (the Nam GB got me hooked) and the Monogram is just so much cheaper then the others. Would it be worth the effort of rescribing/riveting a monogram or is the overall "feel" not as nice as with the others?

Re: Monogram 1/48 F-4C Phantom "Build Update #4"

Posted: Fri Jan 23, 2015 8:41 am
by Goose
Nice job mate!

I read that you will put some ather washes and chipping. May I propose you to add some transparent orange on your tail's metal part? just to give it a more burnt look? as on the F-100 that often have big burnt areas. Maybe you had already that in mind but just a proposal (not indecent that one lol)

See ya

Goose

Re: Monogram 1/48 F-4C Phantom "Build Update #4"

Posted: Sat Jan 24, 2015 4:42 am
by UKguyInUSA
FishBowlMan wrote:Excellent, Martin! :th: I've always loved the Phantom. Interesting colour scheme on this one - especially the red and white stripes. I'm guessing this is the commander's aircraft?


Thanks for watching and commenting, greatly appreciated! You're correct, this aircraft was flown by Commander Lt. Colonel Barry Howard and these stripes were for his aircraft which this is modeled after.

Cheers, :cheers2:

Martin :)

Re: Monogram 1/48 F-4C Phantom "Build Update #4"

Posted: Sat Jan 24, 2015 4:44 am
by UKguyInUSA
Yevgeny wrote:You make it look easy :)
Nice colours and finish :th:

Hello Yev,

Thanks for watching and commenting mate :)

It's not as easy as it might seem; lots of patience required and many hours of work, including a few days when I worked on her from 9.00am until 2.00am the following morning, because I got carried away! :)

Cheers, :cheers2:

Martin

Re: Monogram 1/48 F-4C Phantom "Build Update #4"

Posted: Sat Jan 24, 2015 4:46 am
by UKguyInUSA
Nige201980 wrote:That is one stunning Phantom mate a really cracking job.

Hello Nige,

Thanks for taking a look and your kind comment, much appreciated mate! :)

Hope you're doing well?

Cheers, :cheers2:

Martin

Re: Monogram 1/48 F-4C Phantom "Build Update #4"

Posted: Sat Jan 24, 2015 5:00 am
by UKguyInUSA
TheWeasel wrote:Great looking Phantom there Martin! Can't wait to see the reveal.

Do you know how it compares to the Hasegawa or Academy kits? I'm planning to do a lot of 1/48th Phantoms in the future (the Nam GB got me hooked) and the Monogram is just so much cheaper then the others. Would it be worth the effort of rescribing/riveting a monogram or is the overall "feel" not as nice as with the others?
Hello mate,

Thanks for watching and glad you like her so far. Regarding your questions: This is the first Phantom I've ever made and first Monogram kit, so, I cannot answer how it compares to the other manufacturers kits. But, that said, although this kit is from 1979, I am impressed with how well it goes together (except the Air Intakes), the amount of detail in the cockpit and all the weapons that come with it. Also, the decals are excellent, they go on like a dream. It has subtle raised panel lines and rivet details, which I don't mind, and regarding Panel lines....if you look at a photo of this actual aircraft, or any other Phantom, you don't see highly defined panel lines. If your panel lines are 0.5mm wide, then at 1/48 scale, that would equal 24mm wide on the actual aircraft. in other words, a 0.5mm panel line recess represents a gap of almost 1 inch between panels on a real size craft. The plane would be unfit for service and would take off that being the case. The gaps between panel lines on actual aircraft are probably 1.00mm wide, max. which means they'd need to be 0.021mm wide on a 1/48 scale model which is equal to .0008" (eight tenths of an inch) which is invisible to the naked eye. So, I wouldn't go through all the effort of re-scribing just for artistic license, I'd prefer to keep it realistic.

Overall, now that I have completed this kit...I would give this 9/10 base don the age of the tooling, the quality of decals, the amount of details, how well it goes together and the price of $13.19 from Hobby Lobby using the 40% discount coupon downloadable from their website. Even at their $21.95 retail price, I still feel it's great value for money!

Cheers, :cheers2:

Martin

Re: Monogram 1/48 F-4C Phantom "Build Update #4"

Posted: Sat Jan 24, 2015 5:03 am
by UKguyInUSA
Goose wrote:Nice job mate!

I read that you will put some ather washes and chipping. May I propose you to add some transparent orange on your tail's metal part? just to give it a more burnt look? as on the F-100 that often have big burnt areas. Maybe you had already that in mind but just a proposal (not indecent that one lol)

See ya

Goose

Hey Goose,

Thanks for watching and glad you like her so far! Regarding a transparent orange wash, I've already completed my build, and I'm on here now to upload the "Final Reveal" photos. hat I did was a blue wash first to indicate the effect of heat on steel, and then after that had dried, I mixed yellow and brown thinned down to a water consistency and washed that over to give that yellowy brown stain from heat.

Cheers :cheers2:

Martin :)

Re: Monogram 1/48 F-4C Phantom "Build Update #4"

Posted: Sat Jan 24, 2015 5:30 am
by UKguyInUSA
Hello Guys,

Well, I've completed this baby, so here is the build progress that took place since "Update #4" and my "Final Reveal" that will be separate to this thread and within the "Final Reveals" section.

So, what did I do since "Update #4" to get her to completion;

First, I did a dark dirt wash on the wings:


Image


Followed by the Fuselage and the underside of the plane:


Image


Image


Image


Image


Next items for a dirt wash were the external fuel tanks, the wheels and the AIM-9 Sidewinder carrier racks/pylons:


Image


Followed by the Gun-Pod and Horizontal Stabilizers:


Image


Next, it was time to do some subtle paint chipping/wear:


Image


Image


I then assembled the undercarriage:


Image


Followed by the Air-Brakes:


Image


I then gave everything, except for the missiles and nose of the plane, a matte/flat clear coat:


Image


The nose was masked and a Satin clear coat was airbrushed onto it:


Image


It was now time for the "Final Assembly":


Image


Starting with the central "Gun Pod":


Image


The four AIM-7 "Sparrow" missiles:


Image


The external fuel/drop tanks:


Image


The starboard side AIM-9 "Sidewinder" missiles and "ECM Pod":


Image


Then the port side AIM-9 "Sidewinder" missiles:


Image


With the underside stores completed, I then fitted the "Horizontal Stabilsers" and taped them in position until they set:


Image


Last but not least, I masked the "Canopy Frames" prior to painting and fitting:


Image


I then painted the Canopy Frames to complete them:


Image


All I had left to do now, was to fit the canopy Frames, then scratch-build two Pitot tubes that snapped off from the Tail-Fin during all the handling, and paint the light details onto the air-frame.

To see the final product, you'll have to check out my "Final Reveal" within the relevant section on this forum for "Final Reveals"!

Thanks for taking a look and commenting, greatly appreciated, and I hope you like the "Final Reveal" that will be following this post shortly!

Cheers, :cheers2:

Martin :)