Page 1 of 1
LFG Roland C.II, 1/48th by Eduard. WWI Recon. Aircraft
Posted: Wed Jul 15, 2015 12:03 am
by TheTroyster
Oh man not sure what I have gotten myself into here! A 1/48 scale aircraft is kind of small for my eyesight, but I am such a fan of World War One history I thought this would be a great project. I ordered this kid about two weeks ago and it just showed up, and when I opened the box I nearly had a panic attack - yes photo etch parts - lots of them, the plane is all of four inches long, and I have no idea how I am going to build this kit as I can hardly see the thing. Don't have my camera with me today so Ill get my first set of photo's posted on Wednesday, but will include a stock photo I swiped off the web today. So without further adieu the German Roland C.II “Walfisch” - (in English we would call it the whale) an advanced German reconnaissance aircraft of World War I.
images.jpg
.
th.jpg
Re: LFG Roland C.II, 1/48th by Eduard. WWI Recon. Aircraft
Posted: Wed Jul 15, 2015 3:13 pm
by Avgas
Go for it, I have a couple of Profipack biplanes to do as well so I'll watch yours with interest. I've never used photoetch before. My eyes aren't that good either!
Re: LFG Roland C.II The box, inside, and the washing of parts
Posted: Wed Jul 15, 2015 4:32 pm
by TheTroyster
Ok here is the box:
Box1.jpg
Here is the box newly opened.
Box-2.jpg
Here is the CRITICAL first step - washing of the part. I am sure everyone does this but it's a good reminder to always wash your kit before starting. I like to use a vegetable brush and lightly brush the parts.
wash-1.jpg
Re: LFG Roland C.II, 1/48th by Eduard. WWI Recon. Aircraft
Posted: Wed Jul 15, 2015 5:40 pm
by TheTroyster
Avgas wrote:Go for it, I have a couple of Profipack biplanes to do as well so I'll watch yours with interest. I've never used photoetch before. My eyes aren't that good either!
I am glad you responded, finally someone who has done some bi-planes. I liked your wood grain prop so much I ordered the product for myself!
Re: LFG Roland C.II, 1/48th by Eduard. WWI Recon. Aircraft
Posted: Wed Jul 15, 2015 6:22 pm
by Avgas
I think bi planes are a bit of a niche area...

Must admit I bought a handful to get me back into modelling thinking small=easy. Wrong. I'm enjoying building them though. Be careful with the decals, some of mine fell apart on the Nieuport build. Don't know if it was just a bad batch but they were very flimsy. I've just started the Eduard Pfalz DIII and have the Albatros DVa and SSW III in the profipack range to build so I'm hoping you are going to lead the way with the photoetch

.
Re: LFG Roland C.II, 1/48th by Eduard. WWI Recon. Aircraft
Posted: Wed Jul 15, 2015 11:08 pm
by TheTroyster
Avgas wrote: I'm hoping you are going to lead the way with the photoetch
.
I am going to lead the way on photo etch? Going to need a lot more beer for this job!
Primed the interior and looked at the photo etch under a 10X glass!
Posted: Thu Jul 16, 2015 11:45 pm
by TheTroyster
I've almost no experience building planes, a couple of Academy 1/76 Bi-planes, the Revell Write Flyer (which I kind of liked) and a P47 by Revell (old kit) and I loved making this model, even painted it in the US Department of Defense's most favorite color - Olive Drab, and a BF109 in 1/48 which ruined my cheep airbrush and forced me to get a new Iwata Neo (which for my skill level, Rocks!) - but I really like the way planes look so I keep buying kits to force myself into doing them! Just nuts that painting is almost always the first step on a plane! So primed the interior area of the plane here:
prime-1.jpg
Now I have been monkeying around with PE on some AFV models as of late, bought some PE tools and actually was quite pleased with the PE work I did on my FT17 French tank - which I finally finished after five months! Here is a close up of the PE parts, that I had to use a 10X Glass to see clearly:
photo-1.jpg
I mean look at part number 15! What the hell is that? And pray tell how am I going to place that with any skill level on a model! Jesus wept!
and the second part of the PE:
photo-2.jpg
And check out I think parts 50, and 51 I mean I cant even read the part number let alone see the part itself! I should call a lab maybe they have an old microscope I can buy?
I had to order wood color paints so this project will be on hold until I get those colors delivered. In the meantime I will be thinking about those PE parts- just thinking...
Re: LFG Roland C.II, 1/48th by Eduard. WWI Recon. Aircraft
Posted: Sat Jul 18, 2015 3:46 pm
by rwsmith14
Great subject !
Re: LFG Roland C.II, 1/48th by Eduard. WWI Recon. Aircraft
Posted: Mon Jul 20, 2015 9:53 pm
by MarkVerploeg
Nice subject
I never even heared of this plane but very nice to see a really old plane in this sig
Good luck with the build
Re: LFG Roland C.II, 1/48th by Eduard. WWI Recon. Aircraft
Posted: Tue Jul 21, 2015 5:16 pm
by shortCummins
Re: LFG Roland C.II, 1/48th by Eduard. WWI Recon. Aircraft
Posted: Tue Jul 21, 2015 9:03 pm
by TheTroyster
RAF Ace "Roland best German Aircraft of 1916"
Posted: Tue Jul 21, 2015 9:26 pm
by TheTroyster
So you know how all model instructions have these little history blurbs, for this model it reads:
"British ace...who had shot down 17 Roland C.II, said that the Roland was the best German Fighting aircraft in 1916."
Of course he said that- let me translate his statement "Germany please keep making these POS aircraft so I can keep killing Germans."
Okay I have the paints in now, so I can start painting the interior of the plane. The problem is the brand of paints which I have horrible luck at mixing them for airbrushes - they only end up ruining my nozzles
paints.jpg
!
Also I think I will build a small diorama for this model - sketched it out - here is my idea:
drawing-of-d-rama.jpg
Yes the people are drinking beer - they're Germans what else would they be drinking?
Also I have this interesting product that I have for placing photo etch parts, bought it for a HMS Dreadnought (which I've yet to start) and that has a lot of PE parts and is in a 1/350 scale...
Neo-sol.jpg
I've used it on two models thus far and it seems to be the wonder product of all, but it's weird.
WWI Recon. Aircraft Painted Wood Interior
Posted: Thu Jul 23, 2015 2:04 am
by TheTroyster
Okay with the paints arriving yesterday I was able to paint the wood finish interior of this plan so I can finally get started on that wonderful, epic, awesome PE stuff.
First I applied Vallejo 71-077 "wood" to the interior parts, and let it dry for about 9 hours...
paint-one.jpg
Next, I tried this Vellejo 70.828 Woodgrain (Transparent) mixed with with airbrush thinner at a 50/50 ratio and lightly applied it.
paint-two.jpg
Very light applied, first time I have ever done such a large wood area, and first time using an airbrush on this, and it turned out decent, although I have seen better results, this product will take much practice.
final-paint.jpg
I wonder if I should apply a wash to this?
. WWI Recon. Aircraft RE-Worked the wood grain
Posted: Thu Jul 23, 2015 7:17 pm
by TheTroyster
You can see from the above picture that this transparent wookgrain (that's how it's spelled on the bottle) after airbrushing looks like something that's been airbrushed. Typical of an airbrush, nice even coat, but does it look like wood? Not really - wasn't too happy with the lack of wood grain look.
So this morning I played around with this stuff again, and concluded that using a brush would render better results. I applied the product with a brush in one direction, kind of went for that uneven steaking look you get with a brush.
finish-wood-paint.jpg
This is a part before the re-application with a brush:
paint-before.jpg
One minute later after using a brush, same bat part, same bat time, same bat channel only brushed the wookgrain on item. Yes! Now I am happy with the results!
final-prodct-paint.jpg
Re: LFG Roland C.II, 1/48th by Eduard. WWI Recon. Aircraft
Posted: Fri Jul 24, 2015 12:56 am
by Avgas
Should have mentioned that Troy, you brush Wookgrain on!
Re: LFG Roland C.II, 1/48th by Eduard. WWI Recon. Aircraft
Posted: Fri Jul 24, 2015 5:34 pm
by TheTroyster
Avgas wrote:Should have mentioned that Troy, you brush Wookgrain on!
haha - that is funny! Best part about this hobby, screw up and you can re-do it all a different way.
PE work this weekend, have my entire bench cleared, have a twelve pack of IPA Beer, and all my tools, magnifier glasses, and am ready to jump right in...
1st Build day - aka Photo etch day/weekend!
Posted: Tue Jul 28, 2015 6:17 pm
by TheTroyster
Now I am ready for the photo etch day/weekend. This model has 50 plus photo etch parts, and I have worked with about 8 PE parts in my entire life to date! So first I got all my PE tools out, placed on the work area, and ready to jump in...
PE-Tools.jpg
Up first, is the part that actually makes this model a recon vehicle - the camera.
bend-part-1.jpg
Snipped off that tag with my new photo etch tool. No problems.
Next: Placed part in vice to bend at 90' angle
bend-part-2.jpg
PE cont...
Posted: Tue Jul 28, 2015 6:21 pm
by TheTroyster
next bent all four cornes up:
bend-part-3.jpg
Attached the finished part:
bend-part-4.jpg
Once all the PE is attached here is the final unpainted product:
assymbled-camera-4.jpg
PE Cont... PT. 3
Posted: Tue Jul 28, 2015 6:25 pm
by TheTroyster
Also had to roll some PE stuff so I used my rolled tool:
rolled-part-1.jpg
Here I used this weird Neo Sol to attach / hold that part so I could glue it in place - the theory here is the tack of the Neo is much weaker than the PE Glue
rolled-part-2.jpg
Here is the attached part:
rolled-part-3.jpg
After all that PE work I move on
Posted: Tue Jul 28, 2015 6:36 pm
by TheTroyster
Ok now what to do? Do I continue to do this PE stuff or what? The above item took nearly three hours, but I did finish the beer - all of it! So I decided to wait until the next day to continue. See that was the problem, after sleeping on this project I asked my son what he wanted to do and...
Went fishing in the Rocky Mountains at a place called 8 mile reservoir - caught a lot of water, but no fish.
Funny thing, the entire time we were camping, I sat there looking at the tent and the only thing I could think of is how difficult it would be to paint that camouflage pattern on a model.
tent-1.jpg
It's as if I can never escape model building.....
Re: LFG Roland C.II, 1/48th by Eduard. WWI Recon. Aircraft
Posted: Wed Jul 29, 2015 2:18 am
by Danta2er
The PE stuff is cool, but the family stuff is awesome!
Re: LFG Roland C.II, 1/48th by Eduard. WWI Recon. Aircraft
Posted: Wed Jul 29, 2015 6:22 pm
by TheTroyster
Danta2er wrote:The PE stuff is cool, but the family stuff is awesome!
Yes it is.
Half of interior done!
Posted: Fri Jul 31, 2015 5:11 pm
by TheTroyster
I managed to grab some extra time and fit the rear interior compartment into the plane's frame/body.
interior-2.jpg
interior-3.jpg
interior-4.jpg
More PE work, front seat done -
Posted: Tue Aug 04, 2015 8:31 pm
by TheTroyster
So I managed to get the front seat done, and much of the PE work as well.
front-seat.jpg
Is it just me or does this pe stuff take all damn day? About four hours to do all this stuff. And much of it I can't even see; only see it once I take a close up photo. The entire time I am building this model, I am thinking about this being an open canopy, which means it's going to be a dust fest in a month or so - and there is no way I can clean it...
I have to paint those handles on the right side and that crank on the left side in white, yea, hand paint those...I'll get right on that. You know the great thing about all this detail stuff is it helps one really understand how the plane is put together, and what the parts are for. And after this project I should be ready to build that 1/350 scale HMS Dreadnought 1907 that has a lot of PE parts.
instro-panel.jpg
Nearly the entire seating part of the interior is done, and am liking how it looks.
Nearly-full-interior.jpg
Finished the interior and now the easy part....
Posted: Sat Aug 08, 2015 8:04 pm
by TheTroyster
So after weeks, and thus hours of tedious building I finished the interior of this model. I'd say this is not a model for a newbie, which I am when it comes to aircraft. This basically pushed my building skills to its limit, my patience to its utmost endurance level, and I can not say this aircraft building is inspiring me to rush out and build more.
First up was the instrument panel:
instru-pan-installed.jpg
Next I installed the engine, which was a joy compared to all the other items:
Engine-doen.jpg
And now my final view of all those hours of building about to be closed up in the body of the plane to never been seen again. Wow what a since of accomplishment...
Say-Bye-Bye-to-all-that-wor.jpg
In minutes I make much visual progress
Posted: Sat Aug 08, 2015 8:11 pm
by TheTroyster
Here is what it looks like all shut up.
closed-interior.jpg
And twenty more minutes and this thing actually looks like a plane and I am nearly done!
Nearly-built.jpg
Ready to start painting - hopefully
Posted: Wed Aug 12, 2015 10:34 pm
by TheTroyster
So I took some time off and actually built another bi-plane (Fokker D VII in 1/72 scale which was easy) just so I could be more comfortable with this project and now feel much more confident about this build. I was really getting upset about how hard and new this build has been for me.
Okay, as you can see the upper wings were never attached, I placed them on the plane while the trusses cemented in place, and will attach them after painting. I've done some of the rigging but am going to have to do the rest after the decals are in place. Because this plane has large side decals I decided to not do all the rigging as it would make putting them on nearly impossible.
ready-for-paint-1.jpg
In addition there are some parts that attach to the sides of the plane, which, again, will have to wait until after the decal placement is finished.
For the rigging I used the ole heated sprue (sp.?) trick and not thread as there really is no decent place to attach thread - and it always gets so gunky after a time.
ready-for-paint-2.jpg
Next up will be to prime the plane and then paint.
Not sure you can tell but the size of this plane is the same as a 1/48 BF109 - which many of you have done.
Primed
Posted: Thu Aug 13, 2015 11:37 pm
by TheTroyster
So I primed the plane and will let it sit for a few days as the primer is not the highest quality so it will take a while for it to harden. The rigging Ill tighten up after all is done with a lighter. The rigging looks a little large in this picture but it's not, my camera seems to be focusing on this item.
primed-one.jpg
prime-two.jpg
I see the finish line
Posted: Thu Aug 20, 2015 1:49 am
by TheTroyster
Color modulation on the wings
Posted: Thu Aug 20, 2015 9:13 pm
by TheTroyster
I sealed the decals late last night with a Satan Gloss. This morning I though I would do a color modulation on the wings. Since the wings were most likely a canvas type of material that is pulled tight over this wooden rib skeleton, I thought it would only make sense that the material on the tops of the ribs would have a tendency to fade more than the area's not stretched. So it would be lighter not darker.
As it stands the wings have this very mono-tone to them now and no real details are standing out. By it's design these older WWI planes didn't have all those pannel lines the later ones do s0...

I placed some white oil paint dots on the rib areas.

Dipping my brush in thinner I moved down those ribs to hopefully give them a faded out look.
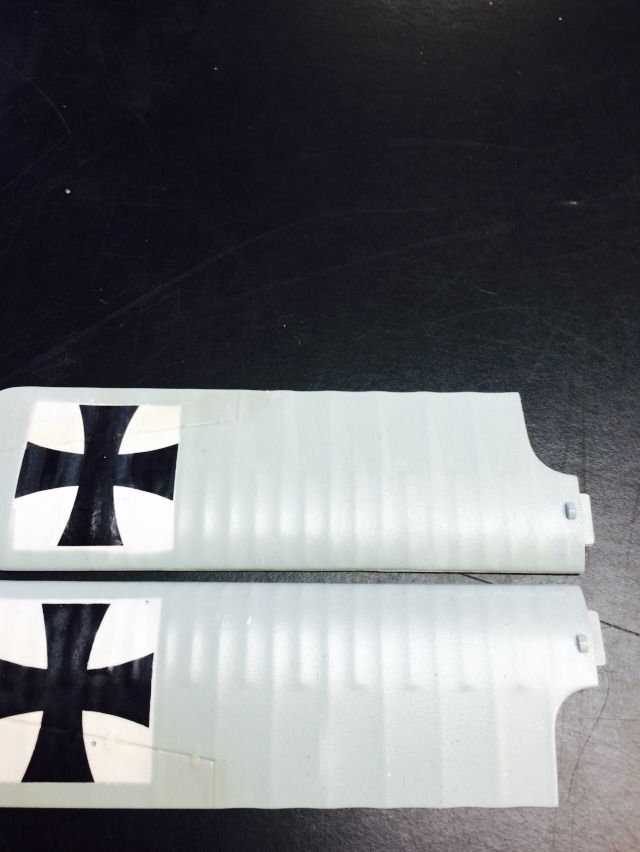
It's very light but the top wing has been done and the lower has not
Re: LFG Roland C.II, 1/48th by Eduard. WWI Recon. Aircraft
Posted: Thu Aug 20, 2015 9:54 pm
by Twokidsnosleep
Looking good

Great to see something different being built
I would love to try one of those Wingnut Wings kits
Re: LFG Roland C.II, 1/48th by Eduard. WWI Recon. Aircraft
Posted: Thu Aug 20, 2015 10:15 pm
by Homerlovesbeer
That interior looks really good and the PE parts have come together beautifully.
Nothing beats a family fishing trip though


