Page 1 of 1
Jason's VJ 48hr 1/48 Tamiya F4U-1
Posted: Sat Aug 15, 2015 5:51 am
by JasonGaspard

I've built this kit before and picked it because I knew how it went together, few pieces and good fit. It was one of the first few I built and I'm excited to see if this looks any better. I started around 5 and am about to call it a day.
Some sanding to be done tomorrow once the glue has set, simple painting here...I was going to try punching out the dials from the decal but I really didn't have time for that.


This went together very quickly, including painting around 3 hours...
The engine was sprayed with Alclad, but looked bare and too clean and since I had time I decided to detail the Double Wasp!
0.5mm lead wire cut, glued into pairs, painted then then drilled out the cylenders and attached my scratch built HT leads. The gearbox and magnetos also always looked pretty beat up in reference photos so I replicated it.


Once all setled I hit it with some aquagloss in prep for weathering tomorrow.
I'm happy how it turned out but I think the 0.5 is a bit too large, 0.3 would have been a better choice but this was fiddly enough for being half blind! Actually, this was a practice run for the 1/32 Corsair if I ever get around to it, I was wondering if this technique would look realistic...
Re: Jason's VJ 48hr 1/48 Tamiya F4U-1
Posted: Sun Aug 16, 2015 12:32 am
by chief5437
Looks great! Love the chipping on the engine

Re: Jason's VJ 48hr 1/48 Tamiya F4U-1
Posted: Sun Aug 16, 2015 7:27 am
by JasonGaspard
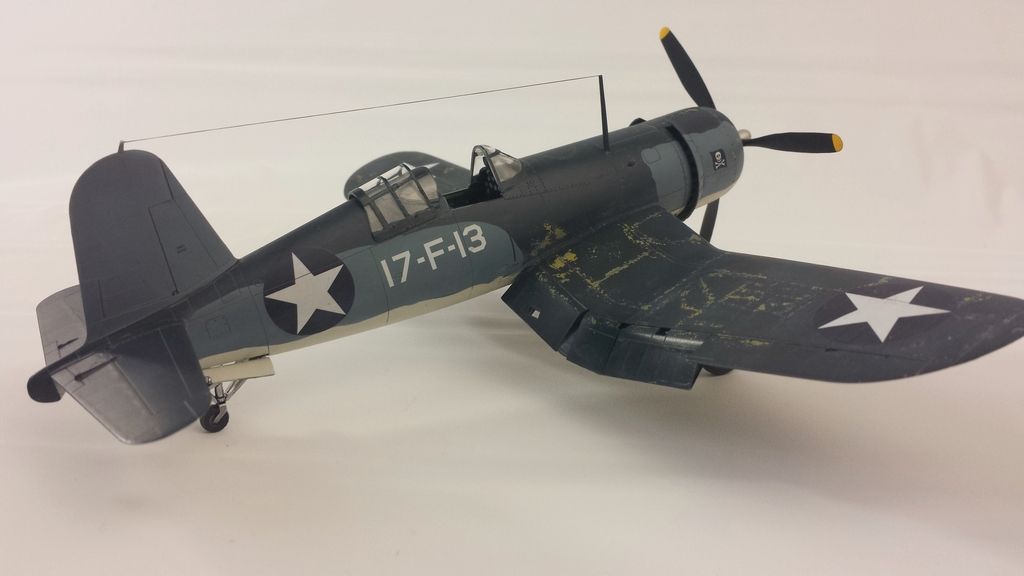
Well, finally got some bench time today...I had wanted to do this as a pretty heavily worn airframe as most of these ended up being. I wanted to try out a multi stage chipping effect that I had seen elsewhere, this involved laying down a metal color (Alclad airframe Aluminium in this case), chipping fluid coated with a primer color. Tamiya's xf-4 is a pretty good approximation of yellow zinc chromate. That was then chipped back, coated with a lacquer clear coat and the chipping process repeated with the top color.


I then decided on the most complex paint job from the options, tri tone...I wasn't thinking. This was my first time masking with silly putty, worked quite well and I will be doing this again. Here the belly color has already been sprayed as had the intermediate, ready for the dark sea blue:

et viola!

Chipping then done, concentrating on panel lines...careful not to go ott but a little heavy in case the weathering and matte coats knock it back. Here is the result, this was taken after Aquagloss was sprayed.

and with the decals on and settling in

Another gloss in the am then weathing fun!
Re: Jason's VJ 48hr 1/48 Tamiya F4U-1
Posted: Sun Aug 16, 2015 8:10 am
by JudgeDredd
Fantastic - great build
Re: Jason's VJ 48hr 1/48 Tamiya F4U-1
Posted: Sun Aug 16, 2015 1:04 pm
by Stokesy44
Great work, love the chipping effort. First rate. How did you actually 'chip' it, would love to know.
Re: Jason's VJ 48hr 1/48 Tamiya F4U-1
Posted: Sun Aug 16, 2015 10:28 pm
by JasonGaspard
Stokesy, I made a thread when I tested the technique a couple of weeks ago
http://intscalemodeller.com/viewtopic.php?f=66&t=13623
If you have any other questions just ask!
First thing this AM I hit it with some weathering wash

and the result...

Some oil streaking and exhaust stains

Panel fading with oil paints and gun staining, went a bit OTT with this since it was so hard to see on the dark blue...

Some oil in the engine cowl, I don't know how but I wore down to plastic here...

Cya in the reveal section!
Re: Jason's VJ 48hr 1/48 Tamiya F4U-1
Posted: Mon Aug 17, 2015 7:16 pm
by JudgeDredd
Cool build!


