Page 1 of 2
Tamiya 1/72 - A6M2b Zero (Zeke)
Posted: Sun Sep 13, 2015 9:23 am
by TommyKillander
Hey guys!
I thought that I should try to build something with props - I'm mostly into jets so it's fun to do something different for a change.
The kit is Tamiya 1/72 scale Mitsubishi A6Mb2 Zero Fighter, I got the one with extra decal and paint-scheme options at a very good price (~10€), it normally costs more than twice as much (in Sweden that is).
The level of detail in this kit is amazing. I have never seen anything like it on a 1/72 before... This explains why the kit is almost as expensive as a 1/48 scale.


There are a couple of decal options to choose from.


The canopy is like a "lighthouse"

so I decided to invest in a Eduard masking-kit, to reduce the amount of foul language...


I will build the A2-2-102 stationed on carrier Junyo Oct 1942 - Jan 1943. Gray Green colour with red markings on tail and fuselage. After some consideration I have decided to make a small shipdeck dio aswell so I will cut and fold the wingtips.
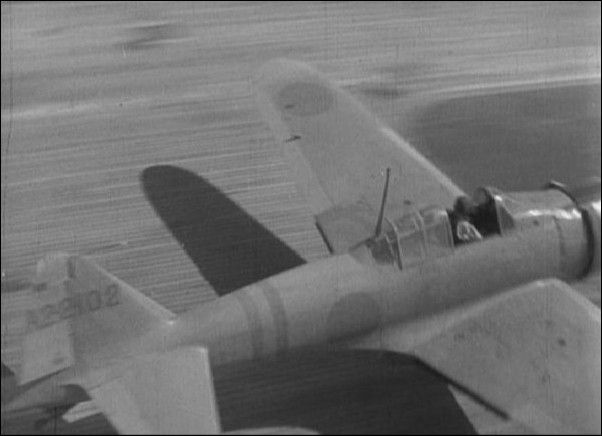
To get some more input (and inspiration!) I have studied the Blayd Zero. This is a replica of a A6Mb2 (type 21) built from scratch.
Link to walkaround here:
http://www.j-aircraft.com/walk/dave_plu ... /blayd.htm
Cheers!

Re: Tamiya 1/72 - A6M2b Zero (Zeke)
Posted: Sun Sep 13, 2015 10:11 am
by TommyKillander
Hi,
After studying cockpit of the Blayd Zero I decided to go ham with Aotake.
First a couple of pictures to get ourselves in the right mood...

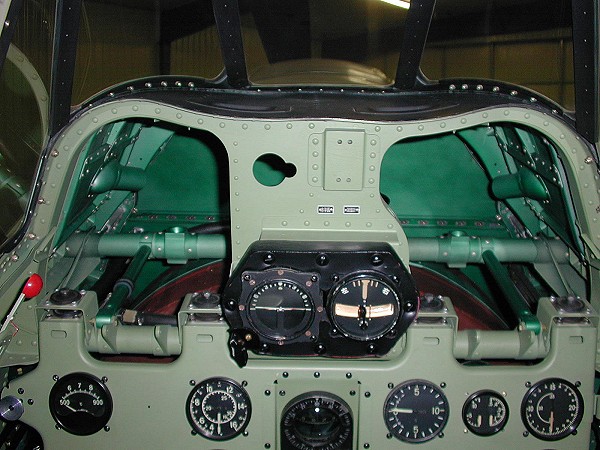


....and off we go!

First some base coat on the various bit and pieces in the cockpit, no need for resin or PE here as far as I'm concerned.

Tamiya suggests that the Aotake mix should be made using X-13 Metallic Blue mixed with X25 Clear Green.
I'm not convinced that this is the right way to go (it will probably end up too dark) so I decided to google for a while and I found method using Model Master laquer based Metallizers sprayed directly onto the styrene (very thin!) and using a 1:1 ratio mix of X23 Clear Blue and X25 Clear Green and apply thin coats over the metal paint.
I did a test on my dependable SU-100 benchmule first, sprayed 3 thin coats and it levelled perfecly. However, I did the mistake not to wait long enough between the coats so the Aotake pooled up around the edges

That's surface tension laughing back at you...
This is not a big issue; most of it will not be seen anyway after closing up the cockpit.
I am, however, very pleased with the colour; transparent green with a hint of blue.


I used XF71 Cockpit Green to coat some of the Aotake and also did some detail paintwork of knobs and levers.


I have glosscoated with AC2 Aqua Gloss preparing for IP decals and weathering, moving on with other parts of the build.
Cheers
Re: Tamiya 1/72 - A6M2b Zero (Zeke)
Posted: Sun Sep 13, 2015 12:00 pm
by Joesdad
I did this kit for VJ 48hr build (didn't finish in time), it's a fantastic kit Tommy. I can't give any heads-up on issue because there aren't any. Check out the little faring just in front of the windscreen

You could 'nt build these all the time because they're quite expensive, but it's great just to sit slapping it together without worrying. Some guys might call that mind thumbing I like to call "the good life".....

Re: Tamiya 1/72 - A6M2b Zero (Zeke)
Posted: Sun Sep 13, 2015 12:35 pm
by TommyKillander
Joesdad wrote:I did this kit for VJ 48hr build (didn't finish in time), it's a fantastic kit Tommy. I can't give any heads-up on issue because there aren't any. Check out the little faring just in front of the windscreen
You could 'nt build these all the time because they're quite expensive, but it's great just to sit slapping it together without worrying. Some guys might call that mind thumbing I like to call "the good life".....
Yeah, I totally agree with you!
After finishing my entries in the Homeland GB, I didn't want to start a new big build so instead I pulled this little kit out of the stash a sort of "in-between-builds"...
Re: Tamiya 1/72 - A6M2b Zero (Zeke)
Posted: Sun Sep 13, 2015 12:50 pm
by Homerlovesbeer
Oooo tasty! Following this build....
Re: Tamiya 1/72 - A6M2b Zero (Zeke)
Posted: Sun Sep 13, 2015 3:11 pm
by Stokesy44
Beautiful work for such a small subject. Cannot wait to see it come together.
Re: Tamiya 1/72 - A6M2b Zero (Zeke)
Posted: Sun Sep 13, 2015 3:17 pm
by keithinflorida
Very nice work. Dont think my eyes are up to 1/72nd anymore
Re: Tamiya 1/72 - A6M2b Zero (Zeke)
Posted: Mon Sep 14, 2015 8:44 pm
by TommyKillander
Thanks guys!
Not much built today, been doing some research about the colours of early Zeros.
It seems like the gray/green colour that Tamiya suggests for the kit (spraycan AS29, acrylics XF76) might not be the right colour for this model. There are some findings of relics and some research where the correct colour seems to have a brown tone.
http://modelingmadness.com/earlya6mcolors.htm
http://www.aviationofjapan.com/2012_05_01_archive.html
http://www.aviationofjapan.com/2011/10/ ... guide.html
I will get some Vallejo 71023 and 71138 and make some tests to see how it looks
Cheers
Re: Tamiya 1/72 - A6M2b Zero (Zeke)
Posted: Tue Sep 22, 2015 9:25 pm
by TommyKillander
Hey guys,
I have been quite busy at work and with the family so there have been Zero building time...
Hrm... ok, sorry about that - couldn't resist it.
Actually I managed to do some work today and last Sunday:

Engine assembled and painted. I used 1:1 mix of XF12 and XF23 to get that blue-gray colour.

Put decals in the IP and seat. Tamiya decals are nothing but shite - period. The Micro Sol turned the meters into a sludge so this was the best I could do without destroying all of them. One on the left side wasn't possible to salvage


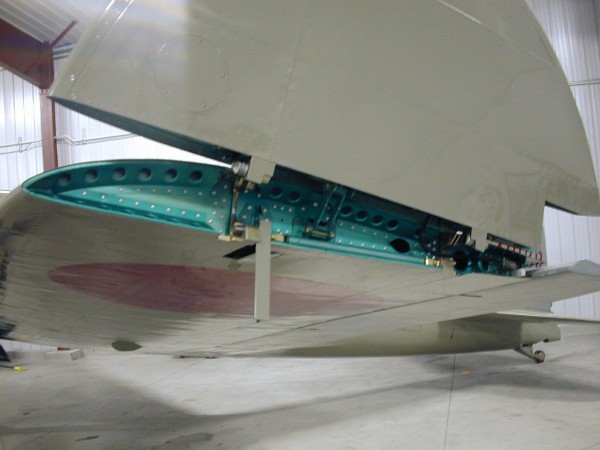
I have detached the wingtips using a resin-saw. I will put them in a folded position like the picture below and I will coat the edge with Aotake (I might need to do some scratch-builing there as well...

)


Finally, the engine and cockpit have been treated with AK Interactive Engine Grime wash. i haven't made up my mind if I should coat these details with Satin coat or keep them as they are... I'll have a look tomorrow and make up my mind then.
Cheers guys!
Tommy
Re: Tamiya 1/72 - A6M2b Zero (Zeke)
Posted: Thu Sep 24, 2015 8:51 pm
by patrickroos
Re: Tamiya 1/72 - A6M2b Zero (Zeke)
Posted: Fri Sep 25, 2015 8:28 pm
by TommyKillander
Re: Tamiya 1/72 - A6M2b Zero (Zeke)
Posted: Thu Oct 01, 2015 8:07 pm
by TommyKillander
Hey guys!
Got some work done on the Zero this week. Not much but I'm not in a hurry...


I got the engine assembled and ready for glosscoat. I was browsing some Zero pictures when I suddenly realised that I have taken the wrong parts from the sprue. The A6M2b should have the Sakae 12 engine, but I have built a Sakae 21

Nevermind, I will not break the engine apart and fix that - instead this will be a
very special Zero...


I made an attempt to thin out the edges of the wings a little bit. I will add some hinges and stuff there as well when I put in the wingtips later on. Edges will be coated with Aotake.


I know that I repeat myself; but the fit is incredible on this kit. I have been very careful and masked all the glue-joints before painting so the parts fits together perfectly and there are no gaps anywhere. The only place where some attention is needed is where the sprue-gates where, because I sanded that part little too much. But that was easily taken care of by a couple drops of CA-glue left for a couple of days to cure, then sanded and polished with a buffing stick.


Sofar I have not used any filler (part from a couple of drops of CA-glue) and I have not needed to do any rescribing either.
I am VERY pleased with that !
Cheers
Tommy
Re: Tamiya 1/72 - A6M2b Zero (Zeke)
Posted: Thu Oct 01, 2015 8:53 pm
by Aliktren
This is a great kit, almost finished mine and it is such a great little kit, lovely job
Re: Tamiya 1/72 - A6M2b Zero (Zeke)
Posted: Fri Oct 02, 2015 2:25 am
by ThomasBrown
Cockpit work is fantastic Tommy! Cheers!
Re: Tamiya 1/72 - A6M2b Zero (Zeke)
Posted: Fri Oct 02, 2015 6:45 pm
by TommyKillander
Aliktren wrote:This is a great kit, almost finished mine and it is such a great little kit, lovely job
Thanks, I'm fully enjoying this build. Tamiya have done a great job on the design and the tooling. Ejection pin marks are carefully placed where they cannot be seen when the kit is assembled and seams are hidden in panel-lines or easy to work afterwards. No visible flash on the parts. The fit is so tight that even a thin coat of paint on the glued surfaces may cause an noticable offset.
ThomasBrown wrote:Cockpit work is fantastic Tommy! Cheers!
Thanks Thomas!

Cheers
Tommy
Re: Tamiya 1/72 - A6M2b Zero (Zeke)
Posted: Sat Oct 03, 2015 7:35 pm
by TommyKillander
Hey guys!
I have worked on the cockpit today and painted the compartment behind the pilot in XF85 Rubber Black. Tamiya instructions says that XF71 Cockpit Green should be used, but recent research indicates that this area where black with a hint of blue. So I choose to go for that...
http://modelingmadness.com/earlya6mcolors.htm


The final weathering have been done with a mix of Ultimate Light Dirt and Dark Dirt.
Tomorrow I will mask the windshield and canopy and prepare for primer.
The Eduard masking kit has 25 pcs(!) of tiny Kabuki tape squares that should be placed onto something that is sligtly larger than a "pinkie" fingernail


Tommy
Re: Tamiya 1/72 - A6M2b Zero (Zeke)
Posted: Sun Oct 04, 2015 8:18 am
by Homerlovesbeer
Hehe masking is a chore! At least you have masks, I used Mr Masking Sol R to mask mine!
Re: Tamiya 1/72 - A6M2b Zero (Zeke)
Posted: Wed Oct 07, 2015 1:23 pm
by Aliktren
TommyKillander wrote:Hey guys!
I
The Eduard masking kit has 25 pcs(!) of tiny Kabuki tape squares that should be placed onto something that is sligtly larger than a "pinkie" fingernail
Tommy
hehe, I used that mask kit, I believe I was on a hangout at the time and did quite a bit of swearing
Re: Tamiya 1/72 - A6M2b Zero (Zeke)
Posted: Wed Oct 07, 2015 8:15 pm
by TommyKillander
Homerlovesbeer wrote:Hehe masking is a chore! At least you have masks, I used Mr Masking Sol R to mask mine!
That must have been a pain in the backside - It's so easy to flood a windowpane and make a mess of everything.
Aliktren wrote:hehe, I used that mask kit, I believe I was on a hangout at the time and did quite a bit of swearing
Yeah, I can imagine. I used up my share of foul language for a week, when I did mine

Anyway, this is the result I got.
Let the mayhem begin


The alignment is not perfect, but after trying to adjust the tape-squares in one end only resulted in a problems elsewhere. It looks worse on the pictures than IRL, due to the close up photo. Atleast I hope so

I have also added the last small part, there are some very fragile parts on the wings, so from now on it will rest on supports until the undercarriage is in place. The antenna have taken tons of beating, but I haven't managed to break it yet...
Stay tuned!
Re: Tamiya 1/72 - A6M2b Zero (Zeke)
Posted: Wed Oct 07, 2015 9:53 pm
by Homerlovesbeer
TommyKillander wrote:Homerlovesbeer wrote:Hehe masking is a chore! At least you have masks, I used Mr Masking Sol R to mask mine!
That must have been a pain in the backside - It's so easy to flood a windowpane and make a mess of everything.
Oh yea it was a MISSION! My first model in around 25 years (since a teen) and I have to go and try this
It worked out pretty well considering

My end result.....

Yours is looking really sweet.....

Re: Tamiya 1/72 - A6M2b Zero (Zeke)
Posted: Thu Oct 08, 2015 8:21 pm
by TommyKillander
Homerlovesbeer wrote:
...
Oh yea it was a MISSION! My first model in around 25 years (since a teen) and I have to go and try this
It worked out pretty well considering
My end result.....
Yours is looking really sweet.....
Thanks, mate.
Let's hope it turns out as good as yours, it's looks stunning with the green cammo !

Tommy
Re: Tamiya 1/72 - A6M2b Zero (Zeke)
Posted: Sat Oct 10, 2015 10:53 pm
by TommyKillander
Hey guys,
It's been a busy weekend sofar with lots of research and testing of paints for the Zero.
But first things first; I have coated the "inside" of the canopy with XF-71 and primed the aircraft.


I did a quick test of the Vallejo paints 71.023 Hemp (Upper half) and 71138 US Sand (Lower half) that I bought earlier, but the paints seemed too brown.

After hours of googling and reading forums the most reliable source seemed to be Greg Springer's research and paint mix formula based on color samples from actual Zero relics. This is the formula for the fuselage and wings (control planes have a different lighter tone).
100 drops of XF-2 White
24 drops of XF-3 Yellow
11 drops of XF-1 Black
7 drops of XF-7 Red
The paint volume will barely cover a 1/72 so I made two shots of this brew.

I also did a test of XF-76 (Tamiya suggested color) and a mix of Greg Springers formula with a light green tint (middle).

My choice was the GS-mix for the fuselage and wings. For the controlplanes I will use a lighter colour (different material, textile I think).
So off we go to the spraybooth.....


I also did a post-shade to add some variety to the surface, hope it turns out OK after coating and weathering. I'm happy with the result for now and most of the painting is completed (som details and touchups needed).
Oh, while that paint was drying I put some decals on the propeller


Cheers
Tommy
Re: Tamiya 1/72 - A6M2b Zero (Zeke)
Posted: Fri Oct 16, 2015 7:19 pm
by TommyKillander
Hello!
I've been very busy at work so I haven't done much this week more than put on Aqua Gloss.


To be honest the "Ame-Iro" is a little darker than I thought it should be after I applied the coat - but I'm still happy with it.


I have also glossed up and applied decals to the small parts in the undercarriage.
Next up is the decals of the fuselage and wings. I have also started to plan the dio base and buying some materials for that, but more on that topic after I have finished the aircraft.
Stay tuned
Tommy
Re: Tamiya 1/72 - A6M2b Zero (Zeke)
Posted: Sat Oct 17, 2015 10:21 pm
by TommyKillander
I managed to put on the decals today. That was quite an ordeal to be honest...
Finally I got all those small fragile pieces of crap-quality decals on place (I've started to get spoiled by all those Cartograf sheets)
It required great deal of patience and Micro Sol get the decals to behave... I tried to use Micro Set but the decals just turned into goo, so I skipped that and instead spent more time/effort to align the decals and let them dry before I applied Micro Sol to get them to conform to the surface.
Micro Sol always scares the crap out of me when the decal starts to wrinkle and the Aqua Gloss goes white

...but it's OK everything will soon go back to normal and the decal will hopefully look like it's been painted to the surface

I will post more pictures tomorrow after the decals have set properly and I have put on a coat of Aqua Gloss again.
Cheers
Tommy
Re: Tamiya 1/72 - A6M2b Zero (Zeke)
Posted: Tue Oct 20, 2015 6:33 pm
by patrickroos
Re: Tamiya 1/72 - A6M2b Zero (Zeke)
Posted: Tue Oct 20, 2015 10:09 pm
by TommyKillander
Thanks Patrick!
Tommy
Re: Tamiya 1/72 - A6M2b Zero (Zeke)
Posted: Tue Oct 20, 2015 10:14 pm
by TommyKillander
Ok... I have coated the decals now and prepared it for wash.


I'm thinking of using a oil wash for the panel lines; I have never used that so maybe this is a good time to try them out.
Tommy
Re: Tamiya 1/72 - A6M2b Zero (Zeke)
Posted: Wed Oct 21, 2015 9:31 pm
by TommyKillander
Hey Guys,
It's been a busy week at the bench and the build of the aircraft is almost completed.
I have used a black oilwash for the panellines. It's a mix of artist oil paint and odourless turpentine.


I have also scratchbuilt some "hinges" for the folded wing.
There seem to be some argument about the correct color or the starboard side navigation lights for the Zero; the Tamiya instructions says Green, but some people claim is should be Blue. I think Blue looks cool so I will go for that!


I did some chipping of the engine cowling with a needle dipped in XF-16, a sort of drybrushing that left thin "scratchmarks". The small scale makes it difficult to make chipping that looks correct. I used a mix of Ultimate Light and Dark Dirt for the panel lines.

Everything satin coated and ready for unmasking!

The canopy masking was difficult to get in place, but it was even more difficult to remove
The thin painted lines between the tape squares was so easy to rip.
Using a toothbrush, pliers and a scalpel and lots of patience saved most of the paint, except for two lines that where lost
Since I have no mixed paint left I had to come up with another solution - I used one painted tape square and cut it into thin ribs and used them to mend the canopy - and it worked.


The broken window pane have been fixed. I then used WD40 to clean all glue residue and to give the windows a good shine. The WD40 works almost like Future and removes small scratches and gives the canopy a nice transparency.

Next up is to attach an antenna wire and start with the dio base.
Tommy
Re: Tamiya 1/72 - A6M2b Zero (Zeke)
Posted: Thu Oct 22, 2015 8:05 pm
by TommyKillander
Hey Guys,
I will put the Zero on the shelf until the weekend - I will try to take some good photos of it in good lightconditions. I also need to fit the antenna wire.
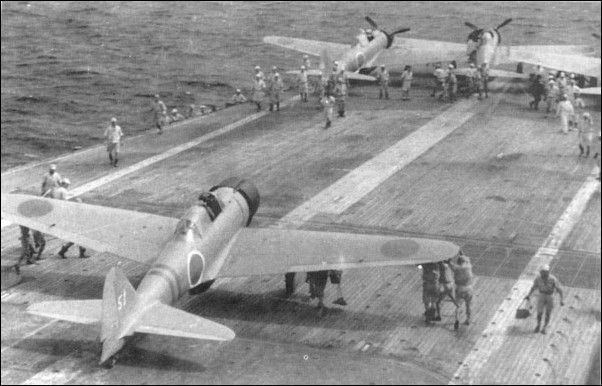
Meanwhile I will start working on the dio base. My plan is to replicate the carrier deck of the IJN Junyo, but there are not many pictures around of that vessel so I will have to make some stuff up as I go, but that is my normal modus operandi


I have an interesting metallic box that I got when I bought a HDMI-cable for my home theatre. My first idea was to reuse the "window" in the middle for the elevator, but the aircraft is too big so It will not work. But I will use it anyway.

The layout of the base will be something like this:

I haven't decided if I should use only the lid or the whole thing...
But I will paint the sides in the light green color of the Junyo hull. I will scratchbuild the tiedowns and the elevator floor.
Right now I'm waiting for some 2x3 mm basswood strips that I just ordered. Orders not confirmed yet so I will continue with the other stuff.
Cheers
Tommy
Re: Tamiya 1/72 - A6M2b Zero (Zeke)
Posted: Thu Oct 22, 2015 10:05 pm
by Timmie
That a really fine looking zero you made.
I'm curious about the base. When it looks as good like the plane you've got yourself a stuning dio.
Grtz Arjan
Re: Tamiya 1/72 - A6M2b Zero (Zeke)
Posted: Fri Oct 23, 2015 6:27 pm
by TommyKillander
Timmie wrote:That a really fine looking zero you made.
I'm curious about the base. When it looks as good like the plane you've got yourself a stuning dio.
Grtz Arjan
Thanks Timmie!
I hope that I can get the dio base to look interesting and fit with the scale of the Zero, I will do my best for sure!
Tommy
Re: Tamiya 1/72 - A6M2b Zero (Zeke)
Posted: Sat Oct 24, 2015 6:48 am
by Aliktren
Fantastic Tommy, love it
Re: Tamiya 1/72 - A6M2b Zero (Zeke)
Posted: Sat Oct 24, 2015 7:30 am
by TommyKillander
Aliktren wrote:Fantastic Tommy, love it
Thanks mate!
Cheers
Tommy
Re: Tamiya 1/72 - A6M2b Zero (Zeke)
Posted: Sun Oct 25, 2015 3:17 pm
by TommyKillander
Hey Guys,
I have done some more research and I have finally decided for a buildup concept and how to go about it.


Pictures are taken 1945 a couple of years before she where scrapped.
So I will try to recreate the long floorboards with the dark lining between them. The deck seems littered with tiedown, but I will only place 6-8 pcs of the on my base - otherwise it will be too busy I think. I will add a faded dashed centerline and the elevator floor will be worn with some stains.
I will use bottom of the metal box with turned upside down and put the deck inside the rim. First I will put a 0.5 mm styrene-sheet as a foundation and make it detachable som it's easy to build the deck. Metal base will be painted separately.

The elevator floor consists of 3 sheets of styrene glued together.


Behold! The first tie-down is completed. I just need to make 8 more to have a couple spares....


The first tie-down is set and I will use that as a reference when I build the wooden deck.

The elevator floor have been intentionally damaged a bit to give it some wear and tear. To do this I used Tamiya Extra Thin to dissolve the styrene and a cocktailstick to make det indentation. I then scraped off the soft plastic and sanded the whole thing in the "travel-direction" of the flight deck..

Cheers
Tommy
Re: Tamiya 1/72 - A6M2b Zero (Zeke)
Posted: Mon Oct 26, 2015 7:53 am
by qeialto

Fantastic work mate!
I did this kit last year, it has been a pleasure, at that time I was without airbrush and even with that I enjoyed it so much and the result was great.
Unfortunately the cleaning lady decided that she didn't like it and destroyed it... Needless to say, she has another job now...
Cheers
Re: Tamiya 1/72 - A6M2b Zero (Zeke)
Posted: Mon Oct 26, 2015 8:55 pm
by TommyKillander
qeialto wrote: Fantastic work mate!
I did this kit last year, it has been a pleasure, at that time I was without airbrush and even with that I enjoyed it so much and the result was great.
Unfortunately the cleaning lady decided that she didn't like it and destroyed it... Needless to say, she has another job now...
Cheers
Thanks mate!
Sorry to hear about your model and the incident with the cleaning lady... That is pretty terrible!
Tommy
Re: Tamiya 1/72 - A6M2b Zero (Zeke)
Posted: Tue Oct 27, 2015 9:02 am
by Goose
Cool job.
congrats
Goose
Re: Tamiya 1/72 - A6M2b Zero (Zeke)
Posted: Tue Oct 27, 2015 5:40 pm
by TommyKillander
Goose wrote:Cool job.
congrats
Goose
Thanks Goose!
Tommy
Re: Tamiya 1/72 - A6M2b Zero (Zeke)
Posted: Sat Oct 31, 2015 12:18 pm
by TommyKillander
Quick update,
I'm expecting the basswood strips to arrive beginning of next week, finally got the order confirmed.
In the meantime I have built the tiedowns I need. I might make some more later, it wasn't so difficult to put them together.

Cheers
Tommy
Re: Tamiya 1/72 - A6M2b Zero (Zeke)
Posted: Sat Oct 31, 2015 1:03 pm
by Coen
Damn!!!!
Zeke looks awesome and that base is really going to look cool.
Wow!!! That's excellent stuff so far.
Re: Tamiya 1/72 - A6M2b Zero (Zeke)
Posted: Sat Oct 31, 2015 10:14 pm
by TommyKillander
Coen wrote:Damn!!!!
Zeke looks awesome and that base is really going to look cool.
Wow!!! That's excellent stuff so far.
Thanks Michael!
Cheers!
Tommy
Re: Tamiya 1/72 - A6M2b Zero (Zeke)
Posted: Mon Nov 02, 2015 8:59 pm
by TommyKillander
Hey guys!
Finally got a wierd shaped package in my mailbox today.... the basswood stripes I have been waiting for

I was a little worried about the color and size of the wood grains, but I think that this will work. It looks much better than the pine and balsawood strips that I tested before.

Please note that the strips have not been sanded yet, they come right out of the saw and are a bit coarse.
Tommy
Re: Tamiya 1/72 - A6M2b Zero (Zeke)
Posted: Sat Nov 07, 2015 8:20 pm
by TommyKillander
Hey guys!
Its time to do some solid wood flooring....
I put the 2x3mm basswood stripes with the 2mm side facing up and uses a 0.25 x 2mm stripe of plasticcard as a spacer between the planks to provide some grooves for the glue and wash. Everything is glued to the base with CA-glue. I first used my expensive Loctite 407 for this, but the wood soaks up quite a lot glue so I switched to some budget CA-glue instead. I know, I'm cheap....

I have not sanded the top of the planks yet, I will do that when the deck is fully assembled.
Tommy
Re: Tamiya 1/72 - A6M2b Zero (Zeke)
Posted: Tue Nov 10, 2015 8:29 am
by Nige201980
Brilliant build mate really looking forward to see the base completed.
Re: Tamiya 1/72 - A6M2b Zero (Zeke)
Posted: Tue Nov 10, 2015 9:32 pm
by TommyKillander
Nige201980 wrote:Brilliant build mate really looking forward to see the base completed.
Thanks Nigel!
The wooden floor is progressing, but it will take a while to get it finished. It's not a boring or tedious job, but it is rather time consuming.
I have never done anything like this before so I have no idea how it will come out in the end.

Cheers!
Tommy
Re: Tamiya 1/72 - A6M2b Zero (Zeke)
Posted: Fri Nov 13, 2015 9:48 pm
by TommyKillander
Hello!
It's been a crazy week at work, but now it's Friday so I managed to do some more on my wooden floor.

I did a quick test of using PVA-glue instead och CA-glue but I didnt have the control of where it went between the grooves and the curing time also made this cumbersome, so I went back to using small drops of CA-glue for each board. It may be slower but I'm in better control of what I'm doing...
But I hope to have all the planks layed out this weekend so I can move on to filling the grooves and do the weathering.
I'm planning of using a mix of cheap PVAC-glue (wood construction glue) with Ultimate Dark Dirt wash between the grooves working the surfaces with a fine grit sanding paper and cotton buds. I will use other washes to add some variety to the surfaces as well.
Tommy
Re: Tamiya 1/72 - A6M2b Zero (Zeke)
Posted: Sat Nov 14, 2015 3:40 am
by Coen
Superb work Tommy.
Wow!!!!!
Re: Tamiya 1/72 - A6M2b Zero (Zeke)
Posted: Sat Nov 14, 2015 8:55 pm
by TommyKillander
Coen wrote:Superb work Tommy.
Wow!!!!!
Thanks, I'm superhappy that you like it too!
I'm soldiering on with the deck, but soon it will be completed. I stopped for the night because it's 9:30pm here and I don't want to fire up the Dremel to drill the holes for tie-downs

I got the tip from a fellow modeller in IPMS Göteborg (he's also active on LSP) that I should double-check the color of the deck after it is sanded, by spraying some water on it to see how much it darkens. I will do that.
His 1/32-scale A6M2 Zero have been an inspiration to me; check out this link and be prepared to pick up your jaw from the floor
(
http://forum.largescaleplanes.com/index ... opic=54999) I know that I will never achieve that myself, but it's great to look at to get your mojo flowing.
Anyway he's an awesome guy that given me pointers in the right direction and he has almost talked me into building a 1/48
I will continue with the deck tomorrow.
Cheers!
Tommy
Re: Tamiya 1/72 - A6M2b Zero (Zeke)
Posted: Sat Nov 14, 2015 10:29 pm
by Coen
You weren't kidding! Wow that's a wonderful build. A lot to aspire to.
I'm sure yours will be fantastic though.
Re: Tamiya 1/72 - A6M2b Zero (Zeke)
Posted: Sun Nov 15, 2015 10:22 pm
by TommyKillander
Coen wrote:You weren't kidding! Wow that's a wonderful build. A lot to aspire to.
I'm sure yours will be fantastic though.
Thanks, sofar I'm happy with the result.
Finally the wooden deck is in place - no more glueing for a while...

Trimmed the sides and sanded the top surface so it is smooth.

Sprayed some water on with the airbrush. I think the color is good as a base for weathering.

Checking how it looks with the aircraft on, of course. Almost s pity to weather it, but it won't work looking like the deck of a yatch

I have built a couple of small deck samples from scrap strips of wood that I will use to experiment with washes.
Tommy


