Page 1 of 1

Dragon 1:35 Panther Ausf. F with kwk42 L/100

Posted: Fri Jan 22, 2016 12:21 pm
by MarkVerploeg
Hi guys
this will be the buiod thread of my Panther with the big 7.5cm L/100 gun
so basicly a barrel that is 100 times longer then the round is wide
so that makes for a gun of 7.5 meters in real life
wich is rather big

So this is the kit i will be building
Image
it is a release from 2014 or 2015
but i think it uses a lot of old parts and the tried and tested Panther G hull

Image
i have the Aber pe set for the Panther F and the ET models anti aircraft protection plates set for it aswell

Image
and the night vision set i had left from a earlier Panther build
it has 2 sets in there and i only used 1

I build the styrene part so far and then i will go on with all the pe
so here is the progres so far
Image
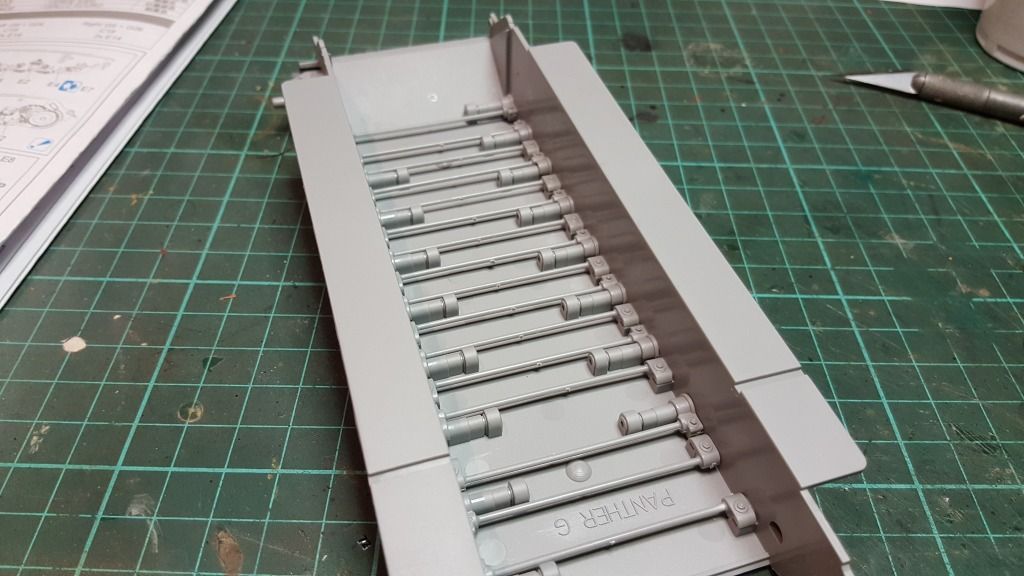
the standard Dragon Panther G hull with the torsion bars in there
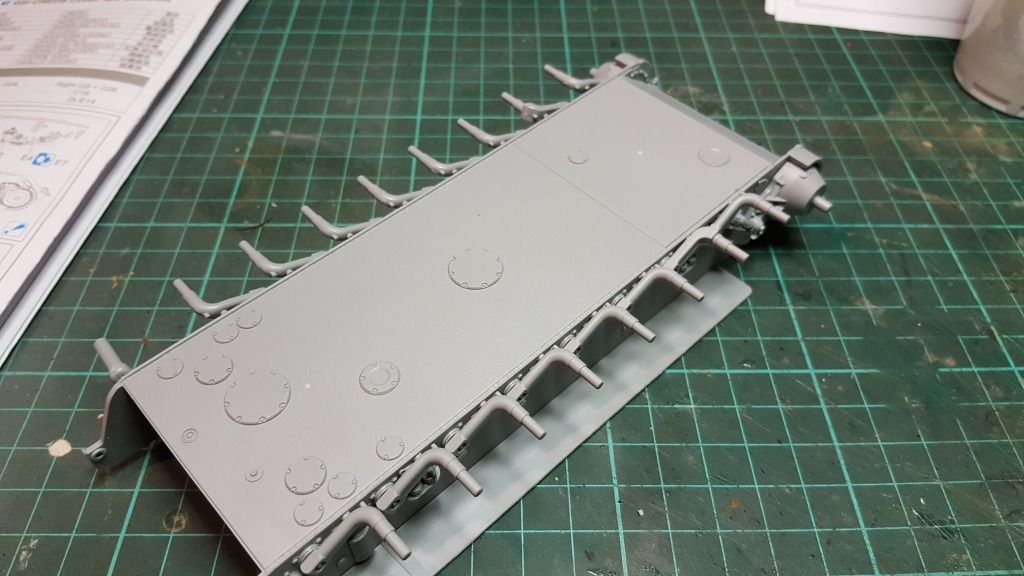
Image
the swing arms where next

Image
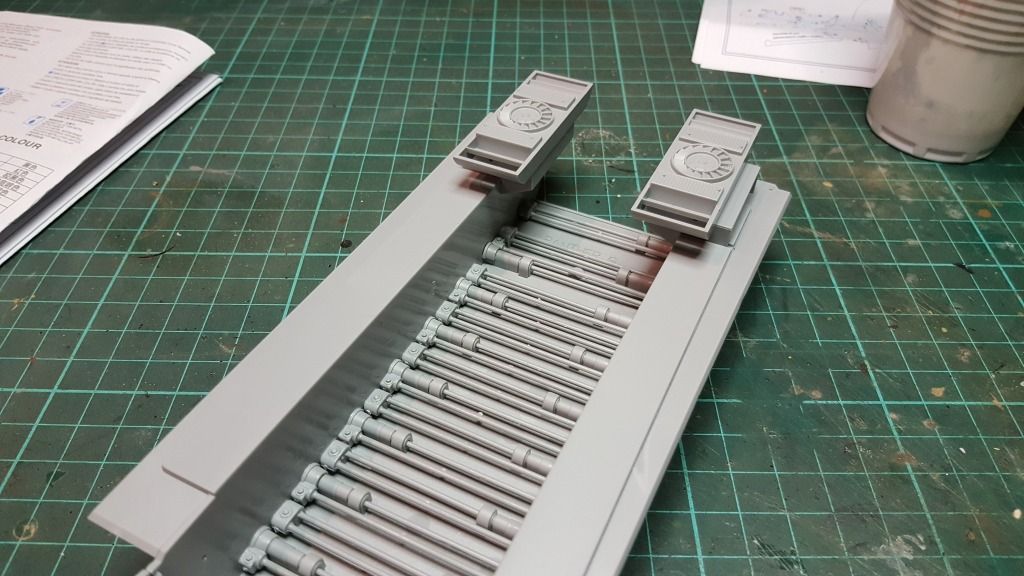
the radiator units where added

Image
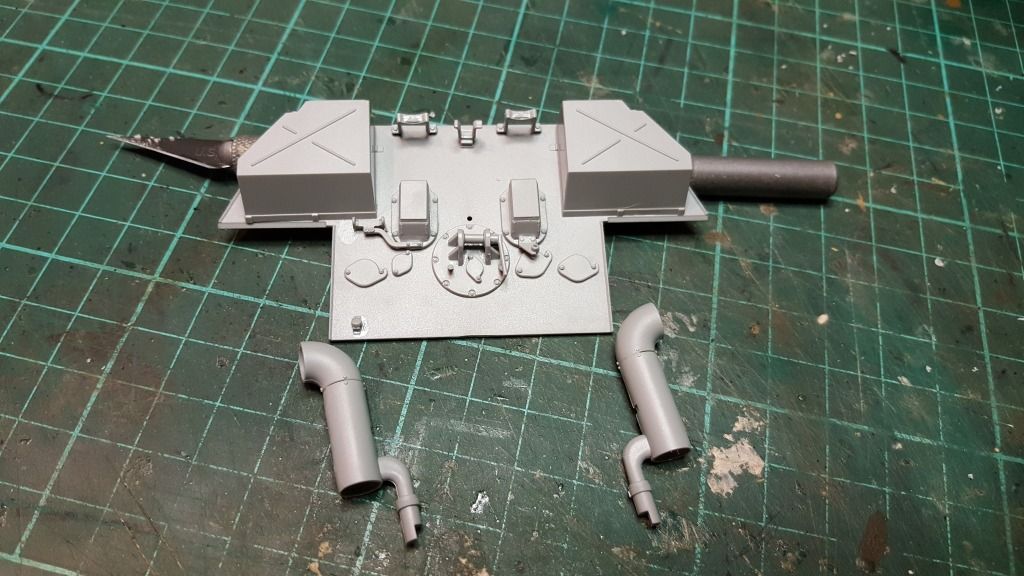
because i want to do some heavy rusting and chipping on the exhausts they will be painted seperate to save me a lot of masking
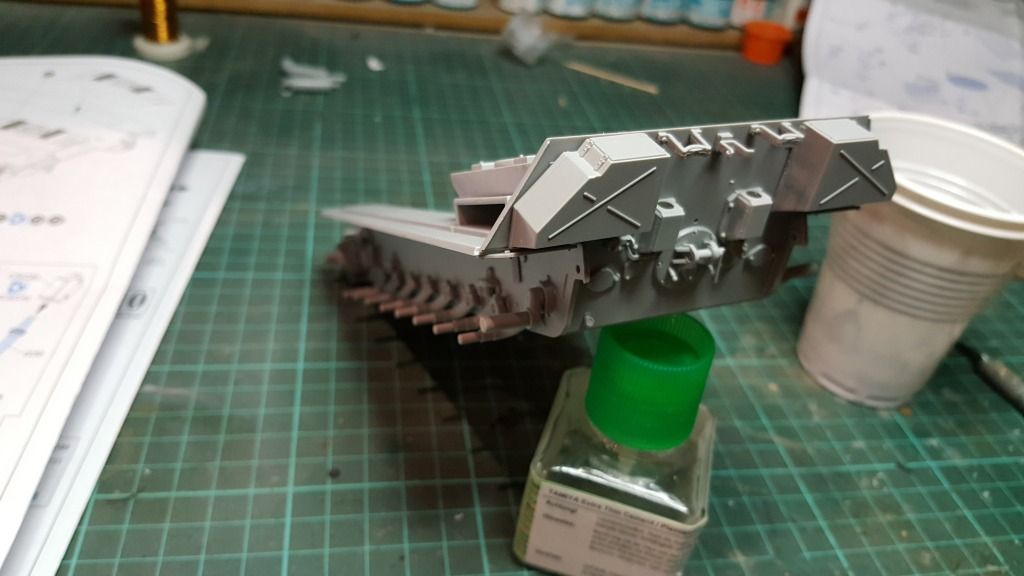
Image
the back plate was put in place

Image
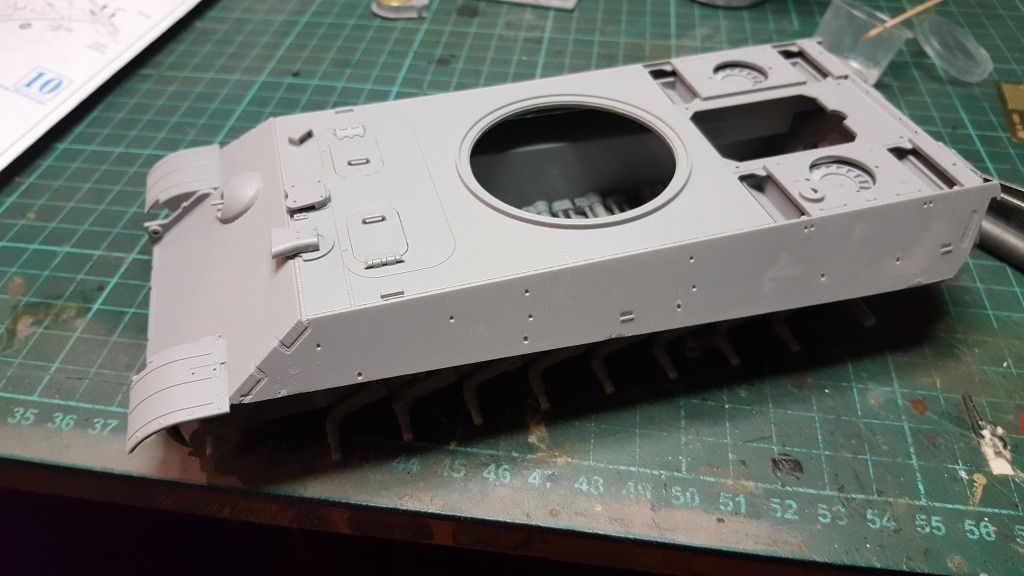
the hatches for the front where added and the upper hull was glued on the lower hull
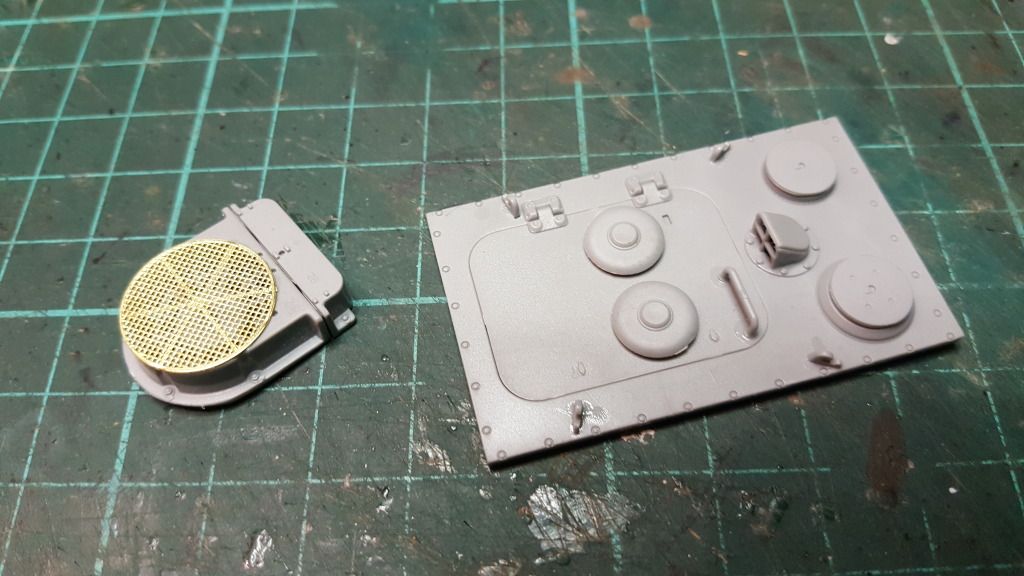
Image
the raised fan and engine cover where build up
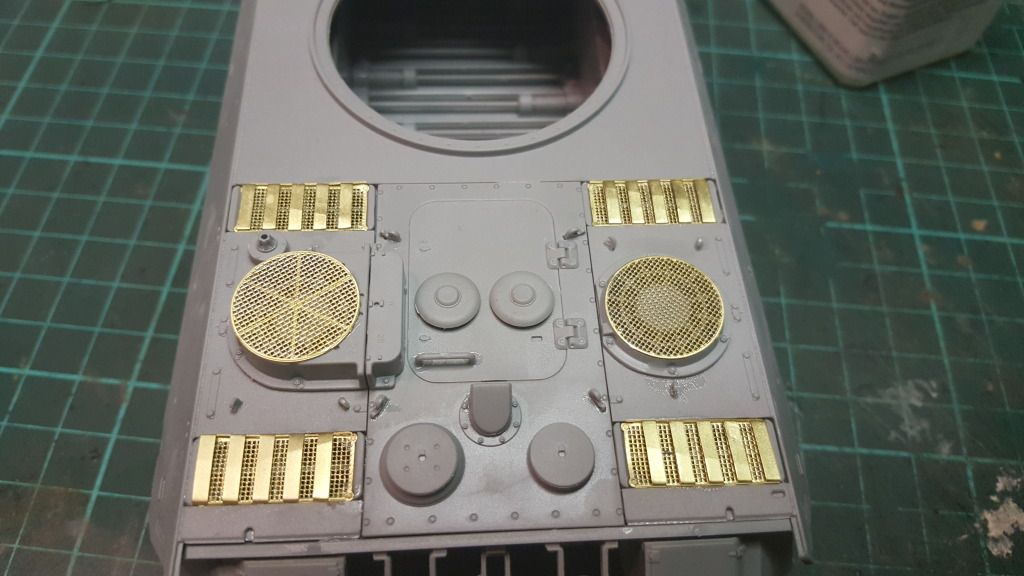
Image
the mesh screens on the engine deck where placed
i used the Aber pe for this
Image
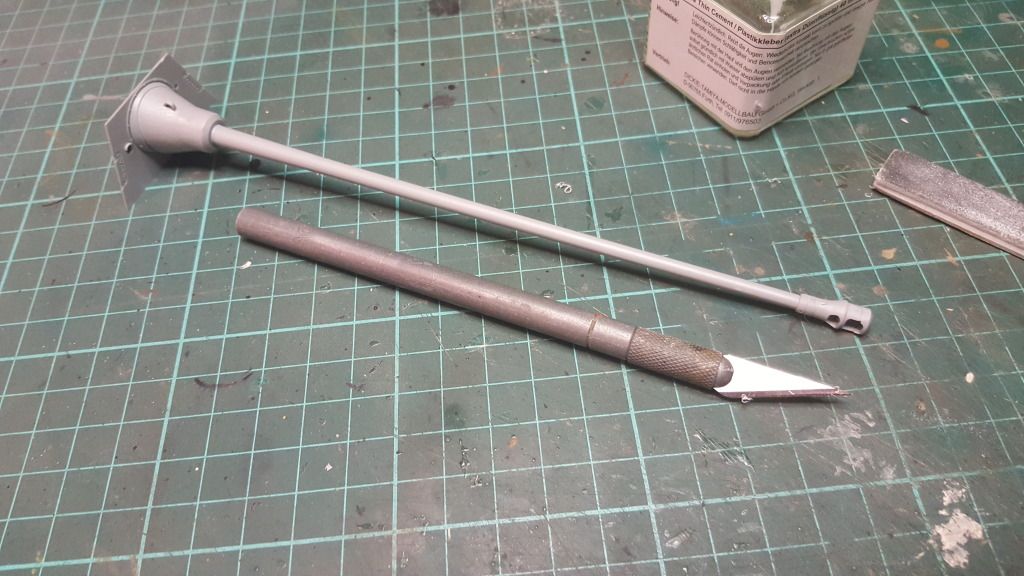
the main gun was build
as you can see it has a pretty long barrel as it is longer then my hobby knife
but i feel it is a shame there is no interior part for the gun
Image
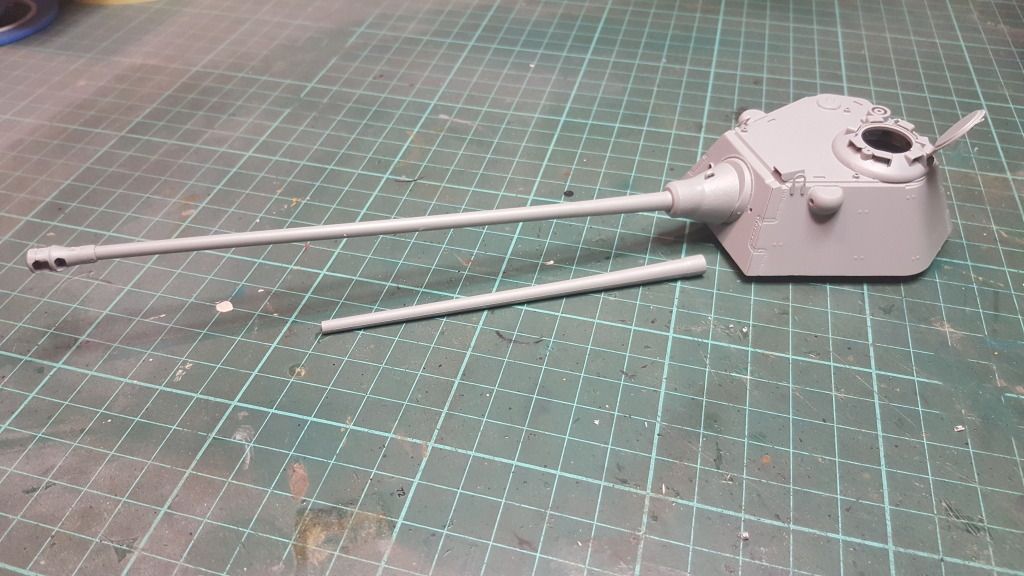
the turret was build
i placed the 8.8cm gunbarrel next to it
that is the gun you see in most Panther F and Panther II kits

Image
another comparrison of the gun
to my knowledge the King Tiger had the longest tank gun of all German tanks
this Panther gun is about 2.5 to 3 cm longer so that would build up to a meter in real life

Image
the build up turret and hull

Image
And the tank as it looks now
i will do the wheels later
but for now i will work on the photo etch that will cover large parts of the tank as there are front and side fenders in there aswell as all the stuff for the tools and several other small bits and pieces that will go on the tank
and then there are the armor plates that i can add aswell
i haven't made up my mind about the tracks yet but i am thinking about taking the friul tracks of a old Coelian i have and put them on this kit

So that is all i have for now
thanks for stopping by and having a look
Cheers Mark

Re: Dragon 1:35 Panther Ausf. F with kwk42 L/100

Posted: Fri Jan 22, 2016 3:08 pm
by RonBurgundy
Great looking build, Mark. Keep up the good work. Great looking version of the Panther too, kinda of an oddball. I have one in my stash, but the DS tracks which came with it were completely crushed. What version of the tracks will you use, late or early? I'm asking as I saw both of the types being used on prototypes in real life and I cant make up my mind which one to use for my kit haha
Keep up the good work, I'll follow your build with great interest :)

Re: Dragon 1:35 Panther Ausf. F with kwk42 L/100

Posted: Fri Jan 22, 2016 4:05 pm
by Smiffy
Great looking work so far, that's one long barrel kind of looks comically long on the box art. I never knew the Germans had night vision in WW2 - you learn something new every day :)

Re: Dragon 1:35 Panther Ausf. F with kwk42 L/100

Posted: Fri Jan 22, 2016 5:09 pm
by MarkVerploeg
It is a bit weird looking with that gun
like they used a big sewer pipe and put it on a tank
they actually used night vision in the late part of the war
it was not very good and needed help from big IR lights as the system only provided a small light with limited range of about 30 meters
they used it in 1 unit wich attacked a Soviet unit at night from longer range
the Soviets reported that it must have been a large unit as they had no chance at all
in fact it was just a single platoon with Panther tanks
mostly Ausf.G

Re: Dragon 1:35 Panther Ausf. F with kwk42 L/100

Posted: Sat Jan 23, 2016 7:09 am
by Sturm
That's an oversized gun.

Re: Dragon 1:35 Panther Ausf. F with kwk42 L/100

Posted: Sat Jan 23, 2016 8:28 am
by MarkVerploeg
Sturm wrote:That's an oversized gun.
Just a little bit :mrgreen:
i think it would have some serious problems if they tried to use something like this
the barrel would bounce up and down after a shot as there is no.support for it
it would also prove to be hard to move around in a urban setting and a forrest as the barrel would hit everything
but as far as i know this version only excisted on paper and was a attempt to give the long 7.5 cm rounds a bit more punch at long range as the round would have a really high muzzle velocity
and the L/70 barrel (excisting version) was already considered a high velocity gun

Re: Dragon 1:35 Panther Ausf. F with kwk42 L/100

Posted: Mon Feb 01, 2016 3:07 pm
by Noobmodeler521
Looks great so far!
Does the 8.8 gun come with it, I'm iterested in the kit but want an 88 for it.

Re: Dragon 1:35 Panther Ausf. F with kwk42 L/100

Posted: Mon Feb 01, 2016 4:32 pm
by MarkVerploeg
Yes there is a 88 barrel in the kit
it is next to the turret in one of the pictures
i don't know if it will fit in the mantlet though ,well not sure anyway
but they looked to be the same size on the end that goes in the mantlet so it may fit or can be made to fit without much trouble
you could look for the Panther II kit aswell
it is a cyber hobby rebox of the older model but that is made with the 88 as the only option
the quality of this kit should be better though

Re: Dragon 1:35 Panther Ausf. F with kwk42 L/100

Posted: Sat Feb 13, 2016 11:15 am
by Tandrade
Looking very Nice!

Re: Dragon 1:35 Panther Ausf. F with kwk42 L/100

Posted: Sat Feb 13, 2016 11:32 am
by MarkVerploeg
Thank you
i started workung on it today so hopefully i have a update soon but it depends on the PE and how fast i can do all that
there are some small bits that i need to fix like the commanders hatch as i used the wrong one

Re: Dragon 1:35 Panther Ausf. F with kwk42 L/100

Posted: Sat May 14, 2016 2:57 pm
by MarkVerploeg
Hi guys
So very long after i actually started it and posted the first update i decided to continue with this build
I lost 1 of the frets with the PE armor plating
And it took me some time to order a new one

But i received a new set of armor plating last week and picked this kit up from the shelf of doom
So here is the latest progres

Image
I started with the construction of the armor plating for the turret roof

Image
The next step was the build up of the armorplating for the grills of the engine deck

Image
A overall look of the PE work

Image
I then constructed the IR device with the MG42
Because the cupola doesn't come with a ring for a MG mount i decided to mount the gun and IR straight on the armor plating

Image
I then placed all tools and other stuff on the sides
Originally i had the covers on the grills
But to place the armor plating i had to remove those covers

Image
After the tools i made some towcables
It seems i tossed the kit cables in the bin as i couldn't find them anywhere
I also added the wading cap for the ball mount in the hull

And this is how it looks all build up
Except the wheels that is but all the parts for the hull and turret are in their places
Image
Image
Image


And that is all i have for now
I placed all the parts on some sticks and it is ready for priming
But i am going to work on some other builds first and then i can have multiple builds to prime all at once
That will save some time with cleaning the airbrush later on

Thanks for stopping by and having a look
Cheers , Mark

Re: Dragon 1:35 Panther Ausf. F with kwk42 L/100

Posted: Sat May 14, 2016 3:26 pm
by Naedrux
That looks really good! Compared to my Panther G (also made by Dragon), this looks like a science-fiction tank with that long barrel and fancy IR sight. I'm looking forward to see what this will look like once it's been painted!

Re: Dragon 1:35 Panther Ausf. F with kwk42 L/100

Posted: Sat May 14, 2016 4:45 pm
by MarkVerploeg
Thanks
The gun and turret are really the only what if parts
There was only a idea to make the L/100
Wich would have been a useless gun as the barrel alone would be 7.5 meters long
And the smallturm or narrow turret was veing developed but not produced
The armor panels and IR device where allready in use allthough both where rare items
The painting will be a change of pace for me
This entire idea came from looking at paper panzer models from well known modellers
They often add parts that don't go with the rest of the paint
So a small rusty cover or a hull red part will be something i want to do
The overall camoscheme will be reseda green with stripes of red brown and dark yellow
But the late war style dark yellow that is known as DG III wich was actually a very light and pale color

Re: Dragon 1:35 Panther Ausf. F with kwk42 L/100

Posted: Sat May 14, 2016 4:50 pm
by Tiger213
Sp
lendid details! I like it ;)

Re: Dragon 1:35 Panther Ausf. F with kwk42 L/100

Posted: Sat May 14, 2016 11:55 pm
by MarkVerploeg
Thanks Tiger
I could have done more as i did have a PE set but i didn't like it
Many parts required a lot of cleaning and barely make a difference
So i just used a lot of kit parts instead

Re: Dragon 1:35 Panther Ausf. F with kwk42 L/100

Posted: Sun May 15, 2016 6:38 am
by gustavlekstal
She is gonna look sick with the late war color scheme. Very good building skills as always Mark. Good luck with the prime.

Re: Dragon 1:35 Panther Ausf. F with kwk42 L/100

Posted: Sun May 15, 2016 7:53 am
by MarkVerploeg
Thank you very much Gustav
I don't expect any problems with the priming
I use the Gunze mr metal primer on PE these days and that really helps with the priming
The regular primer has a lot of grip on that stuff and you can prime and paint it just like styrene
It certainly stops regular primers fron clogging up grills or forming small drops on the PE
One of the best buys i made this year

Re: Dragon 1:35 Panther Ausf. F with kwk42 L/100

Posted: Sun May 15, 2016 10:19 am
by InitialProduction1
Very good looking build MarkVerploep, your going all out with the photo etch,

Re: Dragon 1:35 Panther Ausf. F with kwk42 L/100

Posted: Sun May 15, 2016 10:23 am
by privatepete
Hi Mark great build, the last thing I want is to be picky on anyone's build, the Panther had a short 3rd cable for changing tracks which no one seem to fit also you probably known that German cables had a left hand twist to them I have known idea why they where different to the allied forces. :cheers2:

Re: Dragon 1:35 Panther Ausf. F with kwk42 L/100

Posted: Sun May 15, 2016 12:00 pm
by MarkVerploeg
privatepete wrote:Hi Mark great build, the last thing I want is to be picky on anyone's build, the Panther had a short 3rd cable for changing tracks which no one seem to fit also you probably known that German cables had a left hand twist to them I have known idea why they where different to the allied forces. :cheers2:
I know about the small cable
I just didn't make a small 3rd cable
The 2 big ones are enough for me
They needed a second vehicle to use it most of the times and those where often from the recovery department and they have enough cables and stuff like that
As for the twist of the cable , you thought me something new
I never noticed it before and the ones that are on there are home made so i just twisted them the fast way by using a electric drill wich only turns one way
InitialProduction1 wrote:Very good looking build MarkVerploep, your going all out with the photo etch,
It is not that much really
The parts are big so it looks like it is much but i barely used any parts from the pe set i had
I have a buildthread on here somewhere for a Marder III and that build has a lot of PE
I estimate that the complete build will be 60% metal if i include the tracks
It is a shelf queen though but i hope to get back to it soon

Re: Dragon 1:35 Panther Ausf. F with kwk42 L/100

Posted: Wed Jun 15, 2016 10:40 am
by MarkVerploeg
Hi guys
So it is time to get this build up to date
At the moment this Panther is painted and ready for a gloss coat
And that means i am getting closer to finishing this build

So here is the work so far
Image
I kind of missed a few photo oppertunities
But my work order is pretty simple
I started out with some mr metal primer on all the metal parts
This helps a regular primer and paints to stick to metal en pe
After thatvi used the grey Ultimate primer for the first time
And i like it
It went down very smooth and forms a excellent base for the paint
After that i did a experiment with the black and white method
And SPOILER ALERT , it didn't work
It looks okay now but it is too light so the effect will dissapear under the paint because the colors covered it too much

Image
As you can see here
The green is H422 from the Aqueous range
This is a pretty close match to the lighter reseda green that the germans started to use at the end of the war
I may have used a bit too much but the fact that the base was so light means the black and white effect is lost

Image
The second color is a bit hard to see at the moment
It is a DG III or Dunkel gelb (dark yellow) type 3
This is actually a light yellow
And i mix that with H403 dark yellow and H11 flat white in about equall parts but if i think it is too dark i just add some white to the mix

Image
The 3rd color is Tamiya red brown wich was slightly brightened with some Buff color
Straight from the bottle it would be too dark comparred to the 2 other colors

Image
Image
After the the base colors i dtarted the detail painting
The base color for the wood is a 4 to 1 mix of vallejo English uniform and white
On the tools i then aplied vallejo smoke
I used a moderate amount of paint and drag that over the entire lenght of the handle
This leaves this woodgrain effect and it looks a lot like the laquered wood you would see on the real tools
This also works great on infantry rifles and other weapons that have wooden parts
The metal parts where brushpainted with mr metal color stainless steel
Allthough i did forget the jack block
That won't get the layer of smoke though as those blocks wheren't treated with anything and where just clean wooden blocks held together with metal straps
A brown wash will make it look better later on

Image
To add some intrest to the wheels i decided that i wouldn't paint all the wheels green like in the instructions
I have 1 primer red wheel and 2 regular dark yellow wheels
The rest is green
The tyres where first painted black and then dry brushed with dark rubber
Both are vallejo paints but the dark rubber can be found in the Panzer aces range instead of the modelcolor range

Image
The sprockets and idlers where also painted with the mr.metal color stainless steel

Image
On the engine deck i removed 1 of the small covers or lids and painted that in rust colors
Then i placed it again and glued all the armor plating in place
Again to add some intrest i painted 1 in oxide/primer red

Image
The roof plating was also added and the inside of the cupola hatch was painted with vallejo leather brown
I will use some oil paints later on to make it look more like a leather part

Image
Image
Image
Image
And this is the Panther after painting
According to the instructions this version doesn't need any decals
But because i want to make it look like a tank that was in service i will add some crosses and turret numbers
It would be a 1946 tank as both the rurret en the huge gun where still being developed but that is the fun of building a "what if" i guess
I have all the freedom i want as there was no real vehicle like this anyway

And here is a picture to show how rediculous the gun is
Image
That is a 1/35 STuG III Ausf G next to the turret
The STuG is about 5mm longer then the Panthers barrel
If you think about the fact tjat there would be a breach at the back of that barrel it would mean this gun is bigger then a full sized armored assault gun
The gun barrel alone would messure 7.5 meters wich is about the same as the lenght of a Panthers hull and the only other guns that where and still are that long are found on artillary guns

Next i will go and hunt down a donor tank from my tubs of doom a
That has some friul tracks on it that i want to use on this tank
And i will give it a gloss coat to get it ready for some decals and then the weathering

Thanks for stopping by and having a look
Untill next time
Cheers
Mark

Re: Dragon 1:35 Panther Ausf. F with kwk42 L/100

Posted: Wed Jun 15, 2016 12:47 pm
by Madmattmodels89
Wow I wish I could lay paint that smooth. It looks amazing mate

Re: Dragon 1:35 Panther Ausf. F with kwk42 L/100

Posted: Wed Jun 15, 2016 1:34 pm
by MarkVerploeg
Thank you
It took me a lot of trial and error though
I have a lot of models with a lesser quality paintjob
I used to spray the paint too thick or in other words i didn't thin it enough
And these days i often remove the needle cover fron the airbrush
Just to prevent any splattering
Just keep in mind to put it back before you start cleaning so the needle can't bump into anything and bend

Re: Dragon 1:35 Panther Ausf. F with kwk42 L/100

Posted: Thu Jun 16, 2016 9:04 am
by mick
great camo work

Re: Dragon 1:35 Panther Ausf. F with kwk42 L/100

Posted: Thu Jun 16, 2016 10:34 am
by MarkVerploeg
Thank you very much Mick

Re: Dragon 1:35 Panther Ausf. F with kwk42 L/100

Posted: Mon Jun 20, 2016 7:14 pm
by Stands24
Lol the L/100 gun always seemed a bit silly to me, even if it was just theoretical. I saw the kit and decided against it since I had already bought a Panther II. It's good to see it is a lovely kit still. :D Good job!

Re: Dragon 1:35 Panther Ausf. F with kwk42 L/100

Posted: Mon Jun 20, 2016 10:44 pm
by MarkVerploeg
Thank you
The kit isn't one of my favorites though
The hull is good as they used the tried and tested Ausf G hull wich is very good
But the turret was a bit dissapointing
There is no interior what so ever
Not even for the gun and Dragon has a sprue for the KWK 42
The Panther II is a bit different though
It has the same turret but the hull and mainly the suspension is different
As are the tracks
Those would be the same as the narrow transport tracks of the King Tiger (the final models all had those as standard tracks)
But i have a Panther II in the stash but that is the old orange box from cyber hobby
The gun would be pretty useless
It is very thin and long wich means that after a shot it starts to bounce and move
And because it is so thin that would take some time before it stopped doing that
But for a what if build it is a nice kit

Re: Dragon 1:35 Panther Ausf. F with kwk42 L/100

Posted: Tue Jun 21, 2016 2:05 am
by InitialProduction1
That build looks amazing MarkVerploeg, and the camo job it's awesome.

Re: Dragon 1:35 Panther Ausf. F with kwk42 L/100

Posted: Tue Jun 21, 2016 2:16 am
by MarkVerploeg
Thank you vwry much
The camo came out better then i expected and i am happy with it
I was a bit bummed that the black and white didn't work but atleast i know why
It was too light so the effect was simply covered by the camo colors
The only place i can still see it is beneath the sponsons just above the swingarms of the suspension
But that will be hidden by the wheels once they are on the tank
I hope to finish it soon
At the moment the second gloss coat is drying
Allthough it is a completely unmarked vehicle i always apply 2 layers of aqua gloss
So tomorrow i hope to start with the wash and the streaking effects
Once those are done and dry i will add a coat of flat varnish and do some oilpaint rendering for a little bit of fading
And with a little bit of luck i can finish it by the end of this week or the beginning of next week
It will depend on how busy i will be at work and on my days off
But my goal is to have this and some other builds done by the end of the month so i can have a clean or atleast nearly clean bench for the floaty things sig

Re: Dragon 1:35 Panther Ausf. F with kwk42 L/100

Posted: Tue Jun 21, 2016 9:08 am
by Aliktren
Very nice mark, loving the tricolour wheels :)

Re: Dragon 1:35 Panther Ausf. F with kwk42 L/100

Posted: Tue Jun 21, 2016 9:49 am
by MarkVerploeg
Thanks
I thought that only green wheels would be a bit boring
But in the end you won't see that much of the red and 1 of the yellow wheels as those are the middle ones
Allthough it would still add some intrest

Re: Dragon 1:35 Panther Ausf. F with kwk42 L/100

Posted: Wed Jun 29, 2016 7:46 pm
by MarkVerploeg
Hi guys
So today i finished this build (and a STuG III but i didn't post a thread for that one)
That means it is time for a final update and a spot in the land gallery after i finish this update

So here are the final steps of this build
Image
After the painting and detail painting i added the chipping
As usuall i used german camo black brown for this

Image
Once that was done i applied a coat of aqua gloss
That was left to dry overnight
Once that was dry i added the wash wich is AK wash for dark yellow vehicles ,that is a dark brown wash
And then the streaking effects
Again a AK product ,it js the streaking effects for dark yellow vehicles and it is just about the same color as the wash but it is thicker then a wash wich allows you to make these streaks with more ease comparred to using a very thin wash

Image
Image
There are a couple of rust colored streaks aswell but those look very much the same as the other ones as they are only a little bit lighter in color

Image
I then added a rust wash from Mig prod. to the cables and i added some bare metal effects on some edges

Image
And some oilstains for the engine deck
There is one coming out from under the turret aswell
It often happened that the turret bearing would leak some oil or grease due to the weight of the turret and if it was turned a lot in a short amount of time the grease and oil would leak out because they expand from the heat
But it mainly is just a little touch you can add to get some more little details on your tank

Image
I also added some rust wash around some bolts and nuts on the tank
This photo was taken just before i cleaned of the excess rust wash
I only want it around the bolts and not on the bolts as that creates a bit too much rust effects

Image
Then i added some pigments
I only did half of the surface because the rest will be hidden by the wheels
I use AK's dust effects as a binder or fixer
Even if i do miss a spot the dust effects still add a dusty look to that area
Something you don't get with ordinary pigment fixers

Image
Then the wheels where added

Image
And the tracks where placed
They are Friul tracks that i have taken from a old model that was in a storage box
Since they wheren't on display i figured i could use these tracks on this tank instead of buying new ones
I also added some pigment dust to the flat surfaces of the tracks ,wheels and tank itself
But not that much because i didn't want a very dusty tank this time
I also added some black pigments around the edges of the muzzlebrake to get some soot from the fired rounds

Image
And then i called it finished
The full set of reveal photo's will be put in a seperate thread in the land gallery

Thanks for stopping by and having a look
Untill next time and happy modelling
Cheers
Mark

Re: Dragon 1:35 Panther Ausf. F with kwk42 L/100

Posted: Thu Jun 30, 2016 5:56 pm
by Noobmodeler521
:jd: :jd: Looks Great... now that I have my Panther F. I will most definitely take notes.

Re: Dragon 1:35 Panther Ausf. F with kwk42 L/100

Posted: Thu Jun 30, 2016 8:17 pm
by MarkVerploeg
Thank you
Feel free to use it as reference

Re: Dragon 1:35 Panther Ausf. F with kwk42 L/100

Posted: Tue Jul 05, 2016 7:33 pm
by privatepete
Hi Mark brilliant work again ,I'm catching up build's been away for the bench for a while, you can't go wrong with a Panther in my book :cheers2:

Re: Dragon 1:35 Panther Ausf. F with kwk42 L/100

Posted: Tue Jul 05, 2016 11:11 pm
by MarkVerploeg
Thank you very much Pete
There still are some things that i can improve on it
Like the tracks ,i forgot to sand the part that touches the ground
But other then that i think i am happy with it

Re: Dragon 1:35 Panther Ausf. F with kwk42 L/100

Posted: Wed Jul 06, 2016 9:28 pm
by OneSmallStep1966
I think I complimented this on FB, but I'll say it here too, brilliant build and brilliant paintwork, well done :bow::

Re: Dragon 1:35 Panther Ausf. F with kwk42 L/100

Posted: Wed Jul 06, 2016 11:41 pm
by MarkVerploeg
Thank you very much
I'm glad you like it