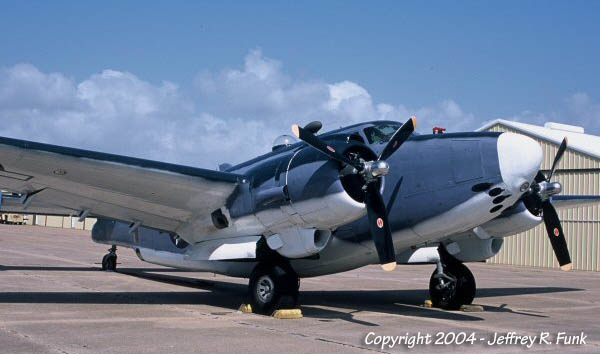
MARTINS PV-1 VENTURA
Posted: Fri May 06, 2016 8:53 pm
Right hi all ,this is what i will be having a go at for this G B had a look at my stash and was not sure what to build , but this kept catching my eye,
so it had to be done .its a big box and its 1/48 scale .


so, looking forward to this,i think it will look nice when its done .
a bit of history .
PV-1 Ventura[edit]
A PV-1 Ventura
The PV-1 Ventura, built by the Vega Aircraft Company division of Lockheed (hence the "V" Navy manufacturer's letter that later replaced the "O" for Lockheed), was a version of the Ventura built for the U.S. Navy (see Venturas in U.S. Navy service below). The main differences between the PV-1 and the B-34 were the inclusion of special equipment in the PV-1, adapting it to its patrol bombing role. The maximum fuel capacity of the PV-1 was increased from 1,345 gal (5,081 l) to 1,607 gal (6,082 l), to increase its range; the forward defensive armament was also reduced for this reason. The most important addition was of an ASD-1 search radar.
Early production PV-1s still carried a bombardier's station behind the nose radome, with four side windows and a flat bomb-aiming panel underneath the nose. Late production PV-1s dispensed with this bombardier position and replaced it with a pack with three 0.50 in (12.7 mm) machine guns underneath the nose. These aircraft could also carry eight 5 in (127 mm) HVAR rockets on launchers underneath the wings.
The PV-1 began to be delivered in December 1942, and entered service in February 1943. The first squadron in combat was VP-135, deployed in the Aleutian Islands in April 1943. They were operated by three other squadrons in this theatre. From the Aleutians, they flew strikes against bases in Paramushiro and Shimushu, Japanese islands in the Kurile chain. Often, PV-1s would lead B-24 bomber formations, since they were equipped with radar. In late 1943, some PV-1s were deployed to the Solomon Islands as night fighters with VMF(N)-531, a Marine Corps fighter squadron.
United States Navy[edit]
PV-1s of VPB-147 in the Caribbean in 1944.
PV-2s of VPB-136 at NAS Whidbey Island, 1945-46.
Long range aircraft at Hawkins Field on Betio (Tarawa Atoll) March 1944.
During the early months of 1942, the primary responsibility for anti-submarine warfare in the United States was shouldered by the Army Air Forces. This irked the Navy, as it considered this region of battle its burden. To carry out such a task, the Navy was pursuing a long-range, land-based patrol and reconnaissance aircraft with a substantial bombload. This goal was always resisted by the Army Air Forces, which carefully protected its monopoly on land-based bombing. This forced the navy to use long-range floatplanes for these roles. The Navy was unable to upgrade to more capable aircraft until the Army Air Forces needed the Navy plant in Renton, Washington to manufacture its Boeing B-29 Superfortress. In exchange for use of the Renton plant, the Army Air Forces would discontinue its objections to Naval land-based bombers, and provide aircraft to the Navy. One of the clauses of this agreement stated that production of the B-34 and B-37 by Lockheed would cease, and instead these resources would be directed at building a navalized version, the PV-1 Ventura.
The PV-1 began to be delivered in December 1942, and entered service in February 1943. The first squadron in combat was VP-135, deployed in the Aleutian Islands in April 1943. They were operated by three other squadrons in this theatre. From the Aleutians, they flew strikes against Paramushiro, a Japanese island. Often, PV-1s would lead B-24 bomber formations, since they were equipped with radar. In late 1943, PV-1s were deployed to the Solomon Islands and to the newly captured field at Tarawa in the Gilbert Islands.
After the war, the U.S. Navy deemed many PV-1s as obsolete and the aircraft were sent to Naval Air Station Clinton, Oklahoma to be demilitarized and reduced to scrap.
well that is all for the start of this build thread see you soon
so it had to be done .its a big box and its 1/48 scale .


so, looking forward to this,i think it will look nice when its done .
a bit of history .
PV-1 Ventura[edit]
A PV-1 Ventura
The PV-1 Ventura, built by the Vega Aircraft Company division of Lockheed (hence the "V" Navy manufacturer's letter that later replaced the "O" for Lockheed), was a version of the Ventura built for the U.S. Navy (see Venturas in U.S. Navy service below). The main differences between the PV-1 and the B-34 were the inclusion of special equipment in the PV-1, adapting it to its patrol bombing role. The maximum fuel capacity of the PV-1 was increased from 1,345 gal (5,081 l) to 1,607 gal (6,082 l), to increase its range; the forward defensive armament was also reduced for this reason. The most important addition was of an ASD-1 search radar.
Early production PV-1s still carried a bombardier's station behind the nose radome, with four side windows and a flat bomb-aiming panel underneath the nose. Late production PV-1s dispensed with this bombardier position and replaced it with a pack with three 0.50 in (12.7 mm) machine guns underneath the nose. These aircraft could also carry eight 5 in (127 mm) HVAR rockets on launchers underneath the wings.
The PV-1 began to be delivered in December 1942, and entered service in February 1943. The first squadron in combat was VP-135, deployed in the Aleutian Islands in April 1943. They were operated by three other squadrons in this theatre. From the Aleutians, they flew strikes against bases in Paramushiro and Shimushu, Japanese islands in the Kurile chain. Often, PV-1s would lead B-24 bomber formations, since they were equipped with radar. In late 1943, some PV-1s were deployed to the Solomon Islands as night fighters with VMF(N)-531, a Marine Corps fighter squadron.
United States Navy[edit]
PV-1s of VPB-147 in the Caribbean in 1944.
PV-2s of VPB-136 at NAS Whidbey Island, 1945-46.
Long range aircraft at Hawkins Field on Betio (Tarawa Atoll) March 1944.
During the early months of 1942, the primary responsibility for anti-submarine warfare in the United States was shouldered by the Army Air Forces. This irked the Navy, as it considered this region of battle its burden. To carry out such a task, the Navy was pursuing a long-range, land-based patrol and reconnaissance aircraft with a substantial bombload. This goal was always resisted by the Army Air Forces, which carefully protected its monopoly on land-based bombing. This forced the navy to use long-range floatplanes for these roles. The Navy was unable to upgrade to more capable aircraft until the Army Air Forces needed the Navy plant in Renton, Washington to manufacture its Boeing B-29 Superfortress. In exchange for use of the Renton plant, the Army Air Forces would discontinue its objections to Naval land-based bombers, and provide aircraft to the Navy. One of the clauses of this agreement stated that production of the B-34 and B-37 by Lockheed would cease, and instead these resources would be directed at building a navalized version, the PV-1 Ventura.
The PV-1 began to be delivered in December 1942, and entered service in February 1943. The first squadron in combat was VP-135, deployed in the Aleutian Islands in April 1943. They were operated by three other squadrons in this theatre. From the Aleutians, they flew strikes against Paramushiro, a Japanese island. Often, PV-1s would lead B-24 bomber formations, since they were equipped with radar. In late 1943, PV-1s were deployed to the Solomon Islands and to the newly captured field at Tarawa in the Gilbert Islands.
After the war, the U.S. Navy deemed many PV-1s as obsolete and the aircraft were sent to Naval Air Station Clinton, Oklahoma to be demilitarized and reduced to scrap.
well that is all for the start of this build thread see you soon