Page 1 of 2
Tamiya F-14A Tomcat
Posted: Thu Sep 07, 2017 10:49 am
by bfrd
Re: Tamiya F-14A Tomcat
Posted: Fri Sep 08, 2017 9:35 am
by Tomcat64
This is one I have in the stash piles so will be watching with interest to see how it all comes together

Re: Tamiya F-14A Tomcat
Posted: Fri Sep 08, 2017 5:58 pm
by aur0ra145
Tomcat builds a Tomcat, I like it!
Re: Tamiya F-14A Tomcat
Posted: Wed Sep 13, 2017 2:42 pm
by bfrd
I have decided to use a different livery for the tomcat.
VX-9 Vampires
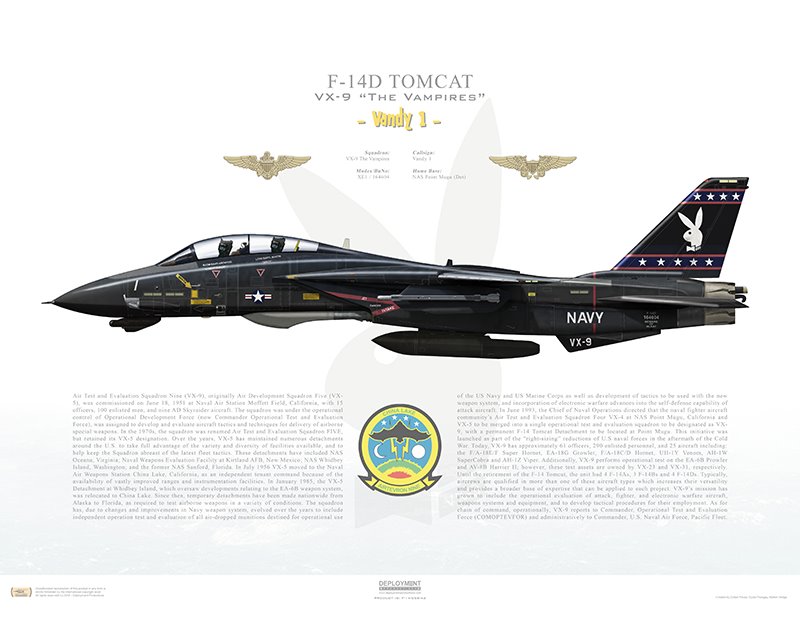
Decals for this livery are scarce and I was only able to find one. It was made prior to this kit being released so some of the decals may need some "adjustment". Might make some custom decals if needed.
Re: Tamiya F-14A Tomcat
Posted: Wed Sep 13, 2017 4:33 pm
by xSCAR45
An all black Tomcat?!

Count me in!!!
Re: Tamiya F-14A Tomcat
Posted: Wed Sep 13, 2017 6:20 pm
by gaz45
Very nice choice mate
Re: Tamiya F-14A Tomcat
Posted: Fri Sep 29, 2017 10:39 am
by bfrd
Before I get to the building, I thought I would show a brief video tour of the Grumman F-14 Tomcat. This is a later model than the kit I am making, but still close.
An actual pilot and RIO talk about the plane and give a quick walk around the outside and inside of the aircraft. The video was filmed at an airshow so there are a few flying shots as well. This is one amazing piece of technology.
[youtube]2aRHLFUnVHo[/youtube]
Re: Tamiya F-14A Tomcat
Posted: Fri Sep 29, 2017 10:59 am
by ElCapitan
bfrd wrote: Fri Sep 29, 2017 10:39 am
Before I get to the building, I thought I would show a brief video tour of the Grumman F-14 Tomcat. This is a later model than the kit I am making, but still close.
An actual pilot and RIO talk about the plane and give a quick walk around the outside and inside of the aircraft. The video was filmed at an airshow so there are a few flying shots as well. This is one amazing piece of technology.
Great video - should help me with my own F-14 build too!
Couldn't they have got too crewmen in the same scale?

Re: Tamiya F-14A Tomcat
Posted: Fri Sep 29, 2017 11:10 am
by Tomcat64
Great video - thanks for sharing!
Re: Tamiya F-14A Tomcat
Posted: Fri Sep 29, 2017 11:23 am
by bfrd
The first thing I am going to talk about in this build are the ejection seats. I picked up an aftermarket kit from Eduard. It contains resin seats, PE, and decals.

Here are the tools I will be using to assemble the seats. I didn't picture the airbrush since I couldn't really get it in the shot well. It is a Paasche Talon for those interested.
 **Where possible I added links to Amazon for the products. With most setups if you click on the link with the middle mouse button it will open in a new window.
EDIT:
**Where possible I added links to Amazon for the products. With most setups if you click on the link with the middle mouse button it will open in a new window.
EDIT:
Thanks to gaz45 for pointing out that I didn't mention a key piece of information when working with resin. WEAR A MASK! When using a saw to cut resin the dust created is harmful to your lungs. Even if you just use a simple dust mask, please don't be like me. Bob failed to remind me and will be punished. If you don't know who Bob is, just keep reading.
I got the quartz square from a quartz dealer when I was picking out my counter tops; they have these small squares as samples. The work great for flattening out or cutting PE. They are hard as a rock (he he, see what I did there) and clean up easily.
Let's start cursing (I mean building)
Here is a closer shot of the main seat. Resin is more brittle than styrene so smaller parts tend to snap off instead of bending. You can see that some of the detail has already broken in the picture. Also notice the large chunk of resin that needs to be cut off.

Here are the rest of the parts before removing the excess resin.

I found it easiest to use the razor saw to cut the bulk of the resin off, then come in with the knife to slice away the rest.
Here are the cushions after the initial cut with the razor saw. Very ugly I know. These parts are not the easiest to hold while cutting.

Once I got the parts cleaned up I painted them using Vallejo Model Air, Nato Black for the seat and Khaki for the cushions. A green for the cushions probably would have been a better choice, but I felt the Khaki would "go" better with the overall look.
Here are the painted seats and cushions. And Bob. Bob is my spiritual counsel for this build. So far he is lucky to still have his job.

I used Zap-A-Gap CA glue to glue the parts together. Once the glue dried I used a dry brush paint to bring out the details. I really like "Necron Compound" from Citadel. I don't know why they didn't call it silver, but that may just be me. Using the dry brush and dry paint really makes this simple. Just work some paint into the brush and wipe on a paper towel until you can just barely see any paint come off. Then brush onto the detail. The harder you press the more paint comes off. It is quite easy to manage, and the details really pop.

Next up for me is the PE. Here is a more detailed shot of the PE. It is good that I have this picture because some of these pieces will never be seen again. If you use tweezers to hold the PE right at the end and the PE slips, it becomes a projectile. Due to the size of the PE it travels at nearly the speed of light. Once airborne it moves into another dimension never to be found.

I like using the Glue Looper here as it makes applying small amounts of glue easy. It works on capillary action to draw a small amount of glue into the tip. Once you touch the tip to something else the glue is deposited. They have several sizes to handle different thicknesses of glue. I find it works much better than using a toothpick.
I am not finished with the seats yet, but here is a picture of where I am so far. I wanted to get something up before the weekend.

Thanks for watching. Any advice or words of encouragement are appreciated. I really feel totally out-classed here.
Re: Tamiya F-14A Tomcat
Posted: Fri Sep 29, 2017 8:43 pm
by xSCAR45
Perhaps a light wash on the seats? They look a bit flat.
Just my honest opinion.

Re: Tamiya F-14A Tomcat
Posted: Sat Sep 30, 2017 1:55 am
by gaz45
Nice start there mate you forgot to add a mask to
Re: Tamiya F-14A Tomcat
Posted: Sat Sep 30, 2017 2:13 am
by bfrd
gaz45 wrote: Sat Sep 30, 2017 1:55 am
Nice start there mate you forgot to add a mask to
What did I forget to mask?
Re: Tamiya F-14A Tomcat
Posted: Sat Sep 30, 2017 11:00 am
by gaz45
You forgot to mention wearing a mask when working with resin mate
Re: Tamiya F-14A Tomcat
Posted: Sat Sep 30, 2017 2:55 pm
by bfrd
gaz45 wrote: Sat Sep 30, 2017 11:00 am
You forgot to mention wearing a mask when working with resin mate
Oops! I have edited my post.
Thanks for the reminder!

Safety should always come first.
Re: Tamiya F-14A Tomcat
Posted: Sat Sep 30, 2017 9:59 pm
by Tomcat64
Nice start - I like that you've got Bob along to help even if he is on his first warning!
Re: Tamiya F-14A Tomcat
Posted: Mon Oct 02, 2017 11:14 am
by bfrd
The ejection seats are finished (or as finished as they are going to get). I put on the decals with MicroSet followed by MicroSol. They went down very well, there wasn't much fuss. I used Tamiya's brown panel line accent on the seat cushions to give them a little contrast. I think the flash washed it out a little, it looks better in person. I thought having two identical seats would be boring. To achieve the differences in the seats I knocked off some of the PE and lost others. This is an advanced technique and should only be attempted by advanced idiots. I have a degree in idiot so I felt comfortable trying out this method. It worked wonderfully, the seats are not even close to identical!


Bob was no where to be found. Applications for new spiritual counsel are currently being accepted.
Re: Tamiya F-14A Tomcat
Posted: Mon Oct 02, 2017 11:23 am
by ElCapitan
Great work!

Losing bits of PE was an inspired decision, well done
Re: Tamiya F-14A Tomcat
Posted: Mon Oct 02, 2017 12:05 pm
by bfrd
ElCapitan wrote: Mon Oct 02, 2017 11:23 am
Great work!
Losing bits of PE was an inspired decision, well done
Thanks Rob! I have been following your builds directly from Flickr, truly outstanding work.
Re: Tamiya F-14A Tomcat
Posted: Mon Oct 02, 2017 3:14 pm
by Tomcat64
Two very nice looking seats there - well done on taking the executive decision on the detailing!
Oh and welcome to PE-pingers anonymous!
Shame about Bob though.
Re: Tamiya F-14A Tomcat
Posted: Wed Oct 04, 2017 11:34 am
by bfrd
Now that Bob and I have finished up the seats we are working on the actual kit. Here are the tools we have been using.

The first thing was to figure out what colors I will use. Seeing as this is a Tamiya kit they have used Tamiya paint call-outs. Since I will be using Vallejo I need to make some choices.

Step 1 went together well without any major problems. I "mostly" followed the paint scheme but deviated in areas where I felt it would match better with an all black plane. Once I had the panels painted in black I used the Citadel dry compound to highlight the buttons.

Bob forgot to take a picture of the step 2 instruction page.

EDIT: Here is the picture that should have been included.

Next up are the side-walls, additional side panels, and the main control panels for both the pilot and RIO. Below is a shot of those components prior to assembly. Some of the gauges are still white due to the Kristal Klear taking ages to dry. I am using the KK to simulate glass screens. Even though the KK is very viscous it does run a little, so make sure you keep your parts level while drying. I used a bit of the brown panel line accent on the khaki parts to give them a little more depth. I used Citadel base paints in various places for buttons and what-not. Rather than going for a super-accurate replica, I just randomly applied dots and dashes. I find that sticking the smaller parts to the bench with a bit of Blu-Tak really helps in painting. With the parts held securely, and can use my free hand to steady my painting had. I applied the decals using MicroSet followed by MircoSol. I only disintegrated one of them, so that is a win in my book.

Speaking of books... I went to my local Half-Price Books and found a load of nice books on aircraft for cheap. I am sure you could do the same at your local used book store. Reference books are always handy to have around.
That's all for now. Thanks for stopping by.
Re: Tamiya F-14A Tomcat
Posted: Wed Oct 04, 2017 12:03 pm
by ElCapitan
Poor Bob
he's clearly not up to the job!
Great work on the instrument panels. I like the notes on the tools being used, it's a really good idea
Re: Tamiya F-14A Tomcat
Posted: Thu Oct 05, 2017 10:42 am
by Tomcat64
Really nice work on the cockpit tub - looks great!
Re: Tamiya F-14A Tomcat
Posted: Thu Oct 05, 2017 11:41 am
by bfrd
I got the tub parts together. It is hard to believe how well these parts fit together. Tamiya really has done an excellent job on the engineering. The KK on the dials finally dried and looks good in person. I put a little too much on the RIO's main radar, but at least it did dry clear. I will ask Bob to remind me to take some better pictures next time.

On to the next step...

Instead of going with a pure white I used
Insignia White from Vallejo for the wheel well tub. Once the base layer dried I painted a few highlighted areas as called out in the instructions. I used a
gray panel line accent to highlight the details in the base layer. Again the fit was perfect and she went together beautifully.

Next I glued the two sub-assemblies together and called it a night.

Bob and I had a heart-to-heart and agreed that he no longer needs to wear the hat. He will stay on (for now).
Re: Tamiya F-14A Tomcat
Posted: Thu Oct 05, 2017 11:54 am
by gaz45
Looking good buddy
Re: Tamiya F-14A Tomcat
Posted: Sat Oct 07, 2017 12:21 pm
by bfrd
gaz45 wrote: Thu Oct 05, 2017 11:54 am
Looking good buddy
Thanks, I can't wait to see how our 'cats stack up! This will only be the 3rd plane I have completed.

Re: Tamiya F-14A Tomcat
Posted: Sat Oct 07, 2017 12:30 pm
by bfrd
Just one more picture to finish up the current page of instructions. Step 7 was pretty easy. Or at least it would have been had I watched my overspray. I had to re-shoot the white sections.

The assembly was smooth and the two sections fit well.

On to the next page.

Not a whole lot going on here. I decided to use a Metallic Black for the gloss and semi-gloss blacks. I like the flake in it.

The wing movement goes together quite well. I am impressed by the simplicity of the design. If you are doing this at home, make sure you use an appropriate sized screwdriver and bit for these small screws. Tiny screws like these can easily be damaged by using the wrong bits. Also, keep in mind that you are screwing steel into plastic. It would be easy to strip out the mounts. You want them snug and that's it.

Re: Tamiya F-14A Tomcat
Posted: Mon Oct 09, 2017 9:18 am
by Tomcat64
Nice progress and good to see Bob in action again

Re: Tamiya F-14A Tomcat
Posted: Mon Oct 09, 2017 2:53 pm
by ElCapitan
Looks good! Glad to see Bob got his **** together!
Re: Tamiya F-14A Tomcat
Posted: Tue Oct 10, 2017 1:44 pm
by bfrd
Slowly making progress. I have to fix a few boo-boos.
Here is the next page...

I decided to go with option III for the weapons. Step 11 was not very exciting. Step 12 is where I ran into problems. I saw that I had to drill out some holes so I grabbed the pin vise and bit. What I didn't notice was that some holes were for ordinance layouts that I was not using. Oops. Bob was away at a seminar getting some much needed training. I can't blame this one on him. So I cut out some strip styrene and glued it to the back. This way the filler had a hard stop. I used Vallejo plastic filler. Once dried I cleaned up the excess with IPA. There was a lot of detail around the holes that I didn't want to sand off.


As with the other parts I used a grey panel line accent to highlight the details. Step 12 also instructs you to fill a few details. I don't plan on this plane being that accurate, so I skipped that step. I didn't feel it was necessary.

I will have to back fill pictures for this page. I apparently didn't take any. I suppose Bob was doing a better job than I gave him credit.

I painted the parts for step 15 while still on the sprues

When the paint dried I used a circle template tool from
Hasegawa to cut holes out of tape. I then used that mask off of the blades and painted the cone white.

I was hoping that the picture would show into the intakes, but that isn't the case with my phone. One thing that I am starting to run into is deviation from the paint callouts. Since my plane will be all black I didn't want the inside of the intakes to be all white. So I painted the inside of the intakes Nato Black. I will use this as the primary color for the plane accenting certain areas with the metallic black.
I did paint the rear portion of the intakes white as instructed though. My thoughts for the inner portions of the engines and wheel wells were that they would likely have already been painted like the non-black planes. The VX-9 squadron likely had their planes painted black after the fact. At least that is my working theory.
Re: Tamiya F-14A Tomcat
Posted: Wed Oct 11, 2017 3:29 am
by gaz45
Looking good there mate
Re: Tamiya F-14A Tomcat
Posted: Wed Oct 11, 2017 12:01 pm
by bfrd
Quick shot to finish up the last page.

I have a little bit of a gap on one side. I will deal with that when I get to painting the body.


A few small gaps, but nothing major. I always get excited when they start to look like planes!
I am using a new product. At least new from the list at the beginning.
Mr. Hobby Dark Iron is a buff-able metal finish. Below is an image of the first two stages. On the left is the piece after being sprayed with the Dark Iron. The finish is almost powdery when dry. On the right is after a little buffing with a q-tip (cotton bud for you folks on the other side of the pond). You can see the finish gets very shiny. You can rub the material all the way off, so be cautious.

The next photo shows the parts after a second buffing. This time I decided to raid my kids college fund and use Tamiya's
fine point swabs. The fine point allowed me to get into the smaller areas. You can compare the images. The one of the right is after the second buffing. Luckily the lighting shows almost no difference. I promise the one on the right did look much better. Which is good, after all those fine point swabs are roughly $3,000 a piece. Or at least it seems like they are compared to the regular ones.

The exhaust nozzles are driving me mad. I have cleaned them up with IPA and re-sprayed twice. I am having issues getting the inside of the nozzles to look decent. I gave up on good, decent will be a win. Bob is back at home trying to figure out a way to make it work. He thinks oil paint is the way to go. I am skeptical.
Re: Tamiya F-14A Tomcat
Posted: Wed Oct 11, 2017 12:03 pm
by bfrd
gaz45 wrote: Wed Oct 11, 2017 3:29 am
Looking good there mate
Thanks! I am looking forward to your work on the exhaust. I am struggling with mine. I may have to see how you do yours and steal your method.
Re: Tamiya F-14A Tomcat
Posted: Wed Oct 11, 2017 12:26 pm
by SergioSolo
Wat a cool project! The detailed cockpit looks impressive. Good work
Re: Tamiya F-14A Tomcat
Posted: Thu Oct 12, 2017 2:52 pm
by bfrd
I decided to use the narrower nozzles. I first painted the inside of the nozzle white then used the dust from buffing the outside to stain the inside. I think they came out ok. I need to do the same thing to the inside of the inner portion as well. I will probably use a piece of scrap and paint it up with the Dark Iron and use the dust again. I like the way that turned out.


I just slipped in the engines to see how they fit. As with most every other part the fit is outstanding. I may never build another kit that fits this well again. It is quite amazing.


I decided to use after-market resin wheels. At least I cant break these while sawing them off of the bases. I have broken almost every other piece of resin that way.

After removing them from the bases and sanding them down a bit I put them on a piece of tape for painting.

We also got a visit from Bob's brother Archibald.

Re: Tamiya F-14A Tomcat
Posted: Thu Oct 12, 2017 3:10 pm
by sheppsea
Very nice work - great idea with using the dust from buffing
Re: Tamiya F-14A Tomcat
Posted: Thu Oct 12, 2017 8:00 pm
by pourquoi61
Re: Tamiya F-14A Tomcat
Posted: Fri Oct 13, 2017 11:30 am
by gaz45
Looking good buddy
Re: Tamiya F-14A Tomcat
Posted: Fri Oct 13, 2017 12:08 pm
by bfrd
First off, thank you for all the kind comments! I am glad to see that others are not as critical of my work as am I. I really do enjoy this community.
Unfortunately, I spent most of last night watching my Stars get smacked by Nashville. For all of the good things that happened in the off season it isn't translating into wins. So all I got done last night was the front landing gear. Unfortunately, I grabbed the black panel liner instead of the gray. It is a little dirtier than I intended. I don't plan to weather this plane very much; the gear will just be extra dirty.

Re: Tamiya F-14A Tomcat
Posted: Fri Oct 13, 2017 6:12 pm
by gaz45
Looks great mate
Re: Tamiya F-14A Tomcat
Posted: Sun Oct 15, 2017 3:59 am
by bfrd

Got a little more done on the gear. Starting to skip a few steps for making the painting easier. I decided to paint things up before attaching the gear and some of the other smaller parts.
Here is a shot of the main landing gear. On the right are the parts required to make the one of the left. They may not be the most complex gear, but they are not the simplest either.

I put together the rear wheels. I used a white-ish dry paint from Citadel to bring out the tire details.

Now for painting...
Even though I am using a black paint, I didn't want to use black primer. I wanted to be able to see more of what I was doing. So I used a gray primer (Badger/Ultimate). I have not attached any of the wing parts to make painting and decaling a little easier.


I did two light coats of primer and then moved on to paint. I used Vallejo Model Air - Nato Black. It has a very matte finish, so I will put on a Pledge coat before decals.


After the paint dried for about an hour I put on a coat of Pledge Floor Care. Decals do not like to go down on matte finishes and decal silvering seems to be magnified on black.

All of the wing parts are just dry fitted together along with the engines. I still need to clear the engines to lock in the buff-able paint.
One other note. I used the included masking stickers for the canopy parts. I liked the inclusion of the stickers, but would have been happier if they were pre-cut. Before I sprayed the body with primer, I hit the canopy section with black. I plan on having the canopy open and didn't want the inside of the canopy to be gray. So if you happen to be in a similar situation think about what color you want to show on the inside of the canopy before painting.
On closer inspection I have found some runs in the clear coat, so I will probably try and clean that up before moving on any further.
Please enjoy my black cat.
Re: Tamiya F-14A Tomcat
Posted: Mon Oct 16, 2017 4:19 am
by Twokidsnosleep
Oh man, how did I miss this build!!
I love the scheme you are after here ....Vandy1 with the bunny tail logo.
Have a similar Phantom version to build in my future
Overall great build so far, going to loop back and watch that video

Re: Tamiya F-14A Tomcat
Posted: Mon Oct 16, 2017 11:26 am
by gaz45
It's coming along nicely matey keep up the good work
Re: Tamiya F-14A Tomcat
Posted: Mon Oct 16, 2017 11:42 am
by bfrd
I was hoping to get more done, but things rarely go as planned.
I did get the missiles painted up. Before I painted them I drilled out exhaust holes in the sparrow and sidewinders. I started first with just a needle to get the center. Then a very small bit in the pin vise. Once I was happy, I larger bit. You don't want to try and get the entire hole on the first go round.

I also re-sprayed the clear coat and was able to fix most of the runs. I couldn't help myself and un-masked the canopy.


I an odd turn of events I found the missing ejection handle for the RIO seat. I was looking for a different part I lost and found that one instead.
Re: Tamiya F-14A Tomcat
Posted: Mon Oct 16, 2017 12:05 pm
by bfrd
Twokidsnosleep wrote: Mon Oct 16, 2017 4:19 am
Oh man, how did I miss this build!!
I love the scheme you are after here ....Vandy1 with the bunny tail logo.
Have a similar Phantom version to build in my future
Overall great build so far, going to loop back and watch that video
Unfortunately, the decals don't include the bunny.

I think I will either make a custom mask or find a different decal sheet that has them. I was quite disappointed when I realized the bunnies were not in the building.
gaz45 wrote: Mon Oct 16, 2017 11:26 am
It's coming along nicely matey keep up the good work
Thanks! I am glad you got your exhaust situation sorted out.
On another note. I am toying with the idea of changing up the accent color. I was going to use a metallic black. But since this is a Vampire plane. What about red? I used Photoshop to simulate what I was thinking.

Thoughts? It *is* almost Halloween. I know this isn't accurate, but my shoddy workmanship isn't accurate either!
Re: Tamiya F-14A Tomcat
Posted: Mon Oct 16, 2017 2:51 pm
by Tomcat64
That's really looking great - I like the idea of the red accents, they actually look very subtle & understated.
Re: Tamiya F-14A Tomcat
Posted: Tue Oct 17, 2017 2:43 am
by bfrd
Re: Tamiya F-14A Tomcat
Posted: Thu Oct 19, 2017 1:59 am
by bfrd
Re: Tamiya F-14A Tomcat
Posted: Thu Oct 19, 2017 7:27 am
by ElCapitan
Looks amazing, well worth it!
Re: Tamiya F-14A Tomcat
Posted: Thu Oct 19, 2017 12:56 pm
by bfrd
ElCapitan wrote: Thu Oct 19, 2017 7:27 am
Looks amazing, well worth it!
Thanks!
Unfortunately, I had a wee accident last night. One of the horizontal stabilizers was layed down on a q-tip last night. Normally a q-tip doesn't do much damage. This q-tip was drenched in
toluene (or acetone- not sure). I couldn't bear to take a picture, but I suppose I should to show how I will fix it. Which brings up the question of-
How in the hell do I fix it?! Part of me wants to just paint over the damage and position that part downward.
However, in the spirit of the build I suspect I should strip, repair, re-scribe, and re-paint. Yuck!

This is what I get for having a messy work bench. 100% my fault for not cleaning up one project before working on another. Solvents shouldn't have been anywhere near finished pieces. I guess I learn this lesson the hard way.


