Page 1 of 1
#42 - Boned
Posted: Tue May 01, 2018 12:18 pm
by bfrd

The B-1B bomber is one of the most iconic planes that has ever served in the military. It's svelte body and massive power-plants are a stunning combination of speed and beauty.
Rockwell International won the design for the next generation of US bomber. The United States wanted a bomber with the payload capacity and range of the B-52 and the speed of the B-58. The plane that Rockwell designed would be designated B-1A. It had a maximum speed of Mach 2.2 at high altitude. At low altitude it was capable of sustaining Mach 0.85 over long distances. Unfortunately, the cost of this machine caused the program to be cancelled in 1977.
In 1981 the program was restarted. The stealth bomber was already in design but still several years away from being ready. Rockwell re-designed the plane to increase low altitude performance. The B-1B was only capable of Mach 1.25 at high altitude, but low altitude cruising speed increased to Mach 0.96. Various other improvements were made to the airframe and electronics packages. The B-1B formally entered service in 1986. By 1988 there were 100 B-1B's in USAF.
The B-1B is expected to remain in service until 2030.
https://en.wikipedia.org/wiki/Rockwell_B-1_Lancer

Mongram released the B-1B kit in 1983. Around that same time a young kid and his dad built that model. It hung in the rural Louisiana room for many years until it was eventually retired. Thanks to Ebay that same kid has a second chance to build the same model. Hopefully, it will turn out a little better than the first attempt. It will be aided by a few additional items not available in the early 80's.
While I like the nostalgia of building the kit as I did 30 years ago, the decals have not survived the test of time. They are yellowed and brittle. I have instead opted for new decals made by Caracal.

I will be building the model as a member of the
9th Bomber Squadron out of Dyess AFB.
Since this model was produced a few years before the actual plane was released there are a few minor issues with the structure. These will be corrected with some resin parts from Barracuda Studios.
Wing Seal Set

Forward Nacelle and Intake Set

Rear Nacelle and Exhaust Set
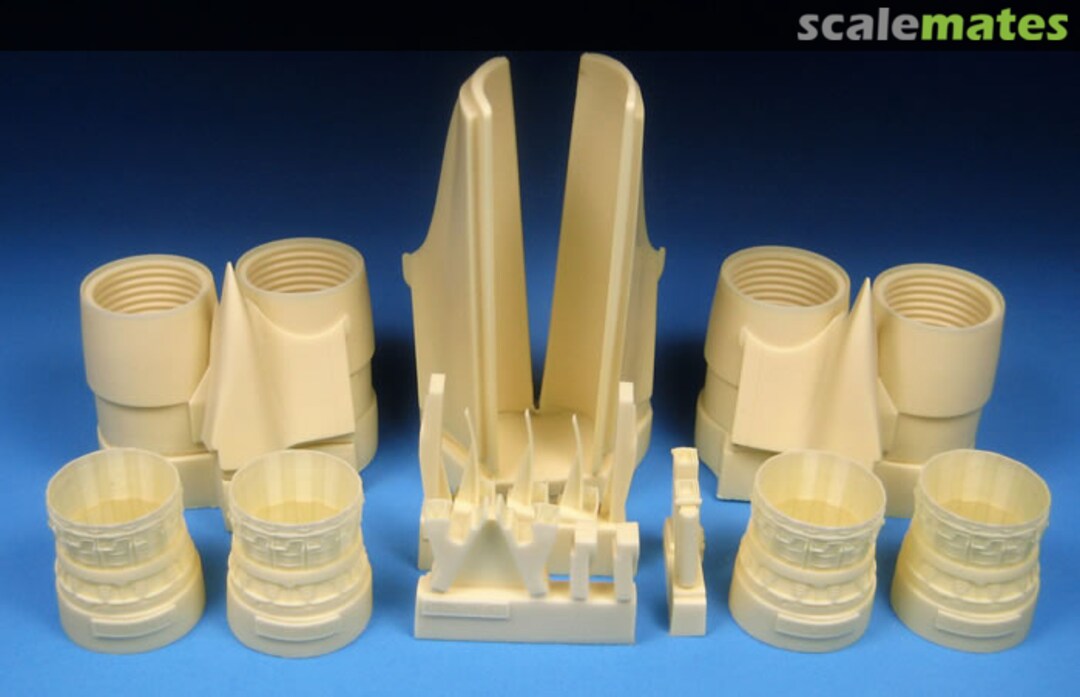
All of the resin parts require extensive cutting and fitting. I have no idea what in the hell I was thinking. This is going to get messy.
Scalemates Project
Edited with sprue pictures.


Re: #42 - Boned
Posted: Tue May 01, 2018 12:26 pm
by smokeriderdon
The intakes and exhausts for the 1/48 kit were labor intensive to say the least. These appear even more so. Looking forward to seeing you tackle this.
Re: #42 - Boned
Posted: Tue May 01, 2018 12:40 pm
by bfrd
smokeriderdon wrote: Tue May 01, 2018 12:26 pm
The intakes and exhausts for the 1/48 kit were labor intensive to say the least. These appear even more so. Looking forward to seeing you tackle this.
You like watching train-wrecks too, don't you!

Re: #42 - Boned
Posted: Tue May 01, 2018 2:16 pm
by Les0012
Another big bone to keep an eye on,cool.
Good Luck, Les
Re: #42 - Boned
Posted: Tue May 01, 2018 3:53 pm
by Twokidsnosleep
Super cool Mathew, very much looking forward to see this B take shape
Thanks for joining the sig and I wish you good luck in the build

Scott
Re: #42 - Boned
Posted: Tue May 01, 2018 4:33 pm
by gaz45
Nice looking kit mate
Re: #42 - Boned
Posted: Wed May 02, 2018 1:51 am
by smokeriderdon
bfrd wrote: Tue May 01, 2018 12:40 pm
smokeriderdon wrote: Tue May 01, 2018 12:26 pm
The intakes and exhausts for the 1/48 kit were labor intensive to say the least. These appear even more so. Looking forward to seeing you tackle this.
You like watching train-wrecks too, don't you!
LMAO On occasion.
Re: #42 - Boned
Posted: Sat May 05, 2018 9:37 am
by Stokesy44
That looks like some stunning resin there Sir.
Looks like you've got a challenge on your hands

Re: #42 - Boned
Posted: Sat May 05, 2018 3:48 pm
by bfrd
I have made the first cuts into the kit. I am way out of my depth. I chopped off the nose. That cut was great. The next step was to nix the tail cone. That cut was off. I will have a ton of filling to do. Note to self: Self, when cutting sections of a plane off, try and make perpendicular cuts.
Pictures incoming.
Re: #42 - Boned
Posted: Sat May 05, 2018 5:32 pm
by Skullfish
Good luck with the build, this thing looks like it should be firing Lazrs!!!

<<<except firing Lazrs!!
Jase
Re: #42 - Boned
Posted: Sun May 06, 2018 1:52 am
by digger303
Your going to do an awesome job !
Re: #42 - Boned
Posted: Mon May 07, 2018 12:57 pm
by bfrd
I'm afraid the rest of my weekend followed the downward trajectory of my first two cuts.

Phone is not behaving well, so I don't have the pictures to go along with the story.
First off, let me quote the site on which I purchased the resin.
Requires some hands-on modelling to install.
I think this is a bit understated, and a bit like when your doctor (or dentist) says "this may cause some discomfort".

The other issue I ran into was my kit was very warped. The box showed a lot of damage from humidity, and I suppose that has affected the plastic inside as well. Nothing fit well, which caused issues trying to cut and line up pristine resin parts.
My next challenge was three different sets of instructions and no clear indication of when in the standard build process you are supposed to perform the resin instructions. This is more my fault for not dry-running everything thing first.
I did get the engine nacells glued together. One of them looked decent, the other was terrible. Same procedure, same cuts, same sizes, different result. This must be due to the warped parts. I tried to "fix" it with 2-part epoxy putty. I think that made it worse. Insult was added to injury when I discovered that I inadvertently skipped a step. It was at this point that I broke down and ordered a second kit...
Time to re-group. I won't be defeated, just delayed. I think I will try and build up some mojo with the Cold-War build. That is a new kit with practically no resin. My mojo tank is arrears at the moment and I need something straight-forward.
Thanks for all of the kind words, but I think I am going to do the replacement kit OOB. I may use the nose and tail cone replacements as those are fairly easy to do. But, I must understand my limitations. I have only been doing the modelling thing for about a year now, and I don't think I am ready for what I tried to do. I have often told my daughter that it is more important to know what you can't do than what you can do. I need to take my own advice. The list of things I can do is growing with every build, just not where it needs to be right now.
If anyone is interested a link to part of the instructions are below. Barracuda sells the nacelle upgrades in two parts. The step I missed was not realizing that I was working on the rear instructions and glued part of the front nacelle. Once I did that I could no longer place the intake fan for the engines. This would have been quite noticeable and in the end what caused me to throw up the white flag.
Late Exhaust and Rear Nacelle Upgrade Set
Just to be clear I don't find fault with the resin or their instructions. I boned myself on this build.
I will be back!!!
Re: #42 - Boned
Posted: Mon May 07, 2018 1:36 pm
by RossiM1
Looks like a major amount of surgery for this one good luck will be interesting to follow along
Good luck

Re: #42 - Boned
Posted: Tue May 08, 2018 3:43 am
by smokeriderdon
Let me tell you, I had the EXACT same complaints about the nacelle set for the 1/48 kit. And I was vocal about it on a few FB boards. And a number of people acted like I insulted Jesus. The owner of Barracuda ended up in one of the threads and we had a good conversation. He admitted the weak point was the instructions. Mainly the LACK of any real instruction. These parts are excellent, but since both the 72 and 48 kits were originally made as B-1As, there is a LOT required to do the B conversions.
Thankfully the only thing really needed for the 48 kit is the intake/exhausts.
Re: #42 - Boned
Posted: Tue May 08, 2018 12:14 pm
by Les0012
Time to re-group, have a beer or three get the mojo back and crack on.
You will be fine
Les
Re: #42 - Boned
Posted: Mon May 14, 2018 6:41 pm
by Twokidsnosleep
Hang in there bud
Door prize draw coming up this weekend

Re: #42 - Boned
Posted: Tue May 15, 2018 4:01 am
by smokeriderdon
If you used super glue, you can likely separate the parts with acetone without damaging the resin. Just a thought.
Re: #42 - Boned
Posted: Tue May 15, 2018 5:28 am
by Johno
I feel your pain, ive had a few bite off more than i can chew moments recently, im just getting back into modelling myself. Sometimes the only way to figure out the right way to do something is by mastering the wrong way to do it, good luck
Re: #42 - Boned
Posted: Tue May 15, 2018 12:25 pm
by bfrd
smokeriderdon wrote: Tue May 15, 2018 4:01 am
If you used super glue, you can likely separate the parts with acetone without damaging the resin. Just a thought.
I did think about that. My fear is running into the same issue. I may try, but the smart half of my brain says to stick with OOB. I use "half" very loosely, it is probably closer to smart 1/100th of my brain...

Re: #42 - Boned
Posted: Tue May 15, 2018 4:37 pm
by smokeriderdon
LMAO Well, you already know what NOT to do now...
Re: #42 - Boned
Posted: Sun May 20, 2018 5:57 pm
by pourquoi61
Re: #42 - Boned
Posted: Wed Aug 01, 2018 7:08 pm
by Twokidsnosleep
Re: #42 - Boned
Posted: Wed Aug 01, 2018 9:30 pm
by bfrd
Scott’s kick in the pants post motivated me to get back on with my primary build.
I started work on the wings. First by cementing the wing halves together. I used small clamps to hold them temporarily.


It helps to have a bunch!
The sprue gates were very large and took a chunk of wing out with them. I used a little sprue goo to fill.

I noticed that the panel lines were quite shallow so I deepened them with a Holly tool that I got from Ultimate.

Wow, these things are sharp.
Re: #42 - Boned
Posted: Wed Aug 01, 2018 9:36 pm
by Twokidsnosleep
HA HA it works
Cool tool, don't poke your eye out!
Re: #42 - Boned
Posted: Sun Aug 12, 2018 3:26 am
by bfrd
While most of the resin won’t be salvageable, I am able to use some parts. Here are the resin exhaust tips with very tiny little actuator arms.

Took a while but once I got in a groove it wasn’t too bad. Good thing they provided many extras!

Re: #42 - Boned
Posted: Sun Aug 12, 2018 3:43 am
by digger303
Re: #42 - Boned
Posted: Sun Aug 12, 2018 10:45 am
by TommyKillander
Lovely work with those resin exhausts
Good luck with the rest!

Tommy
Re: #42 - Boned
Posted: Mon Aug 13, 2018 2:07 am
by bfrd
Got the exhaust pretty much finished.
First I primed them with Ultimate Gloss Black

Then a coat of Vallejo Metal Color Steel.

Then I put a light coat of Vallejo Jet Exhaust just on the outside edges and inside of the cans.

The internal fans got Steel with the center caps getting Chrome. I did a light dry brush with Citadel Necron Compound.


I don’t care for the flash very much, but it was the only easy way to show the insides.
Thanks for the comments!
Re: #42 - Boned
Posted: Mon Aug 13, 2018 8:30 am
by ElCapitan
Those exhausts look the business - well done! I'm so glad you got a replacement kit and kept this build going. How much of the resin parts are un-salvageable?
Re: #42 - Boned
Posted: Mon Aug 13, 2018 12:08 pm
by bfrd
ElCapitan wrote: Mon Aug 13, 2018 8:30 am
Those exhausts look the business - well done! I'm so glad you got a replacement kit and kept this build going. How much of the resin parts are un-salvageable?
The rest of the nacelle parts are not being used. I was able to clean them up with acetone for the most part. But some of the CA glue and styrene refused to come off completely even after repeated soaks. Given the less-than-pristine state of the resin and the difficulty of assembly I felt it was best to just go OOB with the new kit. The front nose cone will be used if I can find the darn thing! There are a few pieces like oil cooler that still might get used, but I am running out of time as well.
Time will tell how much will get used.
If there is an award for most unused purchased aftermarket, I am a shoe-in.

Although, I doubt that should be celebrated.
Re: #42 - Boned
Posted: Tue Aug 14, 2018 12:26 pm
by bfrd
I have the cockpit area painted up along with the pilots. 30+ year old decals are not the best in the world, but they did eventually go down. Not sure why the seats are red, but if that is what it says... I didn't bother to paint the seatbelts or add figures to the back row because they can't really be seen. Not even sure why I painted the seats.

Cockpit glass was masked with MicoMask and painted

I do not plan on having the cockpit door on the bottom of the plane open. The kit door is a terrible fit.

I used a piece of plasticard and made my own.

I also got the landing gear primed in Ultimate Gloss Black

Re: #42 - Boned
Posted: Wed Aug 15, 2018 2:20 am
by bfrd
I got the fuselage halves together. The fit was better than I expected. I tore off a bunch of tape pieces and had them handy. I would cement and tape as I went.

Found the nose cone buried in my box of Ultimate sanders.

The tail section was a terrible fit.

I mixed up a two part epoxy putty and hulk-smashed it into the joint.

After I got it roughly applied I used a wet finger to smooth it down and a putty tool to remove excess. It will still need sanding but the bulk is done.

The brand is called apoxie sculpt. It was recommended by FitchenFoo from Industria Mechanica. I had a small casting defect in one of my pieces and he told me about this stuff. I figure if it is good enough for him, it will be good for me.
Re: #42 - Boned
Posted: Wed Aug 15, 2018 4:38 am
by Twokidsnosleep
Good progress
Have heard if epoxysculpt..was pricey for me to get
Fitchenfoo did an X-wing rising out if swamp build blog that helped me with my Dagoba one
Good dude
Re: #42 - Boned
Posted: Sat Aug 18, 2018 8:45 am
by Stokesy44
Great work, looks like she's putting up a fight but you're winning mate!
Re: #42 - Boned
Posted: Tue Aug 28, 2018 12:36 pm
by bfrd
I have the bomb and landing gear bays taped off and then painted in Badger/Ultimate White Primer. I think I will just let this serve as the paint as well. I don't see much reason to paint white on top.


I have some clean up to do, but no paint tear off so I am happy! Yikes, there is some over-spray though!

Next up, figure out what to do with the bomb bay!
Re: #42 - Boned
Posted: Fri Aug 31, 2018 8:19 pm
by bfrd
Why yes, it is the last day of the build. Also yes, I haven’t yet finished.
I worked on the wheels yesterday. Painted everything with Ultimate/Badger black primer. I think it gives a perfect tire black finish.
Then I got to use my shiny new circle cutter to mask off the outside. Once masked I painted the interior parts White Aluminum from Vallejo.

Here you can see some bleeding. By cutting the circle just a slightly bit larger the bleed is on the outside of the rim.

It is very easily fixed with some black panel liner.

Here are the finished wheel assemblies.

Today I finished out the bomber bay. There are a couple of hours of hidden work in there. Oh well.

I have got the wheels on her, but they are not the most stable. I have got her balanced on her nose while the cement sets.

Close up of the main gear. Lots of touch up still needed.

That’s it for now. Next up will be decals.
Re: #42 - Boned
Posted: Fri Aug 31, 2018 8:21 pm
by Twokidsnosleep
You are getting close Matt, keep at it
Midnight PST, so you got a triplet of extra hours
Re: #42 - Boned
Posted: Sat Sep 01, 2018 1:28 am
by bfrd
I have decals going on, but I have decided to finish it over the next couple of days. I am afraid that if I rush, I will just ruin it completely. I would rather not add another victim to the shelf of doom.
Re: #42 - Boned
Posted: Thu Sep 06, 2018 1:35 pm
by bfrd
Re: #42 - Boned
Posted: Thu Sep 06, 2018 4:20 pm
by Twokidsnosleep
Really good
Take your time, the paint is the most important part on this aircraft
She is looking menacing
Re: #42 - Boned
Posted: Fri Sep 07, 2018 12:45 am
by digger303
Re: #42 - Boned
Posted: Fri Sep 07, 2018 2:29 am
by bfrd
I have to keep reminding myself that I can’t unmask it until I finish. This may be the most dangerous part of the build.


