Page 1 of 2
Miniart 1/35 SU-76M
Posted: Tue May 26, 2020 3:04 pm
by Tomcat64
A long time ago in a galaxy far, far away some of you might remember that I used the building from this set as the basis for my winter "StuG in the dining room" diorama

Well I've been thinking about doing a piece of Soviet armour and decided it was time to fish out the SU-76 kit from where it's been languishing under the bench for the last three years and show it some cement

First up some history on the type courtesy of our friends at Wikipedia:
The SU-76 (Samokhodnaya Ustanovka 76) was a Soviet self-propelled gun used during and after World War II. The SU-76 was based on a lengthened and widened version of the T-70 light tank chassis. Its simple construction made it the second most produced Soviet armoured vehicle of World War II, after the T-34 tank. Crews liked the vehicle for its simplicity, reliability, and ease of use. However, the steering was also sometimes regarded as difficult, leading crews to also refer to the vehicle as suka (Russian: сука; "bitch") or suchka (Russian: сучка; "little bitch"). It was also nicknamed Golozhopiy Ferdinand (Russian: Голожопый Фердинанд; "bare-arsed Ferdinand") due to its very light armor and somewhat similar silhouette, when compared to the Germans' heavy Ferdinand/Elefant casemate tank destroyer of some 65 tonnes in weight.

History
Design of the SU-76 began in November 1942, when the State Defence Committee ordered the construction of infantry support self-propelled guns armed with the ZiS-3 76.2 mm anti-tank gun and the M-30 122 mm howitzer. The T-70 chassis was chosen for mounting the ZiS-3 gun, and was lengthened, adding one road wheel per side, to facilitate better gun mounting. The vehicle was not completely enclosed by armour, the rear roof and upper rear side exposed.
The power-plant setup installed in the first mass-produced SU-76s was unreliable. Two GAZ-202 automobile engines were used mounted in "parallel", each engine driving one track. It was found to be difficult for the driver to control the two engines simultaneously, and strong vibration forces led to early failures of engines and transmission units. After 320 SU-76s had been made, mass production was halted in order to resolve the problems. Two chief designers at the GAZ plant, N. A. Astrov and A. A. Lipgart, changed the power-plant arrangement to that of the T-70 - the two engines were mounted in tandem on the right hand side of the vehicle. The armoured roof over the gun compartment was removed to improve access to and servicing of the weapon. This modified version, called the SU-76M, was placed in mass production in early 1943.

After production resumed, GAZ and two factories in Kirov and Mytishchi produced 13,932 SU-76Ms; over 9,000 of the vehicles were built solely by GAZ. Mass production of the SU-76M ceased in the second half of 1945. The SU-76 was the basis for the first Soviet tracked armoured anti-aircraft vehicle, the ZSU-37. Mass production of the ZSU-37 was continued after SU-76M production ceased. All SU-76Ms had been withdrawn from front-line service shortly after the war ended, although some were retained as training vehicles for T-34 crews as late as 1955.
Combat history
The SU-76M virtually replaced infantry tanks in the close support role. While its thin armour and open top made it vulnerable to antitank weapons, grenades, and small arms, its light weight and low ground pressure gave it good mobility. The SU-76M combined three main battlefield roles: light assault gun, mobile anti-tank weapon and mobile gun for indirect fire. As a light assault gun, the SU-76M was well-regarded by Soviet infantrymen (in contrast with their own crews). It had more powerful weapons than any previous light tank for close support and communication between infantry and the SU-76M crew was simple due to the open crew compartment. This was extremely useful in urban combat where good teamwork between infantry and AFVs was a key to success. Although the open compartment was highly vulnerable to small arms fire and hand grenades, it very often saved the crew's lives in the case of a hit by a Panzerfaust, whose concussion blast would mean death in an enclosed vehicle.

The SU-76M was effective against any medium or light German tank. It could also knock out the Panther tank with a flank shot, but the ZiS-3 gun was not effective against Tiger tanks. Soviet manuals for SU-76M crews usually instructed the gunner to aim for the tracks or gun barrels when facing Tigers. To improve the SU-76M's anti-armour capabilities, armour-piercing composite rigid (APCR) and hollow charge projectiles were introduced. This gave the SU-76M a better chance against heavily armoured German vehicles. A low profile, a low noise signature and good mobility were other advantages of the SU-76M. This was ideal for organizing ambushes and sudden flank or rear strikes in close combat, where the ZiS-3 gun was sufficient against most German armoured fighting vehicles.
The maximum elevation angle of the ZiS-3 was the highest of all Soviet self-propelled guns. The maximum indirect fire distance was nearly 17 km. SU-76Ms were sometimes used as light artillery vehicles (like the German Wespe) for bombardments and indirect fire support. However the power of the 76.2 mm shells was not sufficient in many cases.
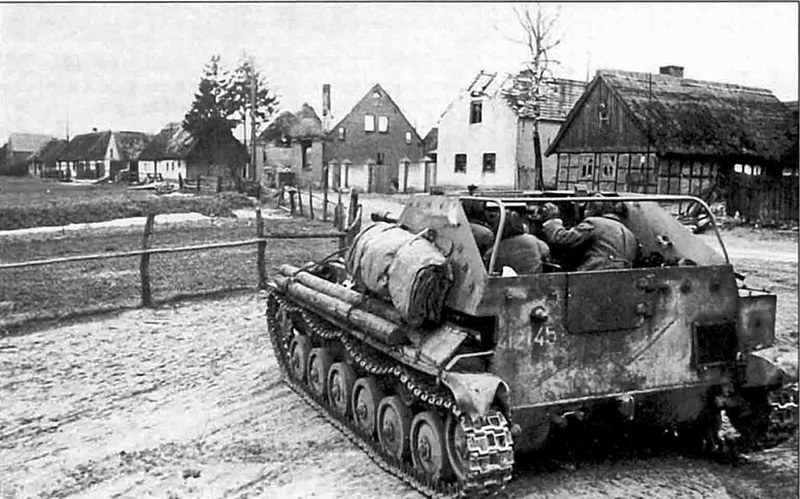
The SU-76M was the single Soviet vehicle able to operate in swamps with minimal support from engineers. During the Belarus liberation campaign in 1944 it was extremely useful for organizing surprise attacks through swamps; bypassing heavy German defences on firmer ground. Usually only lightly armed infantry could pass through large swampy areas. With SU-76M support, Soviet soldiers and engineers could effectively destroy enemy strongpoints and continue to advance.
The SU-76M had a large number of ammunition types. They included armour-piercing (usual, with ballistic nose and subcaliber hyper-velocity), hollow charge, high explosive, fragmentation, shrapnel and incendiary projectiles. This made the SU-76M an excellent multi-purpose light armoured fighting vehicle.
After World War II, the SU-76 was used by Communist forces in the Korean War. A small number of SU-76Ms were captured and used by South Korea after the landing at Incheon.
Miniart 1/35 SU-76M
Posted: Tue May 26, 2020 3:04 pm
by Tomcat64
Onto the kit itself - the original box has long since bitten the dust but more or less everything seems to have survived well enough in its temporary bags
I even saved a bit of the side box art

The sprue frames seem pretty good but the tow cable comes pre-broken on this one - that'll be easily replaced by a length of wire

There's a bit of flash on this one but not as bad as some Miniart plastic I've seen

Some wheels and a tub...

All the track links are individual... which might be fun...


And finally a set of crew dudes and a wooden box

The instructions look a little busy at first glance but nothing too scary

Hopefully I'll get to make a start on this some time this week.
Stay tuned & thanks as always for looking

Re: Miniart 1/35 SU-76M
Posted: Tue May 26, 2020 6:19 pm
by CygnusX1
Judging from the sprues, that's not one of Mini-Art's 'full interior' kits with all the individual nuts and bolts and whatnot?
I like a bit of 4BO now and then; looking forward to seeing what you do with it.
Re: Miniart 1/35 SU-76M
Posted: Sat May 30, 2020 2:50 pm
by digger303
Re: Miniart 1/35 SU-76M
Posted: Sat May 30, 2020 2:55 pm
by ElCapitan
Ready to put my SU-76 to shame! Can't wait to see it

Re: Miniart 1/35 SU-76M
Posted: Mon Jun 01, 2020 3:01 pm
by Tomcat64
CygnusX1 wrote: Tue May 26, 2020 6:19 pm
Judging from the sprues, that's not one of Mini-Art's 'full interior' kits with all the individual nuts and bolts and whatnot?
I like a bit of 4BO now and then; looking forward to seeing what you do with it.
Cheers mate - and nope it's not a full interior job, which is probably just as well given the way it's going so far


ElCapitan wrote: Sat May 30, 2020 2:55 pm
Ready to put my SU-76 to shame! Can't wait to see it
LOL I don't think that's going to happen - I really think Tamiya was the way to go with this one mate!
Miniart 1/35 SU-76M - Build Part I
Posted: Mon Jun 01, 2020 3:39 pm
by Tomcat64
Well I've made a start and as you may have gathered from a couple of the comments above this one hasn't been all beer and skittles so far.
As a general observation Miniart have managed to find a rare formula for styrene which appears to be both soft & brittle at the same time...

Here are some of the rules that will be referred to for the duration of the build:
- Rule 1: There are no locating pins - everything is aligned by dead reckoning and guesswork
- Rule 2a: Anywhere where a pin is supposed to fit through a hole or loop it won't fit, likewise for barrels & tubes
- Rule 2b: If you try and drill the hole or loop the part will break or shatter
- Rule 3: Randomly even the lightest touch of a sanding stick will cause the part to break, split or bend...
- Rule 4a: Sprue gates are not sympathetic and will encroach onto parts where-ever possible
- Rule 4b: Even with absolute care, removing thin parts from the sprue frame will result in them breaking in at least one place
- Rule 5: Randomly the wrong part will be listed in the instructions
- Rule 6: Sometimes you won't be sure if the detail you're looking at is a casting defect, waste from the sprue gate or actually meant to be there
- Rule 7: The part in the instruction won't always look exactly like the part in your hand
I'm sure this will be expanded over time
So along with rule 5 there are no numbers on the Sprue Frames themselves and you have to keep referring back to the first page of the instructions, which I find a little irritating especially when the first assembly instructions are on the reverse sheet so you can't sit them side by side as you're working

Stage one involved lots of vague arrows and an decent application of Rule 2a but wasn't too problematic aside from a heavy dose of sanding

Stage 2 is where Rule 2(a & b) came to light for the first time, parts 68 & 69 are supposed to fit on the ends of 110 - not a hope! I drilled them out with the finest bit in my collection and 68 partially split and was filled, and 69 just crumbled to the carpet monster. So in the end I cut a hole in a piece of plasticard of the same width and sanded the surrounding areas to more or less the right shape (red arrow)

I didn't take a photo of the results of stage 3 for some reason but had to drill out the locating points on the elevation assembly

Stages 4 & 5 involved putting together a pair of cage-like structures which felt out of sequence, but did them anyway; again fitting required a lot of careful sanding and Rule 7 applied

I then went a bit off-piste and after getting through stage 6 with more sanding, went onto stage 8. During more sanding & dry-fitting I ended up with Stage 8 tightly dry-fitted to the gun assembly and chose to glue it in place rather than risk wrecking things by taking it back off again. This will need a swipe of filler around some of the joins.

Fortunately I could still get in to attach the parts from stage 7, although Rule 5 kicked in as 36 should be 136; and rule 4b applied to part 157 although this was ultimately fixed with a dab of CA and a little patience. Oh and the mounting point on the cylinder for part 128 doesn't exist (rule 7)

Onto Stage 8 and I was hopeful that I could get the gun assembly completed... but no... I ran out of time & patience for the moment. So I have the main gun assembly done, although 132 succumbed to rules 4a & 4b and had to be replicated from thin styrene rod. The part listed as 108 is in fact 52 (rule 5) and the muzzle brake doesn't fit and will require attention with various sanders to sort out. Oh and part 106 needed sanding down before it fit in the breech block...

Finally the fit of the inner gun shield assembly thing isn't obvious from the instructions, but I finally figured that there are "pins" on the bottom corners of the cages from stages 4 & 5 that are supposed to engage in the "loops" on the elevation assembly (arrows). In a blatant contravention of Rule 2b I successfully bored out the loops, but the thing still won't fit as the surrounding styrene is still too fat to fit into the recesses around the pins...

So that's where it's currently sitting - I'll figure out how to sand/adapt the inner shield and get the muzzle brake fitted before moving onto the hull.
Thanks for stopping by and enduring this with me
Re: Miniart 1/35 SU-76M
Posted: Tue Jun 02, 2020 2:23 pm
by digger303
I'm thinking I should just toss mine now and not go through the heart ache....do myself a favour
Re: Miniart 1/35 SU-76M
Posted: Tue Jun 02, 2020 6:28 pm
by Stokesy44
digger303 wrote: Tue Jun 02, 2020 2:23 pm
I'm thinking I should just toss mine now and not go through the heart ache....do myself a favour
Don't do it my friend. What you need to realise is when it comes down to it, Tomcat is really not very good at this model kit lark!

Re: Miniart 1/35 SU-76M
Posted: Tue Jun 02, 2020 6:30 pm
by Stokesy44
Another sow's ear on its way to becoming a silk purse!
Plenty of detail on that gun. Paint and weathering mate - which is Latin for 'crap kit now looks awesome cos of me'
Is it a stand alone effort or are you going to put in a dio?

Re: Miniart 1/35 SU-76M
Posted: Tue Jun 02, 2020 11:16 pm
by digger303
Stokesy44 wrote: Tue Jun 02, 2020 6:28 pm
digger303 wrote: Tue Jun 02, 2020 2:23 pm
I'm thinking I should just toss mine now and not go through the heart ache....do myself a favour
Don't do it my friend. What you need to realise is when it comes down to it, Tomcat is really not very good at this model kit lark!
Ohh That's his way then lots of talk and Tom bodgery to cover up.....I get it....

...
Stokesy44 wrote: Tue Jun 02, 2020 6:30 pm
Another sow's ear on its way to becoming a silk purse!
Plenty of detail on that gun. Paint and weathering mate - which is Latin for 'crap kit now looks awesome cos of me'
Is it a stand alone effort or are you going to put in a dio?
Yeah I'm still not convinced, I know it's possible to do it. Yet there is a definite skills gap on my end and the time involved to do it.
Re: Miniart 1/35 SU-76M
Posted: Wed Jun 03, 2020 2:14 am
by BigWall
Too many rules! But, you seem to be playing along with them.
Re: Miniart 1/35 SU-76M
Posted: Wed Jun 03, 2020 9:27 am
by Stokesy44
Maybe leave it in the stash for now until you feel the itch some time in the future? If you think its gonna be an energy sapper wait until you can build it as part of a SIG then there's more incentive to conquer it.
Re: Miniart 1/35 SU-76M
Posted: Wed Jun 03, 2020 12:49 pm
by digger303
Stokesy44 wrote: Wed Jun 03, 2020 9:27 am
Maybe leave it in the stash for now until you feel the itch some time in the future? If you think its gonna be an energy sapper wait until you can build it as part of a SIG then there's more incentive to conquer it.
Maybe your right, just checked the stash .....I have 3 so binning/selling them seems a bit silly or at least a red rag to a bull. Can't let that many defeat me...

Check this out.....
https://www.perthmilitarymodelling.com/ ... 35036.html
Re: Miniart 1/35 SU-76M
Posted: Wed Jun 03, 2020 1:09 pm
by Stokesy44
I must admit the review would out me off. As you've got 3 you could build a graveyard dio with them, abandoned at the end of the war with bits missing, tracks gone and left to rot in the undergrowth.
Re: Miniart 1/35 SU-76M
Posted: Wed Jun 03, 2020 3:59 pm
by Tomcat64
Stokesy44 wrote: Tue Jun 02, 2020 6:28 pm
digger303 wrote: Tue Jun 02, 2020 2:23 pm
I'm thinking I should just toss mine now and not go through the heart ache....do myself a favour
...What you need to realise is when it comes down to it, Tomcat is really not very good at this model kit lark!

Actually although I've deployed my usual weapons-grade ineptitude I don't think I can take all the credit for this one...
@digger303 I checked Scalemates and I'm pretty sure this is one of the original 2008 versions of this kit since that ties in with the Budapest dio kit that it came boxed with. It looks like Miniart have upgraded the kit at least twice since then including new parts so maybe yours are from the later versions and may therefore have fewer of the rules applied. I think they each had a different serial number so worth checking which one(s) you've got.
Thanks for the link too - that's really useful info (and also good to see they're hitting the same problems I've seen in a perverse sort of way), the bit around the suspension arms would be next in line to trip me up!
I'm going to stick with it and get it done (I hope) just to see if it can be done!
Re: Miniart 1/35 SU-76M
Posted: Wed Jun 03, 2020 11:13 pm
by digger303
Tomcat64 wrote: Wed Jun 03, 2020 3:59 pm
Stokesy44 wrote: Tue Jun 02, 2020 6:28 pm
digger303 wrote: Tue Jun 02, 2020 2:23 pm
I'm thinking I should just toss mine now and not go through the heart ache....do myself a favour
...What you need to realise is when it comes down to it, Tomcat is really not very good at this model kit lark!
Actually although I've deployed my usual weapons-grade ineptitude I don't think I can take all the credit for this one...
@digger303 I checked Scalemates and I'm pretty sure this is one of the original 2008 versions of this kit since that ties in with the Budapest dio kit that it came boxed with. It looks like Miniart have upgraded the kit at least twice since then including new parts so maybe yours are from the later versions and may therefore have fewer of the rules applied. I think they each had a different serial number so worth checking which one(s) you've got.
Thanks for the link too - that's really useful info (and also good to see they're hitting the same problems I've seen in a perverse sort of way), the bit around the suspension arms would be next in line to trip me up!
I'm going to stick with it and get it done (I hope) just to see if it can be done!
I dragged out the Budapest kit and 35143 ( 2012 ) to do a comparison last night and they look exactly the same. I didn't un bag them so maybe the changes are more subtle than I can see. The Budapest kits decals looked more yellow in the characters/numbers.
The instructions are something aren't they a totally new mind game.
Re: Miniart 1/35 SU-76M
Posted: Sun Jun 07, 2020 9:10 am
by Tomcat64
digger303 wrote: Wed Jun 03, 2020 11:13 pm
I dragged out the Budapest kit and 35143 ( 2012 ) to do a comparison last night and they look exactly the same. I didn't un bag them so maybe the changes are more subtle than I can see. The Budapest kits decals looked more yellow in the characters/numbers.
The instructions are something aren't they a totally new mind game.
Oh well - it was worth a shot, if you've got three of them I think the best thing you can do is probably melt the plastic down to make something more useful out of it
The Budapest building looks great when it's finished but that's not without its own challenges as well, and with the added fun of being vac form thrown in for good measure!
BigWall wrote: Wed Jun 03, 2020 2:14 am
Too many rules! But, you seem to be playing along with them.
Thanks for checking in BW - sorry I missed your post earlier. And yep there's plenty of rules with this one but we'll get it done (I hope!)
Miniart 1/35 SU-76M - Build Part II
Posted: Sun Jun 07, 2020 9:29 am
by Tomcat64
Well I left it all week but finally plucked up the courage to take another swing at this yesterday...
First up I carefully sanded the receiving loops on the gun assembly to the point where I could get the shield popped in place and then added plenty of TET

As you can see below the left hand side stuck out proud of the front shield but there was plenty of flex in the assembly to pull it back in (more on that in a moment) and as you can see after a little sanding the muzzle brake is also attached and just needs a dab of filler to complete the join

Step 10 just involved adding a single component (part 46) which, after some sanding and fiddling about dropped into place and acts to pull in the sides of the shield assembly. Generous applications of TET followed, and it's been clamped and left overnight...

I then went a little off-piste as I wanted to get the running gear installed on both sides so I could tackle the tracks and hopefully get them back off before completing the hull assembly. For those that didn't see Digger's link to the review the main note here is that the swing arms are sided (so make sure you've got the right ones) and that there is a little "nub" at the end of the half-sectioned pin that needs to be removed otherwise the arm won't sit right in the hull. I found that sanding them back worked best as I ended up inadvertently breaking one off when I tried to trim them with a scalpel.

There's a lot of play even when they're in right, in a couple of cases the arms could be rotated through 360 so getting them all lined up at the same deflection could be a little challenging but here's the completed left hand run

The holes in the back of the wheels & rollers needed to be reamed out to get them to fit, and these are now held in place with a dab of blu tac so they can be removed once I've got the tracks lined up

One final note is that the front glacis place (part 133) needs to be put in place before the final drive & sprocket assembly, and on the sprocket care is needed to get them off the sprue

I then raised the tub up on spare lengths of styrene (square section) to keep everything at about the right height and switched around to the right hand side

Once again these have now been left to cure overnight and I'll make a start on the tracks today...
I'm really pleased to have gotten the gun assembly completed bar some final filling & tidying up and hoping that the hull is going to be less fiddly, but let's see.
Thanks as always for looking in
Re: Miniart 1/35 SU-76M
Posted: Sun Jun 07, 2020 9:35 am
by Stokesy44
Coming together nicely mate. Some great TLC on the gun and the running gear. That gun breach will look awesome when painted and weathered.
Re: Miniart 1/35 SU-76M
Posted: Tue Jun 09, 2020 9:10 am
by Tomcat64
Stokesy44 wrote: Sun Jun 07, 2020 9:35 am
Coming together nicely mate. Some great TLC on the gun and the running gear. That gun breach will look awesome when painted and weathered.
Thanks mate - I certainly feel better about it now I've got the gun assembly mostly done
Miniart 1/35 SU-76M - Build Part III
Posted: Tue Jun 09, 2020 9:21 am
by Tomcat64
Just a quick update from Sunday's efforts as I started on the tracks...
The really helpful instructions just give you this...

My original thought was perhaps the 178 referred to the number of links needed, but no, that's the part number - you are given no clue as to how many links you actually need
The kit includes five sprues like this, with 44 links per sprue for a total of 220 so hopefully it'll be fewer than 110 per side

I'm going to do this in stages to try and preserve some level of sanity and started off with the bottom runs for both sides at 30 links apiece. Each link had the two attachment points and a couple of small epms to deal with but otherwise they were in pretty good shape for the most part although I have had a couple break as they were removed from the sprue frame

By my rough guestimations I think as well as the 30 for the bottom run I'll need 22 links for the run up and wrap around the drive sprocket, 20 for the rear idler and 23 for the upper run across the rollers for a total of 95 per side which sounds about right I think (?) I'll try and get one side at least completed this week, but taking my time as this will require plenty of setting time to get right.
Thanks for checking in
Re: Miniart 1/35 SU-76M
Posted: Tue Jun 09, 2020 6:47 pm
by CygnusX1
Nice instructions there - so how many links exactly...?

I would have said that most manufacturers give you a few spare links when they're individual like that, so maybe build slightly less than directly 50% of the total amount?
Build is coming along anyway, and looking good.
Re: Miniart 1/35 SU-76M
Posted: Wed Jun 10, 2020 12:40 am
by digger303
Nicely detailed tracks.
Re: Miniart 1/35 SU-76M
Posted: Wed Jun 10, 2020 8:49 am
by Tomcat64
CygnusX1 wrote: Tue Jun 09, 2020 6:47 pm
Nice instructions there - so how many links exactly...?
I would have said that most manufacturers give you a few spare links when they're individual like that, so maybe build slightly less than directly 50% of the total amount?
Build is coming along anyway, and looking good.
digger303 wrote: Wed Jun 10, 2020 12:40 am
Nicely detailed tracks.
Cheers guys
As it turns out the tracks haven't been the horror story I was fearing
(so far...)
Miniart 1/35 SU-76M - Build Part IV
Posted: Wed Jun 10, 2020 8:55 am
by Tomcat64
Just a quick update this morning as I managed to get the first side completed last night

In terms of my guesswork on the links here's how it actually worked out
30 for the bottom run
"22 links for the run up and wrap around the drive sprocket" - Actually needed 24
"20 for the rear idler" - Actually needed 22
"23 for the upper run across the rollers" - Actually needed 21
So a total of 97 rather than my initial estimate of 95 per side
I should be able to make a start on the other side this evening with any luck.
Re: Miniart 1/35 SU-76M - Build Part IV
Posted: Wed Jun 10, 2020 9:45 am
by Stokesy44
Tomcat64 wrote: Wed Jun 10, 2020 8:55 am
Just a quick update this morning as I managed to get the first side completed last night
In terms of my guesswork on the links here's how it actually worked out
30 for the bottom run
"22 links for the run up and wrap around the drive sprocket" - Actually needed 24
"20 for the rear idler" - Actually needed 22
"23 for the upper run across the rollers" - Actually needed 21
So a total of 97 rather than my initial estimate of 95 per side
I should be able to make a start on the other side this evening with any luck.
Oooh, saaaaaaag


Re: Miniart 1/35 SU-76M
Posted: Wed Jun 10, 2020 1:10 pm
by Quax
its all coming together well and the tracks look great, all this despite Miniarts best attempts!
I have to say I'm a little troubled, as I just bought Miniarts T-55....


Paul
Re: Miniart 1/35 SU-76M
Posted: Wed Jun 10, 2020 10:18 pm
by Tomcat64
Cheers Paul - I think you might be better off with the T-55 as I think that's a lot more recent (2016?) and I've heard good things about their later releases so fingers crossed for you on that one!
Re: Miniart 1/35 SU-76M
Posted: Thu Jun 11, 2020 4:24 am
by Parker
top of the class for perseverance, Neil.
Re: Miniart 1/35 SU-76M
Posted: Thu Jun 11, 2020 10:10 am
by ElCapitan
Tracks look good - did they come with a jig to get the sag right?
Re: Miniart 1/35 SU-76M - Build Part IV
Posted: Thu Jun 11, 2020 11:31 am
by Tomcat64
Stokesy44 wrote: Wed Jun 10, 2020 9:45 am
Oooh, saaaaaaag
LOL Cheers mate
Parker wrote: Thu Jun 11, 2020 4:24 am
top of the class for perseverance, Neil.
Thanks Parker - I'm determined not to be defeated if I can help it!

ElCapitan wrote: Thu Jun 11, 2020 10:10 am
Tracks look good - did they come with a jig to get the sag right?
Thanks Rob - and nope, no jig, just dead reckoning, light pressure with a thumb and some mild swearing
Re: Miniart 1/35 SU-76M
Posted: Sat Jun 13, 2020 6:51 pm
by alextheblue
Re: Miniart 1/35 SU-76M
Posted: Sun Jun 14, 2020 2:34 pm
by digger303
Re: Miniart 1/35 SU-76M
Posted: Sun Jun 14, 2020 6:57 pm
by Tomcat64
Cheers guys
Miniart 1/35 SU-76M - Build Part V
Posted: Sun Jun 14, 2020 7:00 pm
by Tomcat64
Just a single pic for this update as I managed to get the left side tracks done - either my maths was slightly out but I think I've used one more link on this side than I did on the other side...

The tracks & wheels were taken back off and mounted on cocktail sticks ready for painting later on - and that's all for this one this weekend, I'm planning to start back on the hull this week.
Thanks for all the support & positive comments about the tracks
Miniart 1/35 SU-76M - Build Part VI
Posted: Sat Jun 20, 2020 2:41 pm
by Tomcat64
I managed to get a decent session at the bench with this yesterday and progress continues to be slow & steady
With the running gear removed attention returned to the lower hull and various small bits & pieces without too much to report other than continual clean up of mould lines and flash

I've added my own clumsiness to the challenges already provided by the kit because around the other side and I managed to drop one of the small sub-assemblies (red arrows) and haven't found it yet; I can leave that unattended until the end of the build and if I haven't trodden on it in the meantime I'll bodge something to give the necessary impression. Aside from that part 32 (magenta arrow) just didn't fit into the groove available and had to be carefully sanded, also from the review digger posted I glued it in place flush with the top of the hull side rather than to the bottom of the groove. Finally we'll come back to the bump indicated by the orange arrow in a little while...

Onto section 13 and I lost part 158 as well and replaced that with 0.5mm brass wire before finding it again! Otherwise nothing too bad to report although I didn't bother fitting 182 as the location was vague to say the least and it didn't seem to be necessary with the hatch closed.

Ok section 14 and part 141 (red arrow) had so much thick flash on it that I had to keep checking the references to make sure I was removing excess plastic and not part of the kit. Also remember the orange arrow from a couple of stages ago? Well that bump prevented part 141 from sitting flush on the hull on the left hand side so I filed a groove in it (red arrow in the inset photo) to allow 141 to sit down. The fender was warped and didn't fit at all well around the final drive housing; I've managed to get it more or less in place but some filler will be required there. Otherwise I've left the pioneer tools and headlamp lens off until later.

Section 15 didn't present too many challenges aside from needing to drill through the locating holes on part 146 from the underside

I skipped 16 as that deals with the build up of the exhaust cans and I'll build & paint those separately prior to final assembly if I can. So onto 17 and no real dramas here as again I've left off the pioneer tools, but have added the spare track links as I wasn't paying attention so will need to pick those out when everything is painted.

That's all for now - the kit just keeps on "giving" but hoping to get some more bench time to see if I can move it along a bit more this weekend.
Thanks as always for checking in
Re: Miniart 1/35 SU-76M
Posted: Sun Jun 21, 2020 12:27 am
by digger303
I'm saddened that the kit is still setting up some issues yet it does look good.
Thanks for pointing out all the little trouble spots, I shall be able to come back and use it as a ref later.
Re: Miniart 1/35 SU-76M
Posted: Sun Jun 21, 2020 8:37 am
by Stokesy44
Re: Miniart 1/35 SU-76M
Posted: Sun Jun 21, 2020 10:41 am
by Tomcat64
Miniart 1/35 SU-76M - Build Part VII
Posted: Sun Jun 21, 2020 10:57 am
by Tomcat64
I had another couple of hours at the bench yesterday and managed to move this along a little further despite the kit's best efforts to defy me
First up was the right hand fender assembly; this went together ok but again the fit around the final drive at the front was not great and needed some persuasion to get in place. And the locating "nubs" on the radiator block (at least I think that's what it is) didn't align with the locating holes on the hull, so that was resolved by sanding off the lower pair.

Over the page to section 19 and this is the installation of the gun assembly as well as the start of the rear compartment. It won't come as any surprise to find that the post on the gun assembly didn't fit the locating hole in the hull so this was widened, and the securing pin (81) was fumbled into place and cemented to the hull so that the gun could be removed. This is a really awkward manoeuvre to get the pin in place due to the location under the deck. The rear wall & floor panel went in without too much problem, but would have been a lot tougher with the gun in place so leaving it removeable is definitely the way to go.

Section 20 added a seat and upper panel to the rear side section - I opted to leave the upper panel (part 43) off until the section was installed in the hull

This proved to be the right approach as the panel required some sanding to get to sit properly into the available grooves & gap

Once again doing this with the gun assembly in place would have been really awkward

I've then skipped sections 22-26 as they deal with the build up and installation of the ammo bins & rear bench seat which I'll leave until later.
Onto 27-29 which build up the front wall of the casemate, these are just butt joints and I've highlighted a couple of returns at the bottoms which will come into play in a moment

Skipping section 30 for the moment, I wanted to see how the front wall fit onto the assembly with/without the gun in place and the first thing I hit was that those two returns arrowed above foul on the stepped section highlighted below, so faced with the choice of filing a groove or removing them I chose the latter.

As an added bonus the front wall didn't sit flush with the deck with the gun in place; this is due to the gun sitting too high on the mounting post so I've started sanding back the post on the gun assembly to get it to sit lower. I'll carry on with that this afternoon and hopefully get the rest of the casemate built up as I really want to try and leave the sections removeable if I can to aid painting.
Thanks again for looking in
Miniart 1/35 SU-76M - Build Part VIII
Posted: Mon Jun 22, 2020 8:30 am
by Tomcat64
I got some more bench time in around odd-jobs yesterday and started with working on the casemate section.
After another test fit I found that the long "prongs" on the front wall were still fouling on the hull even with the returns sanded back, so having lost patience at that point I trimmed them back to the main assembly. I may install some plastic strip into the hull box later if I think it needs it there for detail.
Then I moved onto the side walls; on the right side there are a couple of lugs that I assumed were for locating the big box (part 155) over, but with the benefit of hindsight this probably wasn't the case and I think the box should have been fitted farther forward if possible

Nothing much to report on the left hand side other than a couple of shallow epms that needed sanding back; I've left the rifles off of both walls for now as I'll paint them separately

I then went "off sheet" to build up the casemate sections separately from the hull as they were easier to manipulate this way. I also grabbed the corner plates (parts 139 & 115) to add some stability. The instructions show these sitting on top the walls, but I've added them into the corners as I couldn't get the angles to work on top, but this may have been me running out of patience again... I might try & relocate the right hand one again later as that just doesn't look right with the bolt heads where they are...

Going back to the box in the right sidewall, once installed on the hull this fouled on the internal walls, which I think would have been avoided if the box was slightly further forward but it was too secure for me to remove without causing damage at this point.

So with some surgical sanding of the wall on the lower hull as well as the bottom of the box itself I got it sitting in the hull more or less properly. So added the rear wall, which needed a little sanding to get to sit properly but nothing too bad there.

Next question was could I get the thing off again in one piece... yep looks like it

And then would it go back on with the gun in place? Again yes - although there's a bit of flex to iron out when it comes to final fitting

With that done I added the rails which miraculously hadn't broken on the sprue, as well as some of the other greeblies such as viewing scopes

But the aerial didn't survive and was replaced by an aber one from the spares box. The protector thing (part 135) was so badly cast it's just a U-shaped lump so I'm probably going to replace that with something thinner as it just looks clunky

And so with the power of a bit of masking tape the build is more or less completed

And looks more or less the right shape...

I need to build up the exhaust system, ammo bins and rear bench and then work around filling where necessary and then it'll be ready for primer.
Talking of paint
@digger303 do your instructions give any indication of where the decals should go? Mine just show an all over green scheme with no markings!
Thanks for looking in
Re: Miniart 1/35 SU-76M
Posted: Mon Jun 22, 2020 8:53 am
by Stokesy44
Looking really good Sir. Plenty of TLC and its really come together.
As for the decal positions, it looks like they were on the side screens surrounding the fighting compartment, nothing on the hull itself. As for actual positioning, it looks like you can do what you like, no 2 examples I saw were the same!
Re: Miniart 1/35 SU-76M
Posted: Mon Jun 22, 2020 12:06 pm
by digger303
No my instructions are the same as yours...bland. I have the different boxing's all with the same instructions the only thing I could see changed was the coloring on the decals. One is a bit creamier than the other. In fact I sold one of those kits last week. I couldn't see any point in having the same agony twice.
Those corner reinforcing corner plates. I think you have them in the right spot. If I was fabricating a structure that's the way I would weld them in..Far stronger.
Re: Miniart 1/35 SU-76M
Posted: Mon Jun 22, 2020 1:38 pm
by ElCapitan
Good perseverance so far - I'm sure it'll look great and be worth it in the end.
Interesting to see the differences on your kit compared with my Tamiya one. That big box is a radio on mine, and mine has a jack where yours has a horn.
Re: Miniart 1/35 SU-76M
Posted: Mon Jun 22, 2020 5:22 pm
by Tomcat64
Stokesy44 wrote: Mon Jun 22, 2020 8:53 am
Looking really good Sir. Plenty of TLC and its really come together.
As for the decal positions, it looks like they were on the side screens surrounding the fighting compartment, nothing on the hull itself. As for actual positioning, it looks like you can do what you like, no 2 examples I saw were the same!
Thanks mate - in that case I'll see how the decals perform before making a final decision as having looked at the sheet they look a little ropey!
digger303 wrote: Mon Jun 22, 2020 12:06 pm
No my instructions are the same as yours...bland. I have the different boxing's all with the same instructions the only thing I could see changed was the coloring on the decals. One is a bit creamier than the other. In fact I sold one of those kits last week. I couldn't see any point in having the same agony twice.
Those corner reinforcing corner plates. I think you have them in the right spot. If I was fabricating a structure that's the way I would weld them in..Far stronger.
Thanks for checking Digger! And yep after a bit more research it looked like I'd got those corner plates installed correctly more by luck than judgement, all the pics I've seen have them flush with the top of the side wall and not perched on top
ElCapitan wrote: Mon Jun 22, 2020 1:38 pm
Good perseverance so far - I'm sure it'll look great and be worth it in the end.
Interesting to see the differences on your kit compared with my Tamiya one. That big box is a radio on mine, and mine has a jack where yours has a horn.
Cheers Rob - and yep I've been checking in on your photos for references to see how Tamiya tackled some of the bits that Miniart have left a little... "vague"
Miniart 1/35 SU-76M - Build Part IX
Posted: Mon Jun 22, 2020 5:31 pm
by Tomcat64
Just a few odds n sods to finish up today starting with the exhaust system - these have been left removeable to allow for rust painting off the main hull. I drilled out the tailpipes as they were blank ends. Also there was a LOT of flash on the pipes for these so care was needed not to break the parts while cleaning up.

Ammo bins were assembled. Nothing too much to report here other than a couple of epms.

The antenna guard was replaced by a bit of scrap PE fret cut to size and shaped (more or less) around the shank of a drill bit - it's not the same shape as the original but looks better than the badly cast piece

The rear bench was test fitted to get the stays in place. Note the arrowed location nub - this was missing from the cast and had to be bodged out of a bit of scrap.

And finally I didn't find the lost suspension greebly so bodged a replacement out of an unused part, scrap plastic and a short bit of brass wire - I think it'll do the job when everything is green and covered in mud

Talking of unused parts I spotted a part I hadn't used while doing a final inspection of the frames prior to binning and it turned out I'd missed a bit off the gun assembly so that was sanded down and fitted (part 100 for those that are interested). Otherwise that's the build done with the pioneer tools & ammo ready to be cleaned up, and a dab or two of filler applied strategically. This will be sanded down and ready for priming hopefully later this week.
Thanks again for checking in
Re: Miniart 1/35 SU-76M
Posted: Mon Jun 22, 2020 6:43 pm
by Kevthemodeller
Off to a good start Neil, with some nice modification work.
I wouldn't expect that with Miniart, the do get good reviews.
Re: Miniart 1/35 SU-76M
Posted: Mon Jun 22, 2020 7:34 pm
by Stokesy44
Almost ready for paint!

Re: Miniart 1/35 SU-76M
Posted: Mon Jun 22, 2020 7:43 pm
by Hawkmoon

Nicely done and looking the part now