Page 1 of 1
Revell 1/48 A10 Thunderbolt II
Posted: Wed Oct 16, 2013 11:54 am
by Gav0909
So with my Cold War GB on hold for now I thought I would make a start on this. I have other kits I could start, but I have been itching to start this one ever since I got it.
Now I have heard some bad things about the fit of this kit in certain areas, but at least I can go into the build with that in mind. I did a review of this kit which I have linked below.
[youtube]Dio6CGcpUP4[/youtube]
Its an old tooling (1986), however as far as I know its still considered one of the most accurate A10's in 1/48 available today, despite offerings from Italeri and Hasegawa. Now if you watch the review you will see that its raised panel lines etc. However I am not worried about this, and in fact I think that it actually lends to a more authentic look on this kit. It is covered in rivets, which is cracking, really nice. So we shall see how we go!
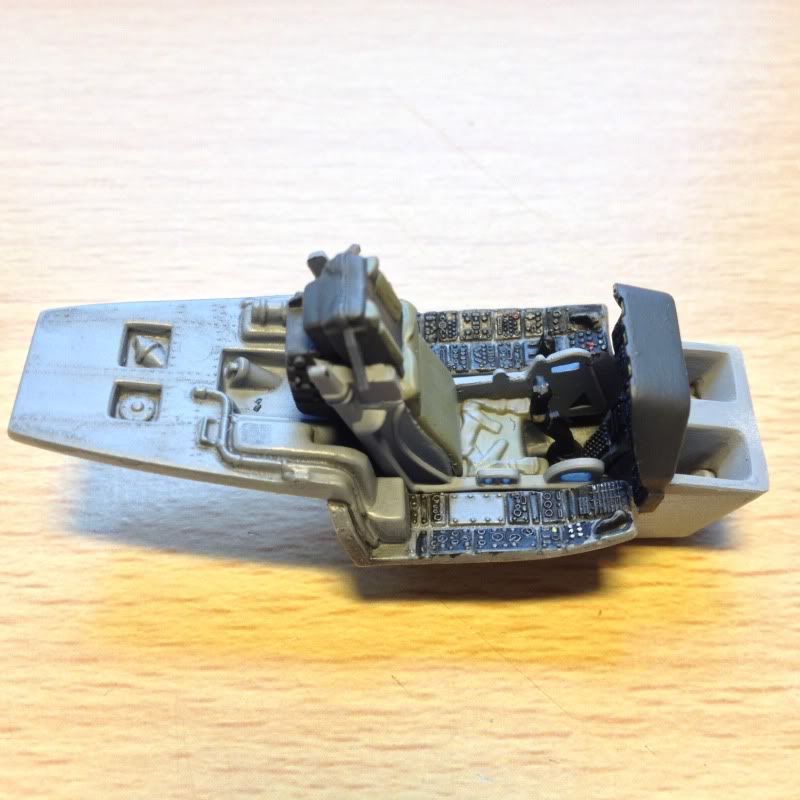
I have built up the cockpit tub (only 3 parts) and painted the consoles etc. The grey has had a wash and a light drybrush which might not be evident in these pics. There is some silvering on the floor to represent worn paint. All the consoles had a light grey drybrush and then the odd button/switch picked out in white or red etc. The real thing is mostly black instruments with grey buttons. I still have some details to paint on the control stick and on the ejection seat. So its not fully done yet.


I painted up what is one side of the front wheel well. I think I might put another wash in there, the real thing is quite clean on aircraft, so the wash is more to give some depth and definition rather than as weathering in this case. But it seems to have pulled away from the ribs somewhat so will revisit that.

This is the rest of the wheel well, and the underside fuselage where the cannon is located. Not painted yet, but its really nicely detailed. The front undercarriage leg is awesome, I can't think of anything I would need to add to that.

Other fuselage half. The tiny grey bit is the cockpit sidewall detail. Might not seem much, but that is literally all there is in terms of sidewall, as the pilot sits so high in this aircraft there is no sidewall almost. The diamond pattern fabric is nicely rendered though.

And just to show the size of this thing. This is 1/48, and this is the fuselage next to my 1/32 Hawk!

Comments and criticism is all welcome.
Re: Revell 1/48 A10 Thunderbolt II
Posted: Wed Oct 16, 2013 12:08 pm
by Paul
Nice gav
It is surprising the size of some aircraft, especially when you see them the same size yet they are different scales, good job so far.
Ps that package should be with you today

Re: Revell 1/48 A10 Thunderbolt II
Posted: Wed Oct 16, 2013 12:22 pm
by Nige201980
Good luck with it mate hope you have better look than I did mate.
Re: Revell 1/48 A10 Thunderbolt II
Posted: Wed Oct 16, 2013 12:24 pm
by Gav0909
Cheers Paul, no post yet but then again it seems to just be completely random round here as to what time the postie comes!
Cheers Nige. Yeah I dry fitted the wheel well into the fuselage last night and the fit is ok. There are some gaps, but nothing a touch of filler won't sort out. But thanks for the heads up on them, at least I can be aware of the bits likely to cause trouble.
Re: Revell 1/48 A10 Thunderbolt II
Posted: Wed Oct 16, 2013 12:48 pm
by Daimyo
Looks good and good luck with the build!

Re: Revell 1/48 A10 Thunderbolt II
Posted: Sat Oct 19, 2013 8:29 am
by Nige201980
Gav0909 wrote:
Cheers Nige. Yeah I dry fitted the wheel well into the fuselage last night and the fit is ok. There are some gaps, but nothing a touch of filler won't sort out. But thanks for the heads up on them, at least I can be aware of the bits likely to cause trouble.
Not a prob mate im looking forward to you doing this my get my mojo back to get mine back down.
Re: Revell 1/48 A10 Thunderbolt II
Posted: Sat Oct 19, 2013 9:34 pm
by chief5437
Hey Gav, just a quick heads up. I built this kit, and if you don't want to use the clear support leg, it needs a TON of nose weight to keep it on the deck.
HTH, good luck with the rest of it.
Re: Revell 1/48 A10 Thunderbolt II
Posted: Wed Oct 23, 2013 10:57 am
by Gav0909
Cheers Chief, I will make sure to put a load of weight up there. If its not enough then tail peg it will be I suppose!
Ok, so I am not able to put as much time into modelling as I was for the time being and so I am doing small odds and sods that don't take as long. And leaving bigger jobs like masking/airbrushing til I have some more time on my day off.
To that end I did a bit of work on the engines last night. You are supposed to put the rear fan part into what is the upper part of the engine housing, and the 4 "arms" are supposed to match up with recesses. However the side arms weren't long enough, so some small shims of plasticard later and they fit nice and snug. I then glued the tail nozzle cones in place. I believe that the real things have a perforated look to them, or the are riveted or something. But I am not drilling loads of holes in there, and I don't have a riveting tool, so they will stay plain.

I forgot to take a picture after I had put the intake fans in place, and also gotten the other cover on. Some taping was needed to pull the intakes to the right place while the glue dried, but I think all in all, once the glue is dry, and a touch of filler here and there and a sand, it will look ok. So no major issues really. Here are the parts I had cleaned up for the engines.

So not a very interesting update, but an update nonetheless.!
Re: Revell 1/48 A10 Thunderbolt II
Posted: Wed Oct 23, 2013 12:33 pm
by Paul
Looking good gav
Re: Revell 1/48 A10 Thunderbolt II
Posted: Wed Oct 23, 2013 1:29 pm
by Nige201980
Looking good mate already going better than mine lol
Re: Revell 1/48 A10 Thunderbolt II
Posted: Thu Oct 24, 2013 11:57 pm
by Gav0909
So I got the engines finished up this evening. Won't know for sure if I need to do some more filling and sanding on the engines until I get some primer on there. But not as much of a ball ache as I thought they might be. I also hollowed out each end of the raised rectangular "thing" between the engines. This is open at each end on the real aircraft, I believe it to be some kind of intake. So I opened up that as the kit one was closed.


And I put one wing together to see how that fit. Was suprisingly good!

I think a simple sanding of the seams will work fine here.
Comments welcome!
Re: Revell 1/48 A10 Thunderbolt II
Posted: Fri Oct 25, 2013 1:43 am
by BrummieModeller
You really can't look after your cutting mats can you my gav larrr LOL

( stop knocking over your mr cement s )
I suppose it looks ok LOL
nah really it will look good once you've finish it will be nice build seen as its a old kit

Re: Revell 1/48 A10 Thunderbolt II
Posted: Fri Oct 25, 2013 2:31 am
by LocoFeldwebel
Very nice start. It is a bit of a tail-sitter so balance the nose well. I worked around these during the early 90's and the wheel wells do get grimey so your weathering looks pretty good so far. Can't wait to see your progress.
Re: Revell 1/48 A10 Thunderbolt II
Posted: Thu Nov 21, 2013 1:45 pm
by krushgroove
What a coincidence - I'm building this exact same kit right now! (see my sig)
I wonder how you are going to deal with the engine openings, (forgive my lack of technical jargon) as the internal part with the fan blades has the circular flange which sticks out from the engine cover. Are you going to leave that as-is or sand/cut it down?
I also have major issues with one side of the wings, when fitted to the fuselage - it just doesn't line up at all and while I'm not going for 100% realism it looks awful, especially when you can look at the other wing join and see it's nearly perfect.
Re: Revell 1/48 A10 Thunderbolt II
Posted: Thu Nov 21, 2013 1:57 pm
by Gav0909
Hey dude,
Yeah I don't know for sure yet. I might whack some filler in there and just try to make it a smoother profile around the inside of the intakes, rather than having the slight gap and step there is now.
Re: the wings. My dry fitting of the wings suggest the wing-to-fuselage join should be quite good, and certainly not significantly different from one side to the other. the wing tabs that meet inside the fuselage do need to go a certain way. The right wing tab needs to sit on top of the left wing tab. Otherwise one wing sits lower than the other. So make sure they are correct first of all. If you still have an issue I don't know why! My plane is still in bits at the moment so I haven't yet tried to glue the wings in place. I need some nose weight before I can close the fuselage up.
Cheers!
Re: Revell 1/48 A10 Thunderbolt II
Posted: Thu Nov 21, 2013 2:18 pm
by krushgroove
Hmm I remember definitely triple-checking the tabs on the ailerons (?) the horizontal tail bits but I can't remember if I triple-checked it on the main wings...now I'm paranoid and want to see if there's any way to remove the wings from the fuselage, because it is just one side that is affected (I'm fearing the answer is no...)
BTW I've been to Oban, lovely place!
Re: Revell 1/48 A10 Thunderbolt II
Posted: Thu Nov 21, 2013 3:43 pm
by Gav0909
Hmm yeah if they are glued there is a good chance that they aren't going to come off easily. I think it might be worth trying to check though! As that might well be your issue.
So I did some more work on this a while back and so thought I would share that with you all..
Wings are made

Pylons are going on, still got some to do

Tail planes and fins are done.

Cockpit tub and front wheel bay are installed in the fuselage

Cockpit tub, seat still needs some painting before I glue it in.

Some of the ordnance I have built up so far, the huge drop tank, ECM pod and two Mavericks.

Comments are welcome. I am a bit stumped on the main build until I can get some suitable nose weight. I can get some steel shot from work but I keep forgetting to go and grab some. But when I do, I will mix a load with some epoxy and cram as much into the nose as I can then button the front up and hope that its enough weight! The joy of steel shot is that it will fill all the space, and its dense so hopefully I can get enough in there.
Cheers
Re: Revell 1/48 A10 Thunderbolt II
Posted: Thu Nov 21, 2013 4:26 pm
by Nige201980
Gav if i remember rightly double the amount in the instructions and if you don't have room in the nose i put some just behind the cockpit in the main fuselage.
Re: Revell 1/48 A10 Thunderbolt II
Posted: Fri Nov 22, 2013 2:23 am
by rm6239
Hi Gav
This beast needs a lot of weight, fill up the nose, then under and behind the cockpit, I remember under estimating it by a huge margin, and having to slip weights dipped in super glue through a gap behind the cockpit tub and then holding the plane nose down until the super glue dried, really not pretty.
Looking forward to seeing yours come together.
cheers
Rossco
Re: Revell 1/48 A10 Thunderbolt II
Posted: Fri Nov 22, 2013 7:27 am
by coladito1
I have about 6 A-10s in my stash!! I looooveee the warthog, and yours is looking mighty fine!!
Re: Revell 1/48 A10 Thunderbolt II
Posted: Fri Nov 22, 2013 7:34 am
by T3hGuppy
Some great work so far dude.
Would you recommend this kit?
Looking for more jets for the stash
Re: Revell 1/48 A10 Thunderbolt II
Posted: Fri Nov 22, 2013 10:49 am
by krushgroove
I used about 40g of lead wheel weights in the nose, hopefully that's enough - where does one get steel shot from in the UK? There's no model shop near me that I know of...is there a trade/industrial shop that would carry it? Angler's shop?
Gav0909 wrote:Hmm yeah if they are glued there is a good chance that they aren't going to come off easily. I think it might be worth trying to check though! As that might well be your issue.
I was able to force the wings off, I think the tabs were flipped. The gaps between the wings and fuselage are MUCH less now!
(I hope you don't mind chatting about my concurrent build going on in your build thread! but I don't want to start a build thread of my own while yours is ongoing)
Re: Revell 1/48 A10 Thunderbolt II
Posted: Fri Nov 22, 2013 10:56 am
by Gav0909
Krushgroove - not at all mate! Happy to share tips with this kit, as I have heard bits of it can be a pig, so if you come across a way to make parts fit better etc, by all means share them! And I will do likewise!
As for steel shot, that would be telling

. I am a PhD student a marine research lab, and we use deep-sea lander systems for some of our work. These require ballast to make them sink to the seafloor, and we use steel shot in what are basically big paint tins lol. We buy the steel shot in bulk on pallets in 25kg bags (which are tiny, which shows how dense it is!). I believe its produced for use in sand blasters (or in this case steel shot blasting). So its not much more than sand sized. I was thinking of mixing this with epoxy to make a heavy glue which I can then put into all the nose nooks and crannies.
T3hGuppy wrote:Some great work so far dude.
Would you recommend this kit?
Looking for more jets for the stash
Yeah I think I would. I hear this is still the most accurate representation of an A10 at 1/48 scale you can get, despite its raised detail. And I must say though, although its raised, the surface detail on this thing is amazing, if it was all recessed then this would be on par with top end kits in terms of detail. Fit is a bit "loose" in places, but careful dry fitting, trimming and patience will see it build up without too many headaches I don't think.
Luis - I also love an A10, they are just mean! Like the Apache, ugly, but oh so good at killing stuff!
Rossco - yup I hear ya! I will be sure to get as much weight as I can in the nose there don't worry!
Kind of want to do some more work on her now, but I have work in the pub every single night until Weds next week, so no free evening until Thursday next week. And I am working full time on my thesis during the days as well, even on weekends!
No rest for the wicked!
Re: Revell 1/48 A10 Thunderbolt II
Posted: Fri Nov 22, 2013 12:26 pm
by krushgroove
Cool, I'll try to share what I can, it won't be much since this is the first kit I've assembled in absolutely ages and I'm trying to move quickly so I can get to painting, which is more my forte'

being super-patient with assembly and prep isn't really my thing but I am trying to be much better about than when I was assembling models as a young'un
Actually I told a bit of a lie, on accident - the tabs on the wings weren't flipped, as I just remembered that last night I put glue in the same locations as I did originally - it's just that the wings have to be...massaged, shall we say, into correct position to minimize the gaps on the top, and then have a look at the underside and check the gap between the flaps and the fuselage. I'll definitely need to put some filler down though.
One thing I do need to ask though: how do you intend to deal with the raised riveting after you've done your filling and sanding? There are thousands of rivets and they're all raised on the model, and doing any sort of filling or sanding will just obliterate them, which is a real shame.
Re: Revell 1/48 A10 Thunderbolt II
Posted: Fri Nov 22, 2013 1:12 pm
by Gav0909
Careful sanding and filling! So far I have just taken care when filling and sanding, but there will be bits where I lose part of a panel line etc. They are quite fine, and I think once painted I will get away with it. Other than that, nothing, just be careful!
Re: Revell 1/48 A10 Thunderbolt II
Posted: Thu Nov 28, 2013 1:14 pm
by EasyEight96
If I not mistaken I got this kit too maybe will build it next round . Thanks Gav at least I know how long is this monster
Re: Revell 1/48 A10 Thunderbolt II
Posted: Thu Nov 28, 2013 1:26 pm
by Gav0909
Haha, yeah its a bit of a monster alright! I might get back to some work on this later today, I still have no nose weight for it, but I can make up some more of the bombs, missiles etc for the wings, and get the pylons in place on the other wing. After that I will be running out of things I can do until I get some nose weight for it.
I could make up the main undercarriage legs ready to install, and bits like that I could probably prime and start painting as well.
Re: Revell 1/48 A10 Thunderbolt II
Posted: Mon Dec 02, 2013 2:19 pm
by RobertA
Looking mighty fine..
Saw the real thing at Duxford yesterday, hanging from the ceiling in the Americat hanger..
Re: Revell 1/48 A10 Thunderbolt II
Posted: Tue Dec 10, 2013 12:17 am
by Gav0909
Cheers Rob, they are brutal aircraft, but just gorgeous at the same time, a bit like the Apache is.
I finally remembered to pick up some steel shot from work to use as nose weight. My initial plan was to mix the shot with PVA so that it would form a solid mass in the nose, but that I could fill the space easily with the mix. However I noticed that the shot was drying in clumps, and that some of the clumps weren't sticking together. So I took some out and mixed it with epoxy instead and put it back in. This seems to have worked. And I definitely have enough weight.
Here are some pics of my progress.


And as she stands at the end of tonights work.

I also tried out my new Neo by priming the drop tank and ECM pod, works brilliantly!!
Comments are most welcome. Please excuse any spelling mistakes, I posted this from my phone!
Re: Revell 1/48 A10 Thunderbolt II
Posted: Sat Dec 14, 2013 3:12 pm
by Gav0909
Quick chat update about my A10 Thunderbolt from Revell.
[youtube]1oTggQcD-PI[/youtube]
Re: Revell 1/48 A10 Thunderbolt II
Posted: Sat Dec 14, 2013 6:55 pm
by JayCub
Always liked the look of this one, shame about the raised lines more so as it can't be really well hidden, the last two Revell kits i bought had fit issues a bergpanther and a 148 spitfire.
your work is great Gav and i like browsing your work logs and videos
Tom
Re: Revell 1/48 A10 Thunderbolt II
Posted: Sat Dec 14, 2013 10:59 pm
by Gav0909
Cheers Tom. I want to do a good job on this, but the seam is noticable so I need to do something about it. I am just going to take my time and do what I can with it. Maybe I can find some stick on raised rivets so that if I do lose some I can replace them. The lines are a touch easier to avoid, its the rivets in places that are a pain.
Re: Revell 1/48 A10 Thunderbolt II
Posted: Sat Dec 14, 2013 11:20 pm
by RobertA
Have seen and commented on the video as well.. getting behind again on videoviewing but I have been very busy building my Torpedo boat, which has to be done by Monday.. I'm 97.5% done..

I've also posted my latest build on YouTube..
It's a Panzer.. which you have probably seen on facebook already!
R
Re: Revell 1/48 A10 Thunderbolt II
Posted: Mon Feb 10, 2014 12:35 am
by conradschmid99
that's a great idea to balance it


