Even though I have several in various states of finish I'm going to try this beautiful plane.
This is just the announcement - I'll post the full intro later - because I have a few things to clean up before I start.
Also, this guy is giving me looks. Really, really intense looks.
Re: DBMiller's Folgore
Posted: Tue Feb 02, 2021 2:57 am
by Twokidsnosleep
Is a good looking aircraft. That figure, not so good looking
Re: DBMiller's Folgore
Posted: Tue Feb 02, 2021 10:58 am
by Tomcat64
Now that's something a little out of the ordinary - looking forward to seeing that come together with the assistance of the Alien cocktail waiter
Re: DBMiller's Folgore
Posted: Wed Feb 03, 2021 1:43 am
by DBMiller
Macchi C202 Folgore
The Folgore doesn't have the all around elegant curves of the Spitfire or the near perfection of the Mustang but
what a beautiful profile! The cockpit so far back makes it a real hot rod - an Italian super car!
It lacked firepower and reliable radio (and several other components were problematic) but still did very well for the Italian air force.
One of the strangest features is the difference in wing length. The engine had so much torque that it tended to roll!
(see the Wiki entry below)
"As with the C.200, to counteract the torque of the engine, Castoldi extended the left wing by 21 cm (8.5 inches);
this meant that the left wing developed more lift, offsetting the tendency of the aircraft to roll to the left
due to the rotation of the propeller."
The Macchi C.202 in the National Air and Space Museum is one of only two remaining in the world.
The early history of this airplane is obscure, but it was among many Axis aircraft brought to this country
for evaluation at the Army's Air Technical Service Command at Wright Field, Ohio, and Freeman Field, Indiana.
After evaluation, it remained in storage for years.
In Italian but still fun.
Re: DBMiller's Folgore
Posted: Wed Feb 03, 2021 9:38 am
by ElCapitan
Looks awesome. I never knew that about the wing lengths...was it unique to this aircraft?
Re: DBMiller's Folgore
Posted: Wed Feb 03, 2021 12:28 pm
by Quax
its a great subject - definitely pulling up the chair and the popcorn
Paul
Re: DBMiller's Folgore
Posted: Wed Feb 03, 2021 2:10 pm
by Tomcat64
Like Rob said I didn't know about asymmetric wings to counteract the torque either - fascinating stuff
Re: DBMiller's Folgore
Posted: Thu Feb 04, 2021 9:00 am
by Stokesy44
Cracking subject.
Italian aviation was no slouch back in the day. Any RAF pilot who flew from Malta soon learned to respect them.
Looks a beauty
Re: DBMiller's Folgore
Posted: Thu Feb 04, 2021 9:46 am
by bfrd
I am embarrassed to say that this is a new plane for me. Looks awesome!
Re: DBMiller's Folgore
Posted: Thu Feb 04, 2021 6:10 pm
by DBMiller
Leave it to me to mess up right at the start - and I haven't even opened the bag yet! I was surfing the web looking for interesting Folgore decals in case the very old Hasegawa set is no good. I found markings that I love - "STORMO! DECALS - MACCHI C.205V ITALIAN ACES - PART II" - so I ordered them.
Problem - they are for the c.205 Veltro (greyhound) not the c.202 Folgore (lightning). It's not like it wasn't right there in the description or anything!!!!!
The differences between the two are enough that it would bug the hell out of me to ignore them - especially the two large oil radiators under the exhaust pipes on the c.205. The other differences could, maybe, squeak by but I'd hate to run into fit trouble - so, I ordered another kit. What else was I to do? I'll use the 202 kit decals on the Folgore and hope for the best.
Kit photos soon.
Re: DBMiller's Folgore
Posted: Thu Feb 04, 2021 10:26 pm
by Miiqqula
A couple of months ago, a private seller offered me this model ridiculously cheap, but I crammed it right away for no good reason
Will follow this build
Re: DBMiller's Folgore
Posted: Fri Feb 05, 2021 1:28 am
by DBMiller
Here is the kit. If all goes well I will be using the included decals. If not, I think I can use some of the decals that come with the set I ordered even if it is for a later version of the airframe.
Typical Hasegawa kit. Nice looking, no flash, etc.
The decals!
The parts!
Re: DBMiller's Folgore
Posted: Fri Feb 05, 2021 10:10 pm
by DBMiller
I've started!
Here is the standard cockpit first step:
The tape covers the gun sight - it's a clear part.
Not a very good diagram for placement.
Sidewalls. Only two extra parts to glue here.
Some paint! Light green for the interior and steel for the seat.
Gear bay area with wing spar.
We lost our remaining kitty last year so I have no furry pal to share my build. Here is a special sea chanty in his honor.
Re: DBMiller's Folgore
Posted: Sat Feb 06, 2021 10:22 pm
by DBMiller
Just a quick update on the cockpit.
I added some dirty wash to the nooks and crannies. I'll add some dry brushing when it's dry.
Re: DBMiller's Folgore
Posted: Sat Feb 06, 2021 11:06 pm
by Kevthemodeller
Stokesy44 wrote: Thu Feb 04, 2021 9:00 am
Cracking subject.
Italian aviation was no slouch back in the day. Any RAF pilot who flew from Malta soon learned to respect them.
Looks a beauty
What he said looking forward to seeing this come together
Re: DBMiller's Folgore
Posted: Sun Feb 07, 2021 10:44 pm
by DBMiller
This is so odd. I'm still working on this and really moving along! Dare I suggest I'll finish this one?
Seat glued in.
Wings and sidewalls painted and in - although the instructions show the gear wells to be the same light blue as the underside of the plane. I'll have to change that.
Fuselage halves together! The wings are not glued on yet - this is just to check the fuselage alignment.
Check this out! The left wing is longer than the right - just like on the real plane! I'd have bet Hasegawa wouldn't have bothered.
Added guns to the engine cowling. They stick out way too far - you can't see them at all on the real plane unless you look from directly above. I'll have to cut them back.
Re: DBMiller's Folgore
Posted: Mon Feb 08, 2021 12:51 am
by Twokidsnosleep
What is the wing length difference for??
Re: DBMiller's Folgore
Posted: Mon Feb 08, 2021 12:57 am
by DBMiller
Twokidsnosleep wrote: Mon Feb 08, 2021 12:51 am
What is the wing length difference for??
From my intro post:
One of the strangest features is the difference in wing length. The engine had so much torque that it tended to roll!
(see the Wiki entry below)
"As with the C.200, to counteract the torque of the engine, Castoldi extended the left wing by 21 cm (8.5 inches);
this meant that the left wing developed more lift, offsetting the tendency of the aircraft to roll to the left
due to the rotation of the propeller."
"As with the C.200, to counteract the torque of the engine, Castoldi extended the left wing by 21 cm (8.5 inches);
this meant that the left wing developed more lift, offsetting the tendency of the aircraft to roll to the left
due to the rotation of the propeller."
Apologies, I looped back and read but didn't see that info
Isn't that interesting
I do like a problem solver who thinks and fixes an issue quickly with novel approaches
Wonder why other high torque aircraft didn't have that problem?
A spitfire with that big V12 Merlin should have been doing loops to the left!
"As with the C.200, to counteract the torque of the engine, Castoldi extended the left wing by 21 cm (8.5 inches);
this meant that the left wing developed more lift, offsetting the tendency of the aircraft to roll to the left
due to the rotation of the propeller."
Apologies, I looped back and read but didn't see that info
Isn't that interesting
I do like a problem solver who thinks and fixes an issue quickly with novel approaches
Wonder why other high torque aircraft didn't have that problem?
A spitfire with that big V12 Merlin should have been doing loops to the left!
If I remember correctly, having one wing longer than the other produced all sort of wonderfull effects when stallling, leading to a very very hard recovery situation.
P.D: Military Aviation History has a video explaining exactly this, and its called "Why the M.C 202 is an OCD nightmare"
Twokidsnosleep wrote: Mon Feb 08, 2021 12:51 am
What is the wing length difference for??
Apologies, I looped back and read but didn't see that info
Isn't that interesting
I do like a problem solver who thinks and fixes an issue quickly with novel approaches
Wonder why other high torque aircraft didn't have that problem?
A spitfire with that big V12 Merlin should have been doing loops to the left!
It does seem like it would be an issue with any single propeller plane - especially the fighters. Maybe it was just overthinking the design instead of training the pilots to be careful!
Re: DBMiller's Folgore
Posted: Tue Feb 09, 2021 4:55 pm
by Tomcat64
Great to see this under way and it's coming together really well too!
What have you done with the real DBMiller???
Re: DBMiller's Folgore
Posted: Wed Feb 10, 2021 8:00 pm
by DBMiller
More gluing and - priming!
See this air intake? I glued it on backwards at first. Luckily I got to it just before it fully cured! I cut it off and re-glued it the right way round. It sure looked right according to the instructions at first - but looking at color references I spotted the error. Whew.
Guns fixed a bit.
Wings glued on. The rear has a gap but the front is pretty good. However - as careful as I thought I was there is still a step on between the left upper wing and the fuselage. It was perfect when I set it aside to dry. I know it was. Really.
Aft radiator on. Waiting for the cover.
First coat of primer!
See this bit circled? It is a part - not molded on. It is smaller than some of the molded parts yet it HAD to be made as an added piece. Why? I can't believe I didn't lose it right off the bat! There are a few other tiny parts that I should have fun with as well.
Shiny!
Re: DBMiller's Folgore
Posted: Wed Feb 10, 2021 10:53 pm
by Twokidsnosleep
You are flying along...hopefully not rolling
Re: DBMiller's Folgore
Posted: Wed Feb 10, 2021 11:21 pm
by aur0ra145
Cool little kit, I don't think the Italian planes get enough love.
Re: DBMiller's Folgore
Posted: Thu Feb 11, 2021 8:02 am
by Kevthemodeller
Coming along very nicely
Re: DBMiller's Folgore
Posted: Thu Feb 11, 2021 9:41 am
by Tomcat64
More great progress - that really is coming along very well!
Re: DBMiller's Folgore
Posted: Sat Feb 13, 2021 4:32 pm
by DBMiller
Took a day off from building. Thought about the paint I have and the colors I need. I didn't want to mail order any because the time it took would break my flow and the sub-freezing weather worried me. I didn't want the paint to freeze on the way here!
I found a store sort of local - about 40 miles away - that sold RC cars and gaming supplies. They stocked Vallejo Model Color paints and I found several that were better than what I had.
This ocher color is much closer to the model on the box, even though the RLM 79 color listed in the instructions is more brown.
Anyway, I didn't like the brownish-tan color I had and this looks nice. Maybe I can use the other for shading.
The Vallejo pale greenish blue is better than the RLM 78 listed but I got both just because.
In any case, the desert must have played havoc on paint so I'll probably be just fine.
The denser color on the wing roots is from trying out the paint I had on hand first then painting over it.
I forgot these! So, a bit more priming to go.
Re: DBMiller's Folgore
Posted: Sat Feb 13, 2021 7:30 pm
by Stokesy44
Blimey, this is rocking along. Nice priming and base colors
Re: DBMiller's Folgore
Posted: Sun Feb 14, 2021 1:13 am
by DBMiller
Tomcat64 wrote: Tue Feb 09, 2021 4:55 pm
Great to see this under way and it's coming together really well too!
What have you done with the real DBMiller???
We're not saying just yet. It depends on how he behaves.
Re: DBMiller's Folgore
Posted: Sat Feb 20, 2021 4:04 pm
by DBMiller
I haven't crashed yet! I've been working on building a new bookshelf in between painting parts.
Here is more blue and tan paint work.
Can't forget the other parts like I usually do!
Re: DBMiller's Folgore
Posted: Mon Feb 22, 2021 12:05 pm
by Quax
looking very nice so far Mr Miller!
Paul
Re: DBMiller's Folgore
Posted: Mon Feb 22, 2021 4:35 pm
by Twokidsnosleep
Good stuff
Show us the bookshelf too!
Re: DBMiller's Folgore
Posted: Mon Feb 22, 2021 7:32 pm
by DBMiller
Twokidsnosleep wrote: Mon Feb 22, 2021 4:35 pm
Good stuff
Show us the bookshelf too!
Maybe! It's tough building something new in a house that is over a hundred years old and very little is square!
Twokidsnosleep wrote: Mon Feb 22, 2021 4:35 pm
Good stuff
Show us the bookshelf too!
Maybe! It's tough building something new in a house that is over a hundred years old and very little is square!
They call that character
Re: DBMiller's Folgore
Posted: Sat Feb 27, 2021 5:41 pm
by DBMiller
So, update on the extra decals (wrong model Macchi) and the new kit (correct model Macchi).
I got the kit and it looks to be the Hasegawa sprues boxed by Italari. The only differences is the extra bits for under nose oil filters (coolers?) And the decals. Oh, the decals! They include a full set, plus extras, of the 'smoke ring' pattern that I like but refuse to paint! Since I won't be using them on the new Macchi they will be going on my current build! I've already tried out one of the extras on a test kit and they lay down very smooth!
The new decals with the version I plan to use (the bottom one with the sand camo).
Also, a few posts back I noted that the instructions call for the cock pit interior to be green but the rest of the interior to be the light blue. This new kit calls for all the interiors to be light green! Do I try to change mine back or just leave it? This is something I need to decide soon!
* * * * * * * * * * * * * * * *
The fuselage stripe comes as a decal but it seemed easy enough to mask and avoid the 'decal look'. Also started painting the nose cone white.
Re: DBMiller's Folgore
Posted: Sat Feb 27, 2021 7:58 pm
by BigWall
It's coming along nicely!
Re: DBMiller's Folgore
Posted: Mon Mar 01, 2021 12:53 am
by DBMiller
More masking and painting. Man, these photos really show up my sloppy work! The masking isn't as smooth or straight as I thought and the painting isn't as clean! Oh, well, just more work for me!
Here is the white done (I thought) on the spinner and fuselage stripe.
Here is the main canopy masked with the green interior color added. I can't wait to unmask this to see how bad it is! The front wind screen - it is so small I don't know how I'm going to mask it! I'll save it for last.
Reverse masking for the tail markings. I added the cross then masked around it to get the shape. There is a decal but I don't want the white to look translucent so I added white paint for underneath. The poor masking should be hidden, mostly, under the decal.
That is some seriously bad masking!
Re: DBMiller's Folgore
Posted: Mon Mar 01, 2021 2:04 am
by aur0ra145
Those are all decals? Dang!
Re: DBMiller's Folgore
Posted: Mon Mar 01, 2021 2:43 am
by DBMiller
aur0ra145 wrote: Mon Mar 01, 2021 2:04 am
Those are all decals? Dang!
Do you mean the 'smoke rings' or the white stripes? The rings are decals and the white is paint. I'll be putting the tail decal on over the paint. With any luck what I painted will be close to the decal size. I measured but I'm of the "I cut it twice and it's still too short" school of craftmanship.
aur0ra145 wrote: Mon Mar 01, 2021 2:04 am
Those are all decals? Dang!
Do you mean the 'smoke rings' or the white stripes? The rings are decals and the white is paint. I'll be putting the tail decal on over the paint. With any luck what I painted will be close to the decal size. I measured but I'm of the "I cut it twice and it's still too short" school of craftmanship.
The smoke rings, there are so many.
Re: DBMiller's Folgore
Posted: Fri Mar 05, 2021 8:20 am
by Stokesy44
Nice looking paint job. Ambitious stuff, those decals!
Re: DBMiller's Folgore
Posted: Fri Mar 05, 2021 3:58 pm
by Tomcat64
Very tidy work masking off the white sections - that looks really crisp
I didn't know they did the "Sand & Spaghetti" squiggles as decals - that's definitely a cure for insomnia!
Re: DBMiller's Folgore
Posted: Wed Mar 10, 2021 4:16 pm
by DBMiller
Getting closer to the scary part - finishing!
Aside from some minor touch ups the painting is done. I still have to glue on some parts before decaling and I have to unmask the canopy to see how bad that came out! Every time I look at my photos on the screen I see more mistakes that I may (or not) have to fix. The horizontal stabilizers need some touch up with the blue paint. The vertical still needs work to fix my bad masking for the white stripes. I think the rest of the fuselage holds up OK except for one little ding I saw.
Here is the main wing masking for the leading edge.
Done- along with the horizontal stabilizer over spray. Also, I decided to re-paint the gear wells and gear light green. It looks better than the blue (which may have been a mistake in the instructions).
The rest of the parts! Props painted black with yellow tips. Gear doors done. Canopy done (fingers crossed!).
The tail cross still needs work. I may just brush paint the tan if it shows up too much after the decals are on. That radiator underneath still needs two parts added but otherwise it is ready for gloss!
Re: DBMiller's Folgore
Posted: Wed Mar 10, 2021 4:57 pm
by BigWall
Coming down to the wire! It's looking great!
Re: DBMiller's Folgore
Posted: Sat Mar 13, 2021 5:33 pm
by Quax
Looks great Mr Miller! Those ring decals are going to look superb but do strange things to your vision!
Paul
Re: DBMiller's Folgore
Posted: Mon Mar 29, 2021 7:21 pm
by DBMiller
Minor update today.
Work on the tail because of the seam between the horizontal stabilizers and fuselage. Over sanded the filler and had more repainting than I wanted. Came out OK though.
Props glued in - nose cone next up!
Wind screen painted by hand. Not so good. I may have to order the masks and do it over. It's so small!
Working on landing gear. The strut has to go from the connecter on the main gear leg to the little hole inside those ridges (see where the tooth pick is pointing). It doesn't really go there to easily so this will take some care.
Re: DBMiller's Folgore
Posted: Mon Mar 29, 2021 7:33 pm
by BigWall
It's coming along nicely and looking great!
Re: DBMiller's Folgore
Posted: Thu Apr 15, 2021 11:08 pm
by DBMiller
I figured out how the extension struts attached! They go UNDER the other struts - not over!
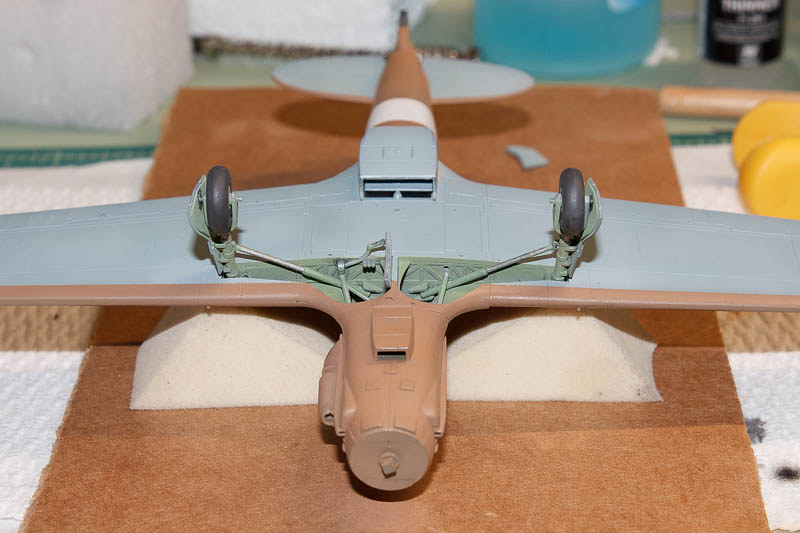
While I was starting to attach the gear doors I discovered a problem.
I attached the main gear on the wrong sides. Break time.
Then I carefully worked them out and put them back correctly. I had to cut the little tabs that held the struts but the super glue I used on the main gear broke free with careful rocking. Whew.
Well, that was an adventure.
Re: DBMiller's Folgore
Posted: Thu Apr 15, 2021 11:24 pm
by Casper
looking great Mr Miller
I find canopies or clear parts this small a nightmare to paint and very difficult to get a crisp edge, pre-cut masks are the best option I think.
Didn't notice the struts were over instead of under until you pointed it out.
casp


 It's not like it wasn't right there in the description or anything!!!!!


 looking forward to seeing this come together