Page 1 of 2
2 humps of a Camel - ......Academy
Posted: Mon Jan 15, 2024 3:29 am
by digger303
As Francis has said we are building Camels. Mines a Academy tooling from way back in 1990 ( my boxing is 2001)with a few add on's hopefully to make it a little more competitive in todays world.
This cost me $20aud a couple of years ago.

Not many parts to it

And apparently the decal sheet makes very roof sheeting.
The wings have hugely prominent ribbing rising up 0.4mm....yep I measured it.

So the first job was to give them a huge sanding.

Now they don't look so bad. Of course being Academy a little sprue goo was needed to fill ejector holes.
Since the part count was a bit on the slim side I decided to jazz it up a tad.

Barracudea seat
HGW seat belt and mask set
Taurus pulsometer
Gas Patch machine gun set.
Part Pe set
Model Maker Decal set....still in transit.
HGW Models 532055 Sopwith Camel - Light Wood....still in transit.
The PE set from part is more comprehensive than I expected with 3 frets covering all aspects of the plane including a pilots seat. It is going to be a little stressful getting that set together I fear.

Re: 2 humps of a Camel - ......Academy
Posted: Mon Jan 15, 2024 3:35 am
by Twokidsnosleep
Oh cool

I am in

Re: 2 humps of a Camel - ......Academy
Posted: Mon Jan 15, 2024 11:49 pm
by RangerNeil
This do sound interesting..... Will be watching avidly - esp. when it comes to the rigging!!

Re: 2 humps of a Camel - ......Academy
Posted: Tue Jan 16, 2024 2:12 am
by digger303
RangerNeil wrote: Mon Jan 15, 2024 11:49 pm
This do sound interesting..... Will be watching avidly - esp. when it comes to the rigging!!
Thanks Neil. One thing about the rigging ....there is no turnbuckles to worry about so it is a bit simpler in that regard.
Re: 2 humps of a Camel - ......Academy
Posted: Tue Jan 16, 2024 4:45 am
by digger303
These are my available wicker seat choices.
Barracuda resin or kit seat or the Part Pe seat.
To my eyes I'm loving the Pe seat, but I will probably use the resin one. As the Pe one is very 2 dimensional.

Re: 2 humps of a Camel - ......Academy
Posted: Tue Jan 16, 2024 7:54 am
by Stokesy44
Count me in. Looking forward to this one
Re: 2 humps of a Camel - ......Academy
Posted: Tue Jan 16, 2024 9:25 am
by cor
That pe seat looks great
Re: 2 humps of a Camel - ......Academy
Posted: Tue Jan 16, 2024 1:56 pm
by RangerNeil
digger303 wrote: Tue Jan 16, 2024 4:45 am
These are my available wicker seat choices.
Barracuda resin or kit seat or the Part Pe seat.
To my eyes I'm loving the Pe seat, but I will probably use the resin one. As the Pe one is very 2 dimensional.
If the PE one is the one on the right that gets my vote!! Looks authentic.....
Re: 2 humps of a Camel - ......Academy
Posted: Tue Jan 16, 2024 2:45 pm
by digger303
RangerNeil wrote: Tue Jan 16, 2024 1:56 pm
digger303 wrote: Tue Jan 16, 2024 4:45 am
These are my available wicker seat choices.
Barracuda resin or kit seat or the Part Pe seat.
To my eyes I'm loving the Pe seat, but I will probably use the resin one. As the Pe one is very 2 dimensional.
If the PE one is the one on the right that gets my vote!! Looks authentic.....
Until I paint it and all those fine gaps will clog right up with the way I chuck paint around....

Re: 2 humps of a Camel - ......Academy
Posted: Fri Jan 19, 2024 2:26 pm
by digger303
Ok so the engine is together with PE wiring added.

Upgrading the wheels required so drastic surgery

These PE spokes are very fragile.

Cementing them into the centre of the tyres was a ordeal soaking up some time

In my eyes the result is a little rough, maybe some filler might be required to smooth out the lines a little.
Re: 2 humps of a Camel - ......Academy
Posted: Fri Jan 19, 2024 6:22 pm
by Garion77
The effort was worth it !! wheels are amazing to look at !
Re: 2 humps of a Camel - ......Academy
Posted: Sat Jan 20, 2024 12:04 am
by digger303
Garion77 wrote: Fri Jan 19, 2024 6:22 pm
The effort was worth it !! wheels are amazing to look at !
Thanks.
If I was doing it again I wouldn't have remove as much material from the centre of the wheel. Just so the little internal PE ring would sit flat against it and get a better result imo.
Re: 2 humps of a Camel - ......Academy
Posted: Sat Jan 20, 2024 8:21 am
by Stokesy44
digger303 wrote: Sat Jan 20, 2024 12:04 am
Garion77 wrote: Fri Jan 19, 2024 6:22 pm
The effort was worth it !! wheels are amazing to look at !
Thanks.
If I was doing it again I wouldn't have remove as much material from the centre of the wheel. Just so the little internal PE ring would sit flat against it and get a better result imo.
Tish and pish, they look awesome and will look even better when painted

Re: 2 humps of a Camel - ......Academy
Posted: Sat Jan 20, 2024 3:01 pm
by RangerNeil
digger303 wrote: Fri Jan 19, 2024 2:26 pm
Ok so the engine is together with PE wiring added.
Upgrading the wheels required so drastic surgery
These PE spokes are very fragile.
Cementing them into the centre of the tyres was a ordeal soaking up some time
In my eyes the result is a little rough, maybe some filler might be required to smooth out the lines a little.
They look good to me mate. Congrats on a job well done.
Re: 2 humps of a Camel - ......Academy
Posted: Wed Jan 24, 2024 3:41 am
by digger303
Thanks guys.
Started work on the cockpit frame work.
Using a bit of handily sized foam it helped keeping this very thin PE straight.

I got as far as this and have run into bit of a brick wall. It seems some pieces are either missing or non existent, but I figure
I'll leave it and move on to other aspects of the build and see what I have left over in the way of parts.

Unfortunately I've ended up with a bit of a mess. I just hope I don't lose anything.

I did do a mock up of the kit parts just to see how everything fitted. It came to light that the seat is way to far forward and the pilot would have his nose half way up the breech of the MG's. Fortunately the Pe set gives me some latitude in fixing that. I just wish I had waited 10 days for BNA to restock ( I didn't know at the time ) and bought the other wicker seat set which comes with the base frame work that it sits on. Never mind I shall have to fabricate one if one doesn't appear in this upgrade set.

This little sucker took me a age to complete. It consists of 6 identical shaped parts laminated together, but getting those parts to stay lined up I found very challenging. So I cheated and filed down the protruding edges...

Interestingly the outside pieces,floor and cockpit dashboard have a attempt at etched wood grain.

Oh and I'm trying to add the inspection windows for the control surfaces pulleys and cables. I've done one smudged Ca everywhere and hollowed out the wing to accommodate this. To me it looks like it stands a little to proud on the wing due to the clear acetate that isn't too clear, but hey I bet they weren't real clear in life either after a few flights.
Re: 2 humps of a Camel - ......Academy
Posted: Wed Jan 24, 2024 7:51 am
by Stokesy44
Wow, that's some boggling PE right there

Re: 2 humps of a Camel - ......Academy
Posted: Thu Jan 25, 2024 12:29 am
by digger303
Stokesy44 wrote: Wed Jan 24, 2024 7:51 am
Wow, that's some boggling PE right there
Yes I'm starting to go blind
Last night I got the pilots foot hold done and added a strip of plastic around the engine cowling to get good fit to the engine backing plate.
Also got the last wing inspection window done. Unfortunately in my clumsiness I managed to get glue on the inside of 2 windows . I'm going to remove the first one and redo it anyway, because it sits too proud. I'll re cut the clear to fit inside the framing and needless to say it has to be a neat fit.
Still got some glue clean up to outside the frame work as well.

Re: 2 humps of a Camel - ......Academy
Posted: Thu Jan 25, 2024 7:49 am
by Stokesy44
There are no well worn paths to glory Sir.
Although she be testing you I have no doubt you will triumph.
Re: 2 humps of a Camel - ......Academy
Posted: Mon Feb 05, 2024 10:53 am
by digger303
Stokesy44 wrote: Thu Jan 25, 2024 7:49 am
There are no well worn paths to glory Sir.
Although she be testing you I have no doubt you will triumph.
A philosopher warrior

I shall start by apologising for lack of updates. It's not that I wasn't doing anything, but more the issue of small steps that didn't seem to be worth a update. I did however take a few snaps.
Engine all sprayed up with AK extreme metalic

Then onto the prop with base coat of lifecolour warm wood.

Masked up the outer sides and then sprayed Lifecolour Sand to get this.

A now things started to go off the rails. After I brush painted a diluted
mix of AK oil stains it dried all grainy and lumpy. Not what I was expecting and
I must have stuck my thumb into the mix as well.

Now I have sanded this back and reapplied the oil wash and it worked ( sorry no pic) and then
applied with a brush Tamiya X-22 and it went and beaded up on me so I've sanded that back as well.
This time I will spray it. I was getting lazy and didn't want to clean the AB for such a small job.
Thats currently as a to job so I went for a change of pace and started back on the cockpit frame. Hoo BOY...
Firstly the engine backing plate wouldn't fit into the PE as it should. I tried thinning those protrusions on the back of the backing plate right down to very skinny pieces and it still wouldn't fit so I chopped them off. A bit radical, but I tested fitted afterwards and you can see a opening if you look very closely and from the bottom of the cowling. So I don't think it's really a issue.

Next issue the PE frame wouldn't fit right back into the fuselage causing the top of the back frame to buckle.
Now I went for the big gear and got my mini drill out with a burr attachment and thinned the hell out of the inside walls of that fuselage.
That helped a lot , but it was still too tight. So I sniped the top brace squeezed it in and made the adjustment...problem fixed.

This is the rudder control no less than 9 pieces of PE, but it doesn't have a place for it to go in the plane. What was supposed to happen was it was to be placed on the kit supplied plastic floor. Yet if i was to use that it wouldn't be possible to fit the whole of the brass framing....sigh. One does have to wonder if anyone bothers with a test build.
So I will fit a plastic cross beam in to make that work.

Another issue...not more you say oh hell yeah.
In this top down view you will notice after a minute that the joystick is far to close to that bar and the pilot would never be able to complete a dive. A quick snip on the under side some reinforcing and it's been moved closer to the seat.

That horrible looking bar piecing both sides of the cockpit is a real feature. Academy didn't place that well either, but I thought I had adjusted it correctly. Yeah NO.....Out with the mini drill again. Now I have a real problem self induced. However I think what I will do is substitute the metal bar for a plastic evergreen wannabee add sprue goo then redrill. It has a very small tolerance for error as it has to go between two struts and bracing wires

Sorry guys for the long post and the litany of problems. Hopefully the next one will have some successes.
Re: 2 humps of a Camel - ......Academy
Posted: Mon Feb 05, 2024 11:58 am
by Garion77
Real nice progress my friend ! I know all the hard work you've put in to get there. Nice job ! I haven't posted an update for mine for a while also but should be able to have one today or tomorrow.
Re: 2 humps of a Camel - ......Academy
Posted: Mon Feb 05, 2024 6:07 pm
by WordenB
Lovely project, looks as though the p/e will elevate the kit hugely. I would have been more than chuffed with the propeller as it was, look forward to see the improved version!
Re: 2 humps of a Camel - ......Academy
Posted: Mon Feb 05, 2024 9:34 pm
by DRUMS01
That cockpit PE sure looks fragile but it also adds sa lot to the scale realism of the build. And the prop sure gave you a tussle, but it sounds like you got it fixed (and looking good too I bet). Since watching you and Francis build both camels, it reminds me why I do not build WW1 aircraft. I like the results when somebody else builds them, but not so much for me.
Keep it up, its looking good!
Re: 2 humps of a Camel - ......Academy
Posted: Tue Feb 06, 2024 8:10 am
by Stokesy44
That PE looks superb. I just hope as much of it is visible as possible.
Re: 2 humps of a Camel - ......Academy
Posted: Tue Feb 06, 2024 2:39 pm
by RangerNeil
Excellent job so far!!
Whats the metal tube for?
Re: 2 humps of a Camel - ......Academy
Posted: Tue Feb 06, 2024 2:45 pm
by digger303
RangerNeil wrote: Tue Feb 06, 2024 2:39 pm
Excellent job so far!!
Whats the metal tube for?
Your going to make me research it aren't you

Re: 2 humps of a Camel - ......Academy
Posted: Tue Feb 06, 2024 2:50 pm
by RangerNeil
digger303 wrote: Tue Feb 06, 2024 2:45 pm
RangerNeil wrote: Tue Feb 06, 2024 2:39 pm
Excellent job so far!!
Whats the metal tube for?
Your going to make me research it aren't you
Wellll - I don't recall seeing it on other Camel models.... Or other flying Camel replica's.......
Re: 2 humps of a Camel - ......Academy
Posted: Wed Feb 07, 2024 2:30 am
by digger303
RangerNeil wrote: Tue Feb 06, 2024 2:50 pm
digger303 wrote: Tue Feb 06, 2024 2:45 pm
RangerNeil wrote: Tue Feb 06, 2024 2:39 pm
Excellent job so far!!
Whats the metal tube for?
Your going to make me research it aren't you
Wellll - I don't recall seeing it on other Camel models.... Or other flying Camel replica's.......
I can't find a direct reference to it, but it is a real feature of Camels. I think it is a air venting system for the engine along with another two just forward of it on the outside.
Seeing is believing

Re: 2 humps of a Camel - ......Academy
Posted: Wed Feb 07, 2024 10:19 am
by Garion77
digger303 wrote: Wed Feb 07, 2024 2:30 am
RangerNeil wrote: Tue Feb 06, 2024 2:50 pm
Wellll - I don't recall seeing it on other Camel models.... Or other flying Camel replica's.......
I can't find a direct reference to it, but it is a real feature of Camels. I think it is a air venting system for the engine along with another two just forward of it on the outside.
Seeing is believing
I think you right. it's called a carburetter (and not carburetor
) air induction pipe
Re: 2 humps of a Camel - ......Academy
Posted: Wed Feb 07, 2024 12:50 pm
by digger303
Garion77 wrote: Wed Feb 07, 2024 10:19 am
digger303 wrote: Wed Feb 07, 2024 2:30 am
RangerNeil wrote: Tue Feb 06, 2024 2:50 pm
Wellll - I don't recall seeing it on other Camel models.... Or other flying Camel replica's.......
I can't find a direct reference to it, but it is a real feature of Camels. I think it is a air venting system for the engine along with another two just forward of it on the outside.
Seeing is believing
I think you right. it's called a carburetter (and not carburetor
) air induction pipe
Nice save I was at a loss.
Re: 2 humps of a Camel - ......Academy
Posted: Thu Feb 08, 2024 3:24 pm
by RangerNeil
digger303 wrote: Wed Feb 07, 2024 2:30 am
RangerNeil wrote: Tue Feb 06, 2024 2:50 pm
Wellll - I don't recall seeing it on other Camel models.... Or other flying Camel replica's.......
I can't find a direct reference to it, but it is a real feature of Camels. I think it is a air venting system for the engine along with another two just forward of it on the outside.
Seeing is believing
One of the things I love about this hobby - there is always something new to learn
Re: 2 humps of a Camel - ......Academy
Posted: Sun Feb 11, 2024 2:25 pm
by digger303
Thanks guys for looking in.
My air compressor regulator pressure gauge sprung a leak so no painting and I'm going to be stuck probably until the replacement arrives..moist likely another 11-14 days.
However I managed to take a bunch of pic's although some are low quality...sorry
Patching and redrilling the hole which had to be relocated. I had some plastic tube about the right size and I filled the gap around it with sprue goo. That square hole ( bullet shell ejection port) just forward of where i was working needs a vent cover. However no kit or PE part seem to be available, so I'm working on that little issue in the back of my mind. No real resolution has emerged so far.

Now the tail section has to have some slots for cables to pass back and forth. The kit has holes drilled straight in instead of at a angle. I tried to replicate that by using my proxon however I stuffed up and melted the plastic. Did it in one then thought I'll have another go and ended up with 2 messes to fix.

The PE set has these little reinforcements to go round the slots. Quite large holes really.

I've been struggling with some steps in these instructions as they are small and a bit busy. A4 is the size paper.
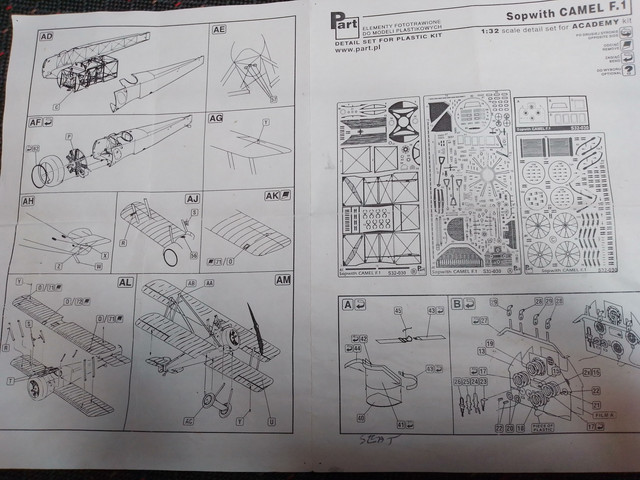

I've been going back and forwards over them a million times checking and rechecking and still getting it wrong....must be me.
The guns on the kit while quite prominent have a few issues. Accuracy, simplistic, over length and I was going to replace them with a set from Gas Patch or Eduard, but I was going to have length issues with them as well. I suspect the fuselage might be a tad shorter than it should be.
Anyway I decided to build up the kit guns with some Pe and see how it looks. Seems a bit silly to put the best accessories on such a basic kit, but I'm undecided as yet.
Kit guns

What's the bet those gun sights last more than a week

I have made a small discovery with some large Pe parts as there was no mention of them in the instructions nor quite a few other ones. I have a lot with no home atm. I made my discovery by just bending where I thought it should be bent and then it clicked They I think are supposed to be a replacement part for the engine backing. Yeah makes no sense my explanation, I shall be forth coming with pic's once I stop fiddling with these guns.
Re: 2 humps of a Camel - ......Academy
Posted: Wed Feb 28, 2024 3:18 pm
by digger303
Well the guns sights are still in one piece ...so far so good.
I've gone with a lighter colour for the wicker, but I'm going to darken it just slightly more.

The cockpit is holding together and is painted mostly with a couple of areas need a touch here and there.
I may also add the gun firing button to the joystick as I noticed it isn't present.

Cheers
Re: 2 humps of a Camel - ......Academy
Posted: Mon Mar 04, 2024 10:55 am
by digger303
Another step forward I hope and maybe it will all come good.

Still not quite there...bit like me
A cushion to go with it...gotta be comfy

I've got to go over it again yet.
Unfortunately I installed it before taking another pic and forgot the damn seat belts. Shall have to fix that over sight.
The under side is a little concave and it's taken a fair bit of sanding and then filler to finish off.

The wing is on, cockpit frame inserted, fuselage closed, seat installed and gun cowling cemented.


I added some piping/plumbing to the dash and that air vent that runs from one side to the other there is a 90 degree
connecting joint that runs back to the engine.
See you again soon.
I'm off to Perth for a week and taking a kit with me. So I might have something else to show.
Re: 2 humps of a Camel - ......Academy
Posted: Mon Mar 04, 2024 7:29 pm
by DRUMS01
Looking good digger. I bet you feel better getting it closed up.
Re: 2 humps of a Camel - ......Academy
Posted: Mon Mar 04, 2024 11:42 pm
by digger303
DRUMS01 wrote: Mon Mar 04, 2024 7:29 pm
Looking good digger. I bet you feel better getting it closed up.
I certainly do, it couldn't happen fast enough all that PE framing and trying to make it fit was trying. ....
Re: 2 humps of a Camel - ......Academy
Posted: Mon Mar 04, 2024 11:58 pm
by digger303
I got those pesky seatbelts installed last night. sourced from Hg models

Plus the engine as well.

.
Re: 2 humps of a Camel - ......Academy
Posted: Tue Mar 05, 2024 6:54 am
by Stokesy44
Good to see it coming together.
Re: 2 humps of a Camel - ......Academy
Posted: Tue Mar 05, 2024 1:55 pm
by Johnj
Oh my goodness ! That cockpit.....super detailed and super fragile. The instructions look really busy. I think it would have helped if they had spread them out over more steps ?
I get what your saying about the AB. Having to clean it out for such a small amount. Your PE work is impressive though
Re: 2 humps of a Camel - ......Academy
Posted: Tue Mar 05, 2024 8:01 pm
by aur0ra145
Looking good! Those seat belts came out looking nice.
Re: 2 humps of a Camel - ......Academy
Posted: Wed Mar 06, 2024 4:57 am
by DRUMS01
Re: 2 humps of a Camel - ......Academy
Posted: Thu Mar 14, 2024 11:57 am
by digger303
Stokesy44 wrote: Tue Mar 05, 2024 6:54 am
Good to see it coming together.
Very slowly
Johnj wrote: Tue Mar 05, 2024 1:55 pm
Oh my goodness ! That cockpit.....super detailed and super fragile. The instructions look really busy. I think it would have helped if they had spread them out over more steps ?
I get what your saying about the AB. Having to clean it out for such a small amount. Your PE work is impressive though
Thanks and yes they could have been better.
aur0ra145 wrote: Tue Mar 05, 2024 8:01 pm
Looking good! Those seat belts came out looking nice.
Thank you
Yes I'm pleased with them despite the laser putting the holes half off the end of one. I hid it easy enough so no biggy.
First time I used them and the backing strip had me

ing
I should have remembered someone else here had the same experience.
DRUMS01 wrote: Wed Mar 06, 2024 4:57 am

Thanks
Re: 2 humps of a Camel - ......Academy
Posted: Thu Mar 14, 2024 12:29 pm
by cor
Its looking good all right. What a nightmare all that cockpit detail has been. Great job on the fiddly bits. I would have like to seen the pe seat in there though. That really jumped out among those 3 seats.
Re: 2 humps of a Camel - ......Academy
Posted: Thu Mar 14, 2024 1:32 pm
by digger303
9 days since the last up date. I haven't moved forward far.
The represented edge cushion was horrible and almost non existent. Not knowing what to use I settled on using thin adhesive lead sheet and cut a strip to wrap around the edge. If I was smarter I should have cut a curve as it was I ended up with a very wrinkled edge and even being lead it was very hard to flatten out.


Pressing on I initially thought I could give it a coat of AK ultra glue being quite thick and won't run, cause I don't have a reverse gear...
That treatment improved it, but it still had a few sharp corners. Not what it should be so I then shifted gears to using Mr Hobby Dissolved putty.hat gave it a very padded look and smoothed more of the bumps.


I might now just give it a bit of a sand......how much crap is going to go into the cockpit...aarg !
I also made some holes where the fuel tank is. I used that Pe tool thats makes flat bottomed holes ( eventually), mainly because a twist drill would break through and wind it's way into the fuselage and maybe crack it apart.
Oh and I added the used ammo chute into the fuselage too as that was missing.
Re: 2 humps of a Camel - ......Academy
Posted: Fri Mar 15, 2024 11:59 am
by Garion77
Good job my friend on hard work !
Re: 2 humps of a Camel - ......Academy
Posted: Fri Mar 15, 2024 1:45 pm
by digger303
Garion77 wrote: Fri Mar 15, 2024 11:59 am
Good job my friend on hard work !
Thank you. It has been a test of my patience, but I never felt the urge to bin it so it must be a good experience
Re: 2 humps of a Camel - ......Academy
Posted: Mon Mar 18, 2024 2:09 pm
by digger303
Hi guys,
Not any big step forwards to report.
I didn't like Academy's cabane's and I know why they did it all for the best reasons I believe. In order to make the rigging more painless for beginners and people like me. However it to me just looks so wrong so I'm attempting to improve them by filling the big holes, sliming the ends and possibly adding a little bit of sheathing around said ends.
So far I've done this...bear in mind I need to add some more filling.

I've also added this maintenance cover under the pilots controls. I didn't have any bolts small enough so I elected to use self made rivets.

Re: 2 humps of a Camel - ......Academy
Posted: Mon Mar 18, 2024 3:59 pm
by Twokidsnosleep
Love added details
Re: 2 humps of a Camel - ......Academy
Posted: Mon Mar 18, 2024 11:21 pm
by digger303
Thanks, I hope it all comes together in the end. I just noticed another thing I might be able to improve on...

Re: 2 humps of a Camel - ......Academy
Posted: Sat Mar 23, 2024 3:03 pm
by digger303

???
Re: 2 humps of a Camel - ......Academy
Posted: Tue Apr 02, 2024 3:15 pm
by digger303
Ok I'm really close to putting paint on or thats what I always think then find something else to do.
Tonight I found I still had some attachment points to add and I think this strip I added to the fuselage head/ body cushion is supposed to represent the stitching holding it in place. Not everything is in the instructions so this is my best guess.

Bit messy I am,but I'll give it a going over before the paint goes on.
The other thing I wanted to show is these holes the struts sit in. Freaky huge and will require filler which is going to be a pain as one side can only be done after the wing is attached.

Cheers