I started this kit last Monday and have been very remiss in not posting it, but I did take some pic's.
I was thinking this was going to be a easy build with little to no problems. One should never assume.
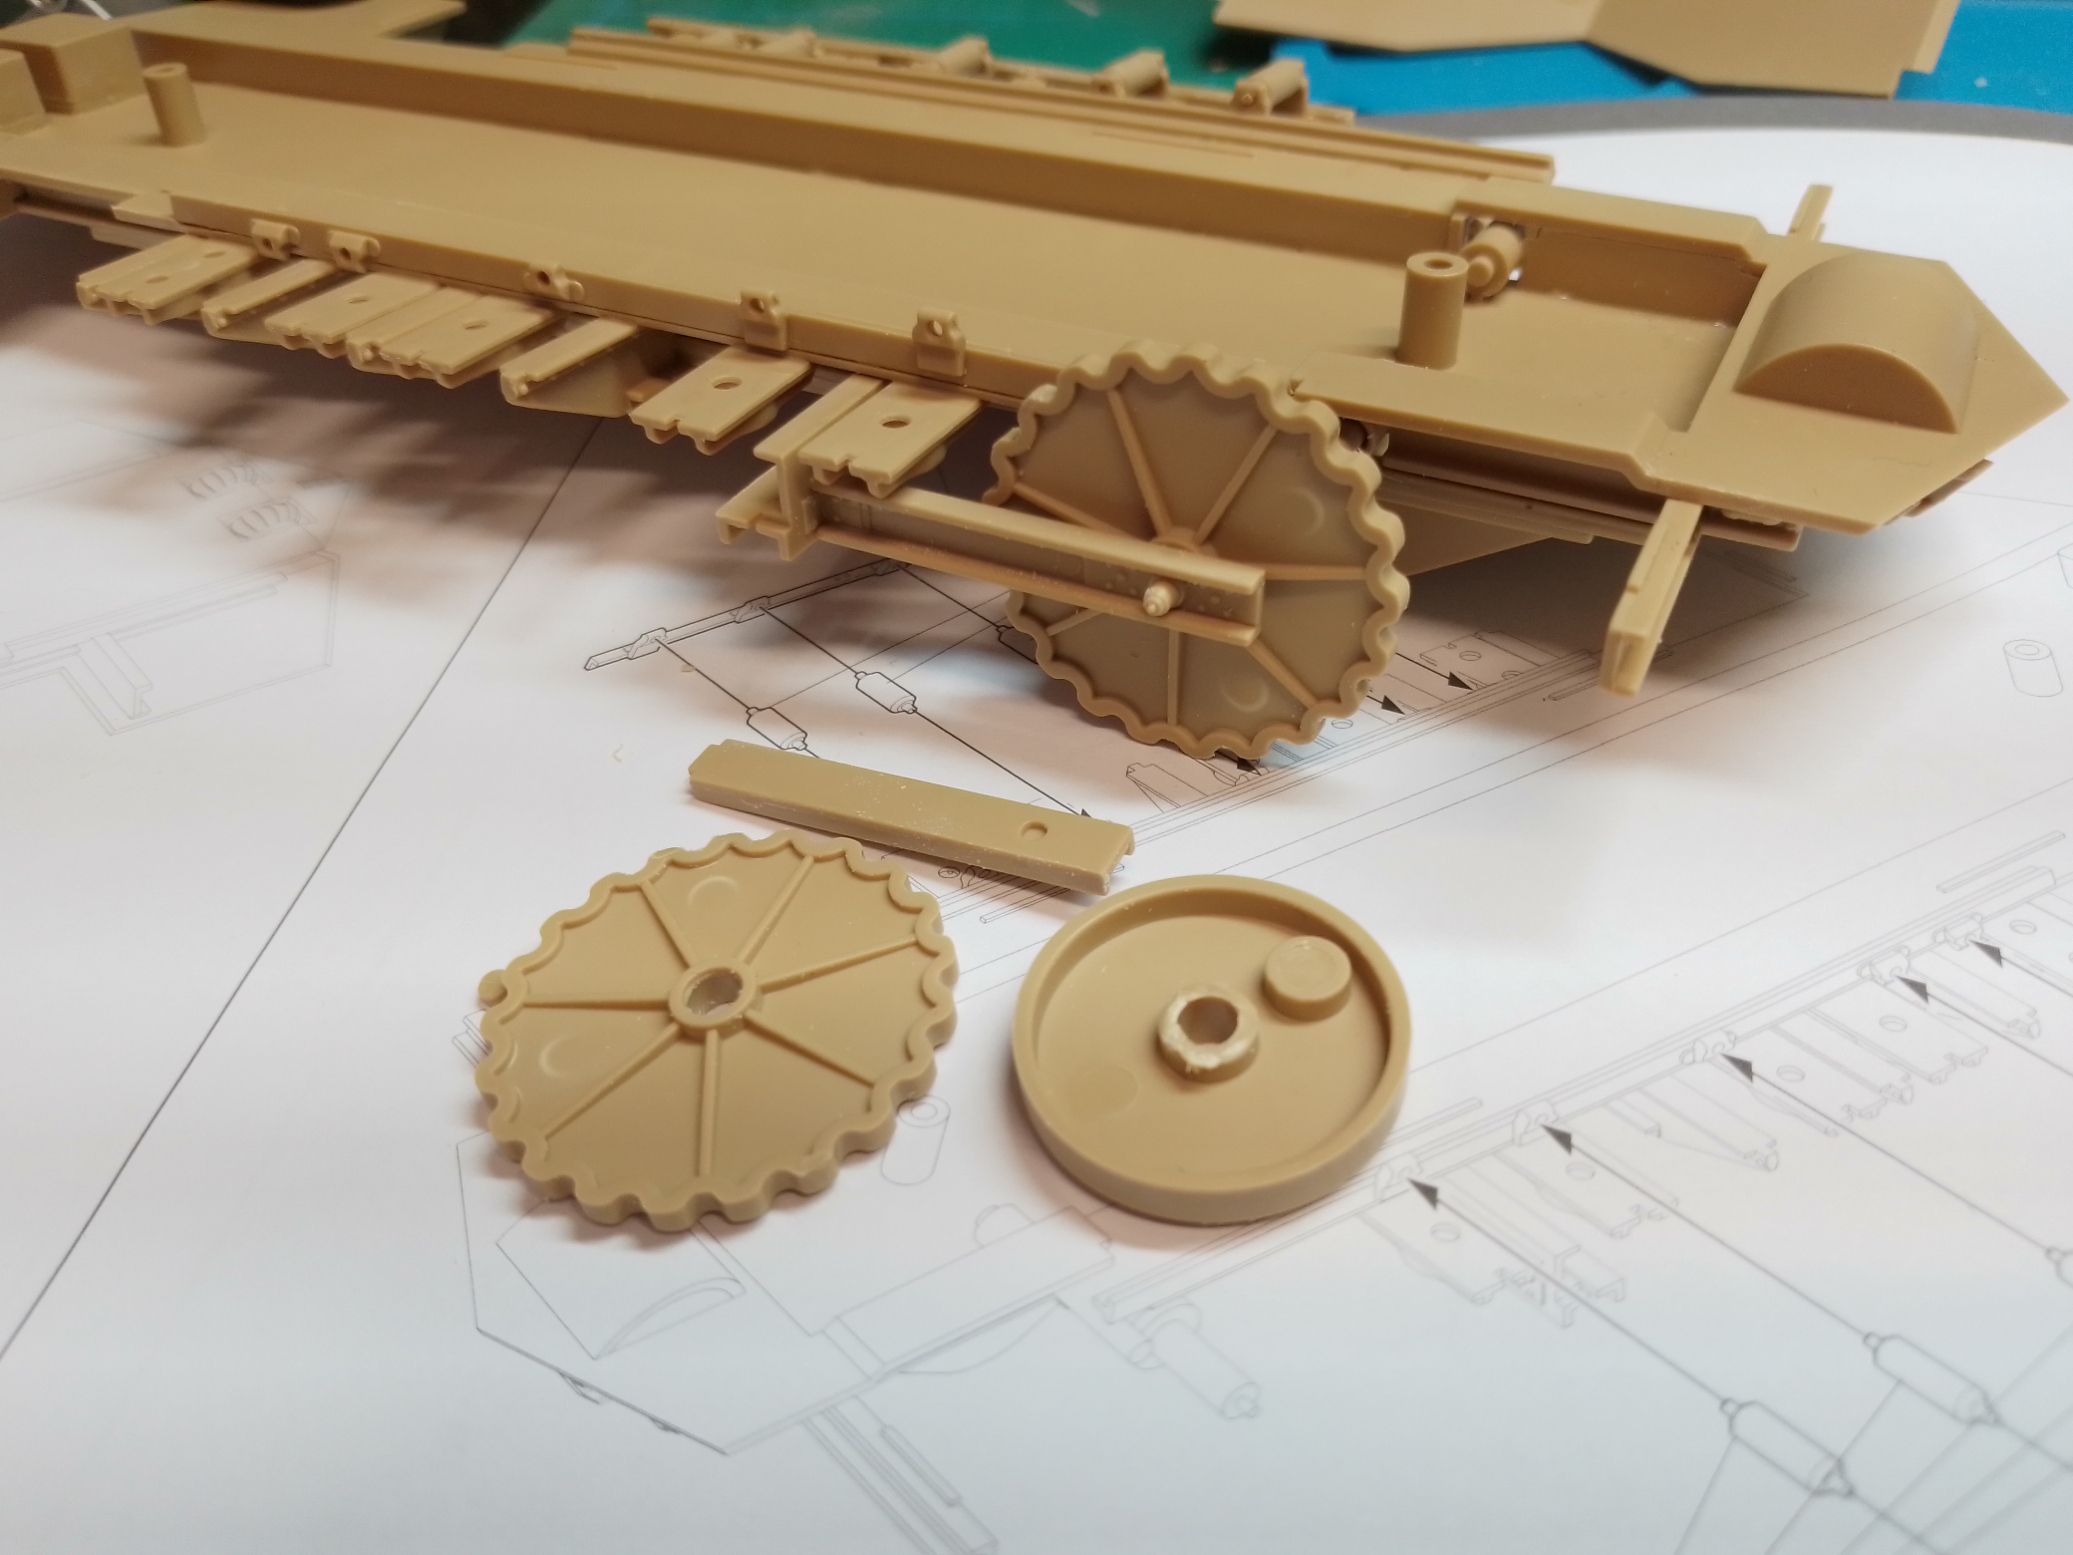
This was the second issue. The wheel hub and drive sprocket do not work well and are exceptionally loose with the first dry fit. I had to remove some of axle housing from the hub to get a nice close fit which also fixed the axle mounting arm on the outside edge.
Now back to the first issue. The suspension springs retaining housing on the top are housed on these flat plates that extend out from the hull. The instructions would have you ( as I did) fit these first then add the outside frame once they were in place. Spotting the possible problem I used a square to these at 90 degrees. Did not work well I had to force these into place. I should have added them to the frame first then attached the whole to the hull.
The hull was no issue and really adding flat doors and a exhaust pipe wasn't really stretching it.
Not much on the inside of the hull.
Now this is where the real issue began. At first I just didn't understand what they wanted me to do and I just started cementing the links to the track plate. I had to then take them all off as the other side would not fit. This is what I should have done to start with make the links then glue the track plate onto that.
I knocked the rest of the suspension together and it all fitted rather well at this point being a pleasure to put together except the Tet wouldn't hold some of the parts which was a bit funny as they were all the same part being the tie rods.
Those tracks were damn fiddly to assemble and took me a couple of bench sessions. Imagine my dismay to learn the damn tracks won't fit the wheels. The links are too close together and after checking the net it seems others have had the same issue.
Never the less with a lot more time and messing about I managed to widen the space and while they are a tight fit they do now look a whole lot better.
Almost ready for some paint after 6 days of which 1 were lost on those tracks not fitting right and 1 fixing my stuff up.
Sorry for the long post guys.
Re: Saint Charmond by Takom
Posted: Sun Oct 20, 2024 8:49 am
by Donkeywalloper
This is a fascinating Tank to me. One of the early designs and what always amazed me was how unbalanced it looked.
Great work, and are you going for te interesting Camo?
DW
Re: Saint Charmond by Takom
Posted: Sun Oct 20, 2024 12:40 pm
by Stokesy44
Looks very like the tanks used in the new version of All Quiet On The Western Front.
Great work on the running gear and suspension. Very delicate and detailed.
Re: Saint Charmond by Takom
Posted: Sun Oct 20, 2024 1:36 pm
by digger303
Donkeywalloper wrote: Sun Oct 20, 2024 8:49 am
This is a fascinating Tank to me. One of the early designs and what always amazed me was how unbalanced it looked.
Great work, and are you going for te interesting Camo?
DW
Thank you I am going to do the camo that's on the box art and to do that I cheated and bought a masking set from J's Work
I strongly suspect it pitched forward and back wildly despite the slow ground speed.
Stokesy44 wrote: Sun Oct 20, 2024 12:40 pm
Looks very like the tanks used in the new version of All Quiet On The Western Front.
Great work on the running gear and suspension. Very delicate and detailed.
Thank you.
Re: Saint Charmond by Takom
Posted: Sun Oct 20, 2024 5:12 pm
by Quax
You’re definitely making a silk purse from a sows ear but it doesn’t look much fun!
Looking forward to the finished article
Paul
Re: Saint Charmond by Takom
Posted: Mon Oct 21, 2024 1:09 am
by digger303
Quax wrote: Sun Oct 20, 2024 5:12 pm
You’re definitely making a silk purse from a sows ear but it doesn’t look much fun!
Looking forward to the finished article
Paul
Your way too kind. I like construction even if I don't get it right at times.
Don't get me wrong this kit isn't a sows ear with some nice sharp detailing and good fit 90% of the time. It's mainly how they got those tracks so wrong and it's not a quick job to fix it or even to construct them, but they do work in the end. Also the instructions required some study going forward a few steps then back.
Re: Saint Charmond by Takom
Posted: Mon Oct 21, 2024 9:28 pm
by SteelScooter
Looking at photos online it looks like the sprocket should have a slight bevel on the point of the teeth making it narrower, which makes sense mechanically speaking. When I build mine (sometime in the next 50 years ) I think I will sand the sprocket and idler.
SteelScooter wrote: Mon Oct 21, 2024 9:28 pm
Looking at photos online it looks like the sprocket should have a slight bevel on the point of the teeth making it narrower, which makes sense mechanically speaking. When I build mine (sometime in the next 50 years ) I think I will sand the sprocket and idler.
I had to do that as well as sanding between the where the wheels run inside the track and it's still a tight fit.
Re: Saint Charmond by Takom
Posted: Tue Oct 22, 2024 7:53 am
by Stokesy44
A bit disappointing from Takom.
They're usually more user friendly than what you've got on your hands here.
Re: Saint Charmond by Takom
Posted: Sun Nov 03, 2024 1:15 pm
by digger303
This weeks progress.
Anti ditching barrel isn't finished yet for and still wondering about that.
Time to paint some Camo which I have no fixed plan as yet on how to approach it.
Re: Saint Charmond by Takom
Posted: Sun Nov 03, 2024 1:45 pm
by Stokesy44
I love the work on the tracks mate. Top drawer stuff
The hull is a painter's dream, all those flat surfaces and bolts crying out for rust streaks!
Re: Saint Charmond by Takom
Posted: Sat Nov 09, 2024 2:56 am
by digger303
Stokesy44 wrote: Sun Nov 03, 2024 1:45 pm
I love the work on the tracks mate. Top drawer stuff
The hull is a painter's dream, all those flat surfaces and bolts crying out for rust streaks!
Such kind words ...thank you
About the hull though I'm not sure if it would have had a huge amount of rust as they were built and used straight away almost and wouldn't have much time in which to get really noticeable.
Today I don't have anything much to show except how one can let standards slip. This part I left to attaching until last as I wanted to paint the lower hull suspension system separate. Wanting to get it done quickly and having noticed what I thought was a minor gap I glued and applied filler. When applying it I noticed ( took me long enough to see it ) there is in fact a large step near the centre. Wanting to finish it I told myself nah it'll be right, filler and filing it will be cool. Next day I'm thinking you fool it's way too big a step and will look horrible. I'll have to tear it out and redo it. What I should have done was reduce the outside edges, applied pressure to the middle and it would have fitted as it was supposed too. I've created way more work for myself now trying to hurry it.
Today I don't have anything much to show except how one can let standards slip. This part I left to attaching until last as I wanted to paint the lower hull suspension system separate. Wanting to get it done quickly and having noticed what I thought was a minor gap I glued and applied filler. When applying it I noticed ( took me long enough to see it ) there is in fact a large step near the centre. Wanting to finish it I told myself nah it'll be right, filler and filing it will be cool. Next day I'm thinking you fool it's way too big a step and will look horrible. I'll have to tear it out and redo it. What I should have done was reduce the outside edges, applied pressure to the middle and it would have fitted as it was supposed too. I've created way more work for myself now trying to hurry it.
Ah yes, we've all been there. That moment when one comes face to face with one's mortality! And all we can hear is the whisper of 'It seemed like a good idea at the time!'
Today I don't have anything much to show except how one can let standards slip. This part I left to attaching until last as I wanted to paint the lower hull suspension system separate. Wanting to get it done quickly and having noticed what I thought was a minor gap I glued and applied filler. When applying it I noticed ( took me long enough to see it ) there is in fact a large step near the centre. Wanting to finish it I told myself nah it'll be right, filler and filing it will be cool. Next day I'm thinking you fool it's way too big a step and will look horrible. I'll have to tear it out and redo it. What I should have done was reduce the outside edges, applied pressure to the middle and it would have fitted as it was supposed too. I've created way more work for myself now trying to hurry it.
Ah yes, we've all been there. That moment when one comes face to face with one's mortality! And all we can hear is the whisper of 'It seemed like a good idea at the time!'
So true.....
Re: Saint Charmond by Takom
Posted: Sat Nov 09, 2024 9:40 am
by Quax
Story of my entire life!!!
Paul
Re: Saint Charmond by Takom
Posted: Sun Feb 09, 2025 1:59 pm
by digger303
Thanks guys.
It's been a few months since I've done anything on this mainly because the camo mask was being a pain.
J's works precut camo mask just isn't sticky enough it keeps lifting when negotiating bends. So In a few places the paint has blown under the mask. I'm probably going to make it look worse if I try to fix it so marching on we have this.
There is a red speckled contamination on some yellow panels. It's come off the masking, but how or why I do not know. I think I can just blend it in at the weathering stage. I've got some thick paint edges too in places....I don't think I thinned the paint enough.....damn.
I like the colours though
Re: Saint Charmond by Takom
Posted: Sun Feb 09, 2025 9:36 pm
by RangerNeil
Looks great in the photos Digger!
Re: Saint Charmond by Takom
Posted: Mon Feb 10, 2025 8:12 am
by Stokesy44
RangerNeil wrote: Sun Feb 09, 2025 9:36 pm
Looks great in the photos Digger!
What he said. Looks really good
Re: Saint Charmond by Takom
Posted: Mon Feb 10, 2025 2:13 pm
by Kevthemodeller
Great looking kit
Re: Saint Charmond by Takom
Posted: Mon Feb 24, 2025 10:50 am
by digger303
RangerNeil wrote: Sun Feb 09, 2025 9:36 pm
Looks great in the photos Digger!
RangerNeil wrote: Sun Feb 09, 2025 9:36 pm
Looks great in the photos Digger!
What he said. Looks really good
Kevthemodeller wrote: Mon Feb 10, 2025 2:13 pm
Great looking kit
Thanks guys.
It's all done now
Thank you for following along it's been a pleasure.
Re: Saint Charmond by Takom
Posted: Tue Feb 25, 2025 7:40 am
by Stokesy44
Nice finish with the mud splatter
Re: Saint Charmond by Takom
Posted: Tue Feb 25, 2025 8:02 am
by digger303
Stokesy44 wrote: Tue Feb 25, 2025 7:40 am
Nice finish with the mud splatter
Thanks mate.
It was interesting trying not to melt it.
Re: Saint Charmond by Takom
Posted: Tue Feb 25, 2025 5:57 pm
by Kevthemodeller
Wow, what a nice kit, lovely build/cammo/weathering
Re: Saint Charmond by Takom
Posted: Tue Feb 25, 2025 8:03 pm
by Garion77
WOW ! an amazing job my friend. Everything looks great... the camo, the tracks wow ! And if I understand right in all the posts, can't believe this was a real tank !
Re: Saint Charmond by Takom
Posted: Wed Feb 26, 2025 2:26 am
by digger303
Kevthemodeller wrote: Tue Feb 25, 2025 5:57 pm
Wow, what a nice kit, lovely build/cammo/weathering
Garion77 wrote: Tue Feb 25, 2025 8:03 pm
WOW ! an amazing job my friend. Everything looks great... the camo, the tracks wow ! And if I understand right in all the posts, can't believe this was a real tank !
Thanks guys and yep a real tank based on a agricultural tractor and of course a very early model.
Re: Saint Charmond by Takom
Posted: Thu Feb 27, 2025 11:04 pm
by DRUMS01
Way to tackle this one digger. I love the tracks and the way you made the cammo. results despite the not to great of masks. This thing in its day was a brutal blunt instrument, wasn't it?
Good Job!
Re: Saint Charmond by Takom
Posted: Thu Feb 27, 2025 11:37 pm
by digger303
DRUMS01 wrote: Thu Feb 27, 2025 11:04 pm
Way to tackle this one digger. I love the tracks and the way you made the cammo. results despite the not to great of masks. This thing in its day was a brutal blunt instrument, wasn't it?
Good Job!
Thanks
A nasty surprise for the other side, not great going over trenches as the gun tended to nose dive spearing into the mud and I should imagine a bit clumsy to drive.
Re: Saint Charmond by Takom
Posted: Fri Feb 28, 2025 8:43 am
by Stokesy44
Am I right in thinking this tank is the same model as the ones seen in the recent remake of All Quiet On The Western Front?
There's a truly harrowing scene of a tank attack which breaks the German lines followed up by troops with flame throwers.
Re: Saint Charmond by Takom
Posted: Fri Feb 28, 2025 1:35 pm
by digger303
Yes, there were 2 versions that came out and I think the earlier ones had the extra turrets.
Flame throwers were hated by every side, but were also very effective in certain scenarios. The defending side learnt very quickly to shoot at the tanks they carried.




 ) I think I will sand the sprocket and idler.


