Page 1 of 3
WW1 Knights of the sky - 1/32 Wingnut Wings Snipe Early
Posted: Tue Jan 07, 2014 10:38 pm
by DC87
As this is the Centenary year of the beginning of WW1 I decided to purchase the Snipe Early from Wingnut Wings. I chose this aircraft for 3 reasons: It represents the technological advancement of aircraft during the conflict as it arrived at the front in the last few weeks and was designed from the ground up as a pure fighter, it was the pinnacle of rotary engine development, finally it has a very nice busy cockpit.
My kit review can be found through the link: http://intscalemodeller.com/viewtopic.php?f=98&t=4859
This is a build I will take my time over and try and do the kit and the subject justice.
Here is the superb box art

The first thing to do in the cockpit was add the sidewall rigging, this was done by creating holes with a pin and gluing in cut wire.


Using a pin again I enhanced the detail of the wicker seat, sorry for the poor focus.


The control column had cord wrapped around the handle to aid grip, this was made using Green Stuff putty and a sharp blade. The dials which will attach to the main instrument panel have been painted and are ready for the decals and another metal drybrush.

Re: WW1 Knights of the sky - 1/32 Wingnut Wings Snipe Early
Posted: Tue Jan 07, 2014 10:47 pm
by longlance67
very cool Dan, WW 1 fighters and great war subjects are always fascinating and often rarely tackled
will be watching this one mate
thanks,
Shane
Re: WW1 Knights of the sky - 1/32 Wingnut Wings Snipe Early
Posted: Tue Jan 07, 2014 10:48 pm
by Rob
Nice one Dan. I'll bet that you couldn't wait to star this wonderful looking kit! Looking forward to lots and lots more

Re: WW1 Knights of the sky - 1/32 Wingnut Wings Snipe Early
Posted: Tue Jan 07, 2014 11:26 pm
by DC87
Thanks Shane and Rob, very nice kit with exceptional instructions (I will post my photo review shortly) - it will be very difficult to go back to line/ CAD drawings now, Wingnut Wings make their instructions available online in PDF... linky:
http://www.wingnutwings.com/ww/productd ... 3050&cat=4
Here is an excellent series of videos made by Kermit Weeks from Fantasy of Flight flying a replica Snipe with an original Bentley engine made by Vintage Aviator which is owned by the man behind Wingnut Wings - Peter Jackson of Middle Earth movie fame.
[youtube]fUQCqSw-Yds[/youtube]
[youtube]q3eMO7tjBoc[/youtube]
[youtube]MHS1mv08qw8[/youtube]
Re: WW1 Knights of the sky - 1/32 Wingnut Wings Snipe Early
Posted: Tue Jan 07, 2014 11:47 pm
by chief5437
I've heard lots of good things about these kits, I hope you're enjoying it! But it does beg the question, how come you didn't save it for the ww1 GB?
Any hoo, best of luck with it!
Re: WW1 Knights of the sky - 1/32 Wingnut Wings Snipe Early
Posted: Wed Jan 08, 2014 12:02 am
by DC87
chief5437 wrote:I've heard lots of good things about these kits, I hope you're enjoying it! But it does beg the question, how come you didn't save it for the ww1 GB?
Any hoo, best of luck with it!
I didn't want to be restricted/ pressured by a time frame/ deadline on such an imposing kit, also I had this in mind for the GB:
http://www.wingnutwings.com/ww/product?productid=3038 
but the amount of rigging is immense

so I thought I would practice with this kit.
Re: WW1 Knights of the sky - 1/32 Wingnut Wings Snipe Early
Posted: Wed Jan 08, 2014 12:04 am
by chief5437
Fair play, don't want to rush such a nice looking kit. That DH2 looks great as well, one of my faves. Those kits are expensive aren't they?
Re: WW1 Knights of the sky - 1/32 Wingnut Wings Snipe Early
Posted: Wed Jan 08, 2014 10:38 pm
by DC87
chief5437 wrote:Fair play, don't want to rush such a nice looking kit. That DH2 looks great as well, one of my faves. Those kits are expensive aren't they?
To an extent chief- they cost £70-80 for the single seat aircraft but factor in the Cartograf decals with 5+ different schemes and the exceptional magazine quality instruction booklet you are basically paying £45-50 for a 1/32 kit which I don't think is too bad.
Onto the build - Got most of the instrument panel done, just a light drybrushing left to do to break up the black areas. It's proving a pleasure thus far.


Re: WW1 Knights of the sky - 1/32 Wingnut Wings Snipe Early
Posted: Wed Jan 08, 2014 10:40 pm
by Lee
That looks awesome Dan - want
To try my hand at one of these one day too

Re: WW1 Knights of the sky - 1/32 Wingnut Wings Snipe Early
Posted: Wed Jan 08, 2014 10:42 pm
by Paul
Wow great job dan that panel looks superb

Re: WW1 Knights of the sky - 1/32 Wingnut Wings Snipe Early
Posted: Wed Jan 08, 2014 11:18 pm
by chief5437
Agreed, panel looks amazing, well done. I'd love one of these as well!
Re: WW1 Knights of the sky - 1/32 Wingnut Wings Snipe Early
Posted: Wed Jan 08, 2014 11:27 pm
by DC87
Thanks Lee, Paul and Chief. I read in a magazine article that these kits are limited to initial production meaning when they are gone they are gone - hoping this changes as they seem to be popular.
Re: WW1 Knights of the sky - 1/32 Wingnut Wings Snipe Early
Posted: Thu Jan 09, 2014 11:24 pm
by DC87
Sat down at the bench for a bit this evening - more work on the panel and began painting the forward fuel tank.

Re: WW1 Knights of the sky - 1/32 Wingnut Wings Snipe Early
Posted: Fri Jan 10, 2014 11:17 am
by wappynutter

.......this is gonna be something really special dude!!!
These kits are built to be flipping awesome, detailed to death and a top class finish!!
Take your time and do that kit justice Dan...
I think Paul needs to get one of these beauties for review.....or kit build video log!!
I am not really "in to" planes like some, but would make an exception for one of these life like kits!!
I found loads of build reviews and kit info online ...
Good luck mate, popcorn and coke ready for the viewing time!!

" munch...munch...munch..."
Re: WW1 Knights of the sky - 1/32 Wingnut Wings Snipe Early
Posted: Fri Jan 10, 2014 12:14 pm
by JayCub
Wow this is looking great Dan, and something i would have built 70s maybe or similar, my first try at making kits and not anyway as good or on the level of this.
really looking forward to seeing how this progresses along.
Tom
Re: WW1 Knights of the sky - 1/32 Wingnut Wings Snipe Early
Posted: Sun Jan 12, 2014 9:05 pm
by DC87
Thanks Andy and Tom

Honest opinions please guys - I have started the wood-grain for one half of the cockpit bracing, now the normal technique across the internet is to use oils streaked with a dry brush... I instead opted to use the Weathered Wood set from Lifecolor - do you think it looks the part, It isn't as in scale as the oil method but I think it gives better colour and interest.

Scroll down the link for photos of the real thing:
http://thevintageaviator.co.nz/projects ... alkaround#
Here is the completed forward fuel tank


Re: WW1 Knights of the sky - 1/32 Wingnut Wings Snipe Early
Posted: Sun Jan 12, 2014 9:45 pm
by Joesdad
Wow Dan, it's turning into a bit of a masterclass, excellent stuff. The Lifecolor wood system thingy looks stop on to me. Looking forward to the instalment
Tim
Re: WW1 Knights of the sky - 1/32 Wingnut Wings Snipe Early
Posted: Sun Jan 12, 2014 9:53 pm
by T3hGuppy
Dan I gotta say I'm loving the work your doing on this one.
It all looks great.
The wood grain looks like it should IMO.
Re: WW1 Knights of the sky - 1/32 Wingnut Wings Snipe Early
Posted: Sun Jan 12, 2014 10:57 pm
by Rob
The wood looks good to me Dan. It's coming on nicely
Re: WW1 Knights of the sky - 1/32 Wingnut Wings Snipe Early
Posted: Mon Jan 13, 2014 7:30 am
by Nige201980
The wood grain looks the part Dan really loving this build
Re: WW1 Knights of the sky - 1/32 Wingnut Wings Snipe Early
Posted: Mon Jan 13, 2014 8:49 am
by Bissyboat
Nice brush work on the wood effect. The texture mix does what it says on the tin. I´m watching this build with great interest.
Re: WW1 Knights of the sky - 1/32 Wingnut Wings Snipe Early
Posted: Mon Jan 13, 2014 3:07 pm
by DC87
Re: WW1 Knights of the sky - 1/32 Wingnut Wings Snipe Early
Posted: Mon Jan 13, 2014 3:25 pm
by Paul
Awesome work Dan, great work in the wood effect
Re: WW1 Knights of the sky - 1/32 Wingnut Wings Snipe Early
Posted: Tue Jan 14, 2014 10:57 pm
by DC87
Thanks Paul
Finished the wood grain on the cockpit frame, my eyes will be thankful for that

.
Some detail painting still to do but I thought I would check the fit of the main parts - an excellent fit from WnW, the fit prior to painting was a little loose - the paint has solved that problem

It is certainly going to build up into a fine cockpit, really enjoyable build so far - very engaging and rewarding sub assembly. A word of warning - the Wingnut Wings kits take over lives, not in terms of bench time but I find myself constantly looking forward to my bench time and drifting off during the day thinking about the next stage of the build.
Anyway here are the pics


So nice to build something that looks old and hand made rather than switches and screens.
Re: WW1 Knights of the sky - 1/32 Wingnut Wings Snipe Early
Posted: Thu Jan 16, 2014 10:29 pm
by DC87
Re: WW1 Knights of the sky - 1/32 Wingnut Wings Snipe Early
Posted: Thu Jan 16, 2014 10:45 pm
by Paul
Fantastic work dan, love that wood effect.
Re: WW1 Knights of the sky - 1/32 Wingnut Wings Snipe Early
Posted: Thu Jan 16, 2014 10:46 pm
by pedrofernandes
Love it !!!
I love the detail of these wingnut wings and love what your are doing to it!!!
Awesome !!!
Re: WW1 Knights of the sky - 1/32 Wingnut Wings Snipe Early
Posted: Thu Jan 16, 2014 11:23 pm
by wappynutter
Beautiful Dan......
....just beautiful...
The detail is just awesome, and you are making it shine mate..
Well done, look forward to the next post..
Re: WW1 Knights of the sky - 1/32 Wingnut Wings Snipe Early
Posted: Fri Jan 17, 2014 12:10 am
by JayCub
Wow Dan that is amazing, love the detail work you have put in, the woodgrain looks real, this is such an intricate build and im enjoying it very much.
Tom
Re: WW1 Knights of the sky - 1/32 Wingnut Wings Snipe Early
Posted: Fri Jan 17, 2014 12:25 am
by longlance67
Dan stunning work mate
amazing work

keep it up
Shane
Re: WW1 Knights of the sky - 1/32 Wingnut Wings Snipe Early
Posted: Fri Jan 17, 2014 11:36 am
by rm6239
Brilliant work mate, these kits are awesome and you are doing it proud. Now that I've found you, I'll settle in for the rest of the build.
cheers
Rossco
Re: WW1 Knights of the sky - 1/32 Wingnut Wings Snipe Early
Posted: Sun Jan 19, 2014 7:46 pm
by DC87
Thanks for the great comments, if your ever in need of a stress free build pick one of the Wingnut Wings kits up as the kit does the hard work of making my skills look good
Not done too much as to be honest I keep admiring the cockpit detail and am worried I will mess it up sooner or later.
What I have done is paint up the engine mount and dry fit the fuselage halves, doesn't quite hold itself together but that is almost certainly because of the thick varnish I gave the wood areas.
The instructions suggest annealing the PE seat belts - any tips or advice?


I think I will do the guns next before attempting the control wires.
Re: WW1 Knights of the sky - 1/32 Wingnut Wings Snipe Early
Posted: Sun Jan 19, 2014 11:22 pm
by Paul
Nice work dan as for annealing if you have a jet flame lighter a very quick pass over it will do it, do do it too long or it'll crumple into nothing, you just want to see it change colour slighty, then leave it to cool on it own, it'll then form shapes and corners ect much easier.
Re: WW1 Knights of the sky - 1/32 Wingnut Wings Snipe Early
Posted: Mon Jan 20, 2014 12:28 am
by muskegman
That is just awsome work you are doing there Dan, I love those older biplanes. Really looking forward to seeing you do more
Mark
Re: WW1 Knights of the sky - 1/32 Wingnut Wings Snipe Early
Posted: Tue Jan 21, 2014 3:27 pm
by Nige201980
WOW Dan great work mate love the leather seat and wood would you be able to do a tutorial and how you did it mate?
Re: WW1 Knights of the sky - 1/32 Wingnut Wings Snipe Early
Posted: Tue Jan 21, 2014 3:47 pm
by DC87
Nige201980 wrote:WOW Dan great work mate love the leather seat and wood would you be able to do a tutorial and how you did it mate?
Thanks Nigel - yeah no probs, it's easy but needs good concentration. I'll do a photo run through and vid this evening
Re: WW1 Knights of the sky - 1/32 Wingnut Wings Snipe Early
Posted: Tue Jan 21, 2014 4:27 pm
by Nige201980
Thanks mate look forward to it mate.
Re: WW1 Knights of the sky - 1/32 Wingnut Wings Snipe Early
Posted: Tue Jan 21, 2014 5:17 pm
by longlance67
top notch work Dan,
this build just keeps getting better and better
Shane
Re: WW1 Knights of the sky - 1/32 Wingnut Wings Snipe Early
Posted: Wed Jan 22, 2014 8:07 pm
by DC87
Here is my technique for producing wood with acrylics. Hope it's okay Nigel and of use to others
Paints used:
Lifecolor Weathered Wood Set - 5 of the 6 colours used... UA-718, UA-717, UA-716, UA-715, UA-714
Vallejo Model color Foundation White
Vallejo Gloss Varnish
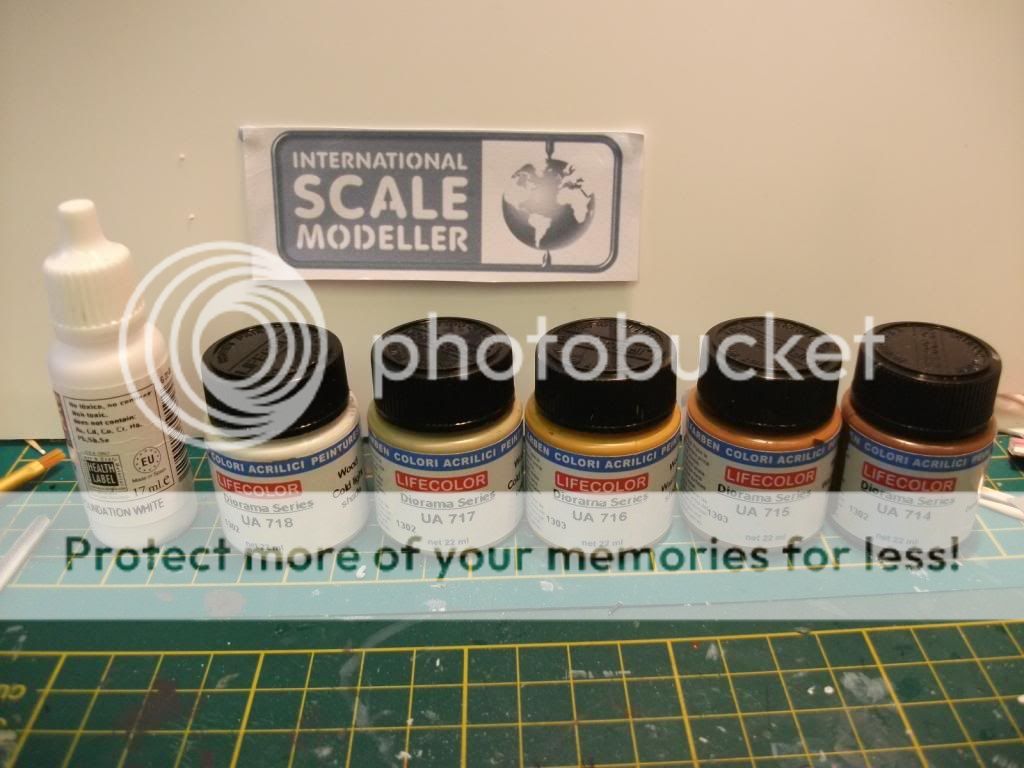

This is a simple technique but it does require some time, concentration and a very steady hand
WARNING do not do large areas in one go, break them up into manageable stages
The test part before painting
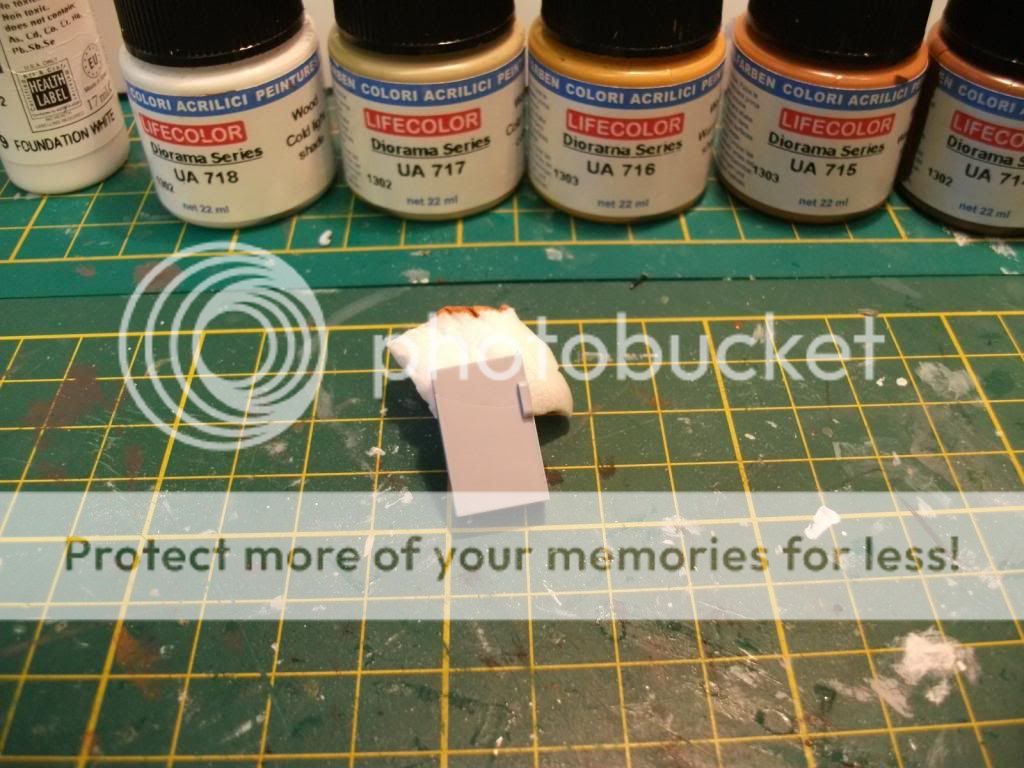
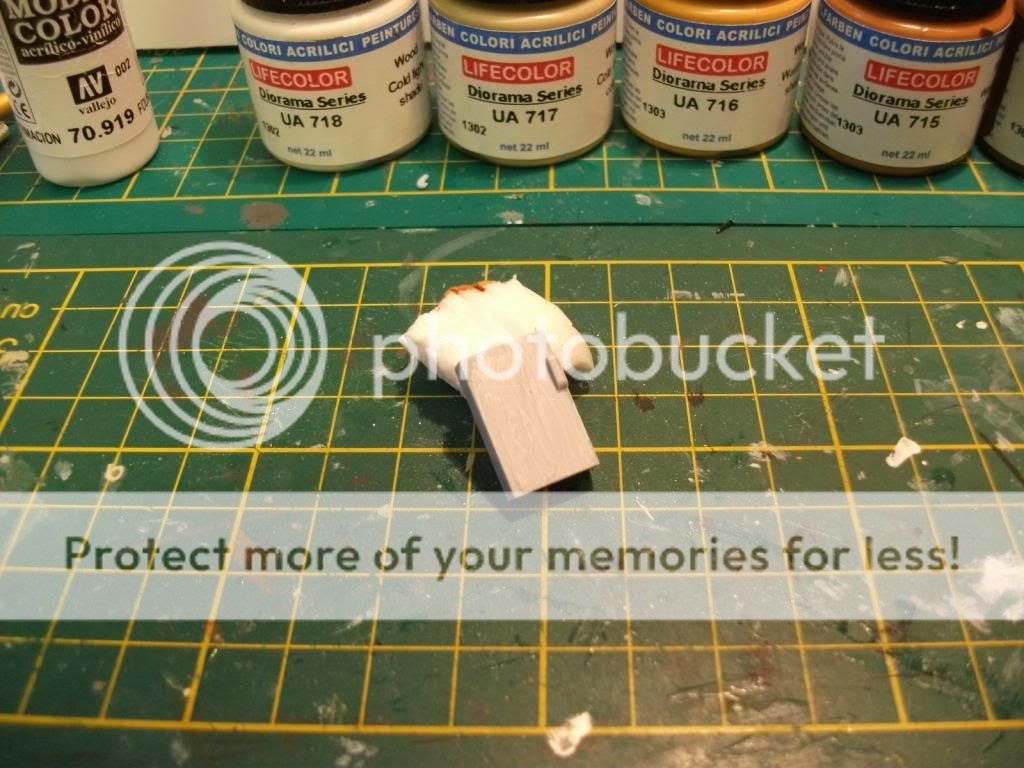
First step after cleaning the part is to apply a watered down (25%) basecoat of Vallejo Foundation White, don't worry about a smooth coat as texture at this point will add to the final wood grain - you will need to look closely I'm afraid.
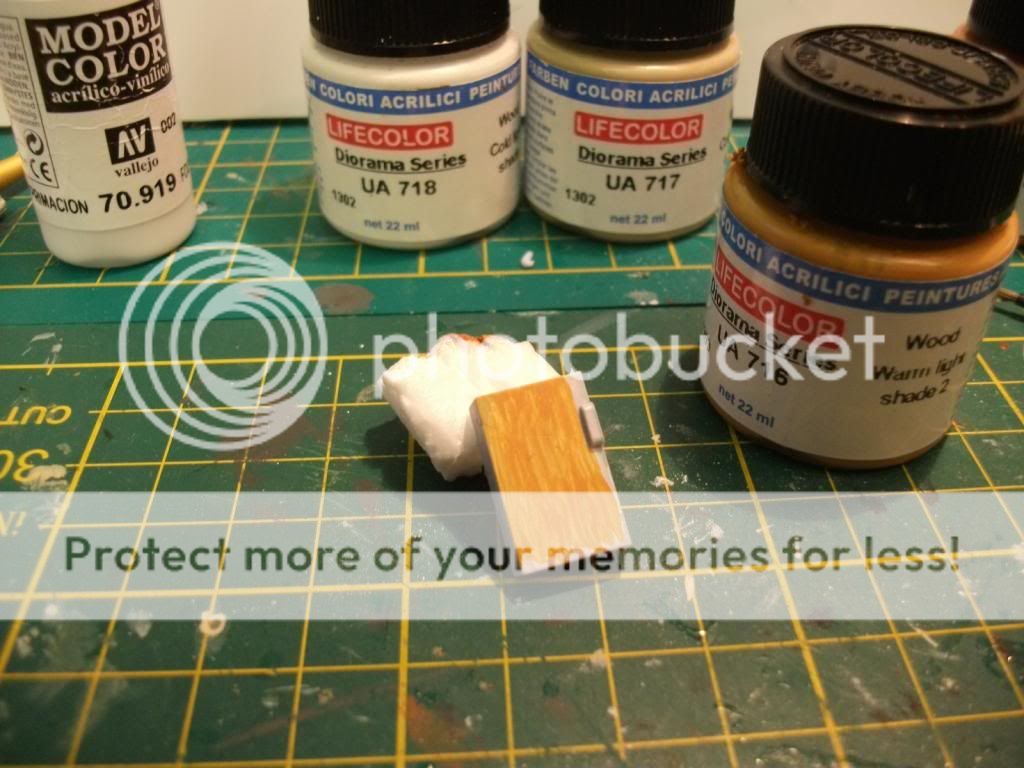
Add the first layer of UA-716 Warm Light Shade 2 (Lifecolor paints are very thin straight from the pot so only one or two coats would be needed with other brands - also only the basecoat and gloss where thinned in any way).
Apply the second layer of UthA-716, I didn't dab the paint brush on tissue because I want to achieve a thick finish to give the part texture.
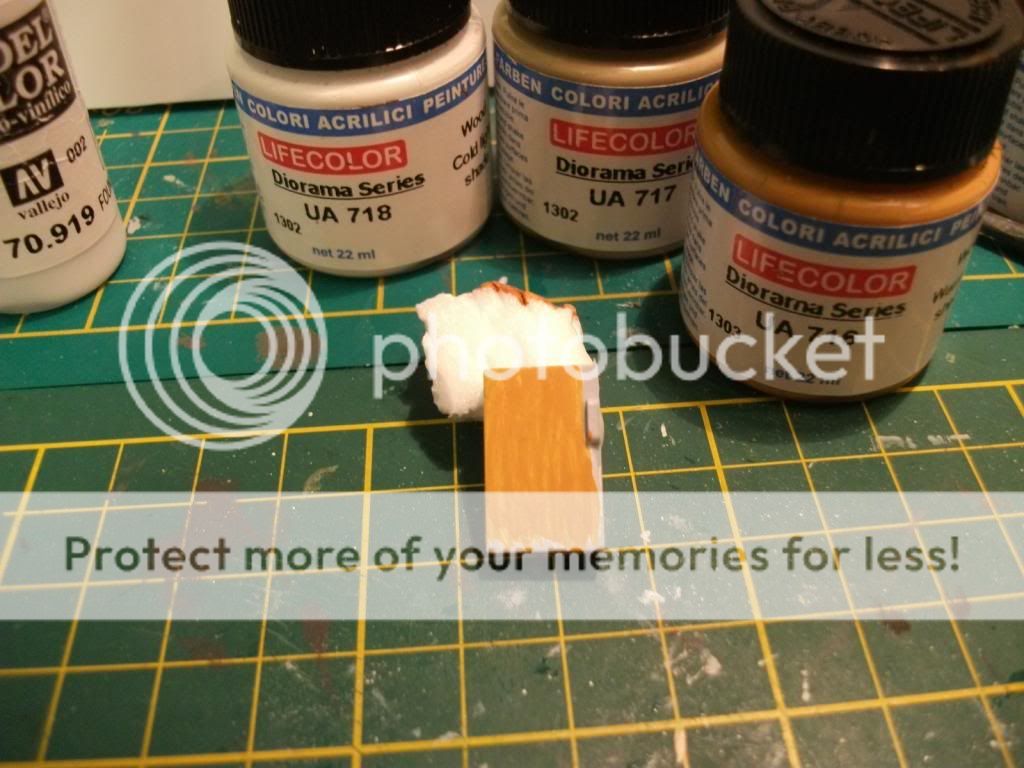
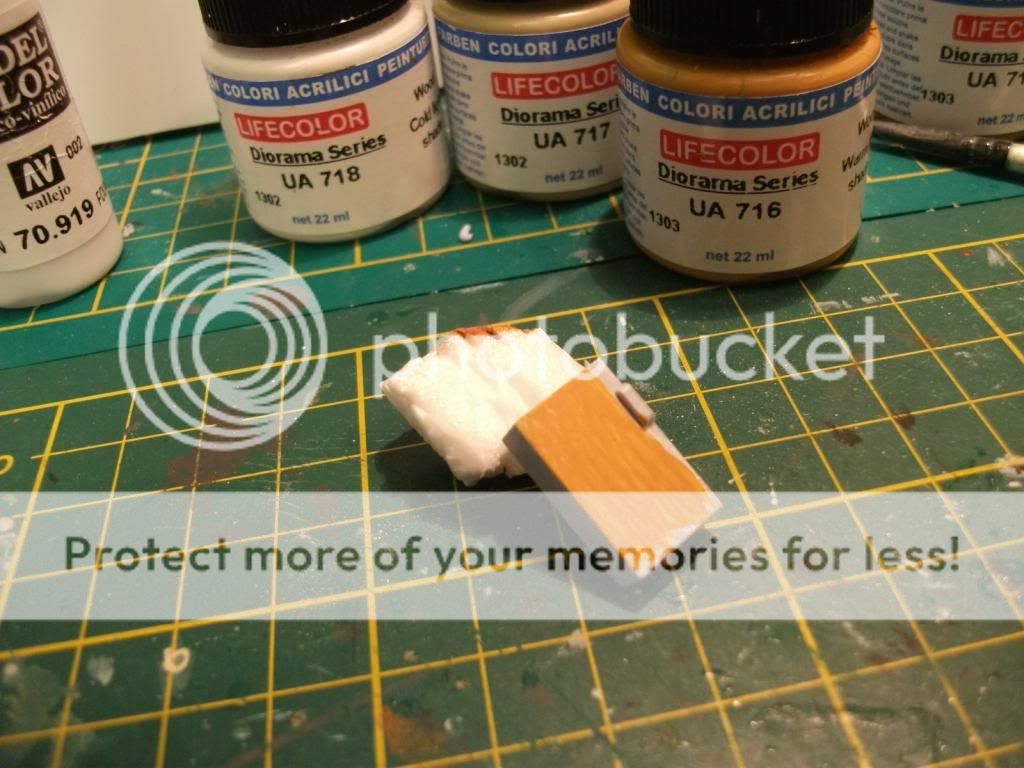
A final coat of the same colour.
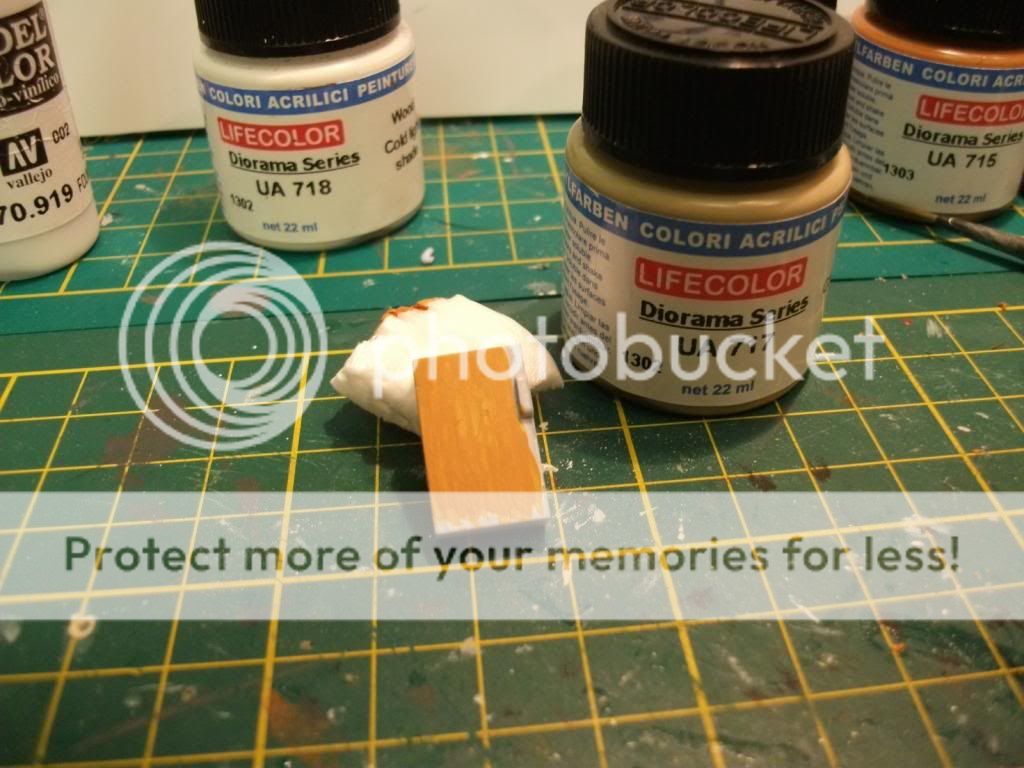
This should produce a nice wood base with subtle textures as some of the basecoat texture shows through, be sure to water the paint from other companies, applying it in thick brush strokes.
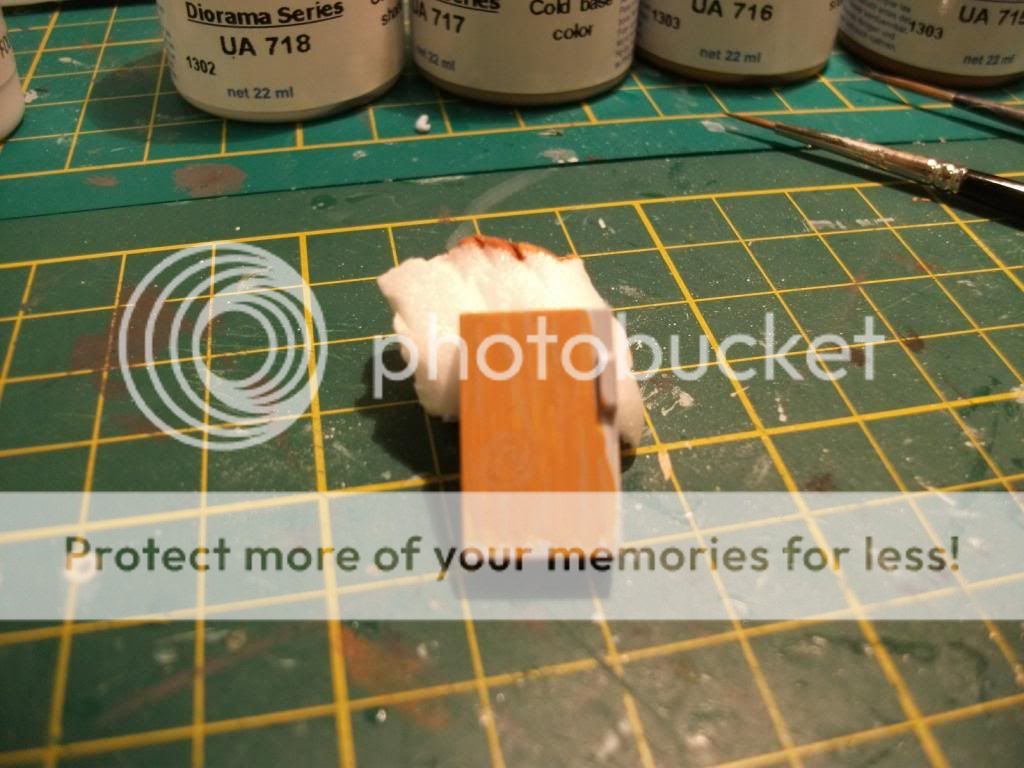
Now the detailing begins to achieve the required wood grain density. The first shade needs to be a neutral colour which complements the main wood colour giving a shadow. - in this case UA-717 Cold Base Colour. The strokes in this stage will create the main wood grain pattern - in this example thin stripes and a swirl to break up the piece.
It is important to note that the pattern won't be very clear after this stage, it is the job of the highlighting to bring the pattern to life.
Carefully go over one edge of each stroke from the previous stage with the lightest colour - for me this was UA-718 Cold Light Shade.
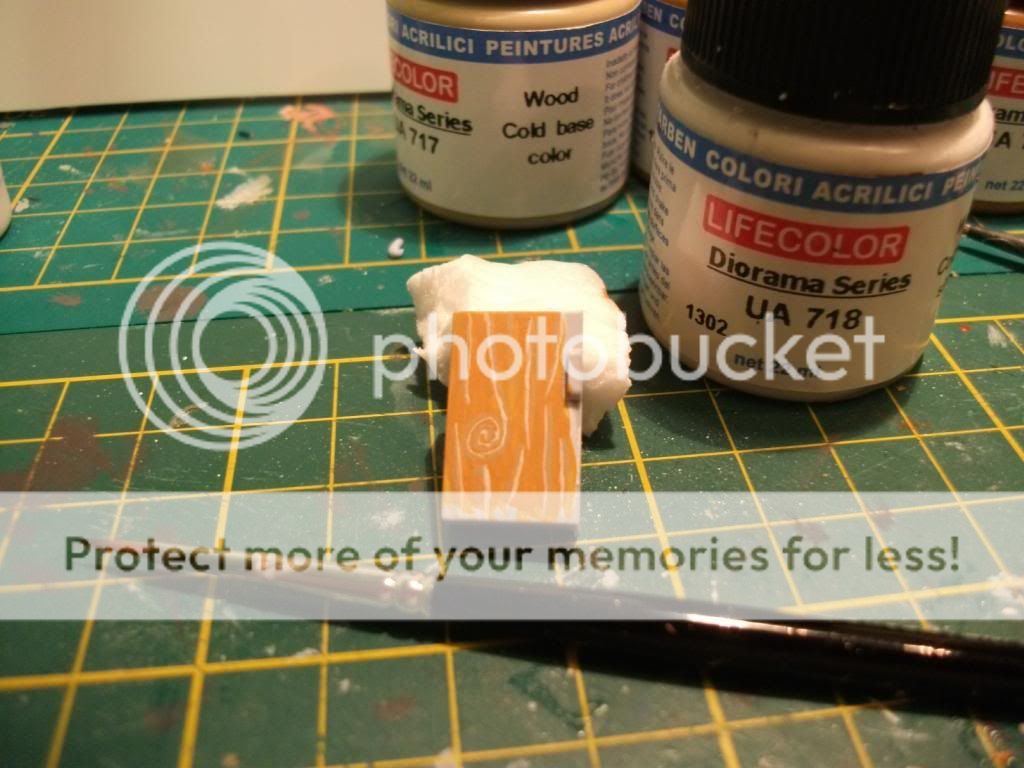
The piece should now come to life with the shadow and highlighting complementing each other.
From now on I am simply adding further interest and grains. It is really up to artistic licence or reference pics where the next dark colours are applied.
After strokes of UA-715 Warm Light Shade.
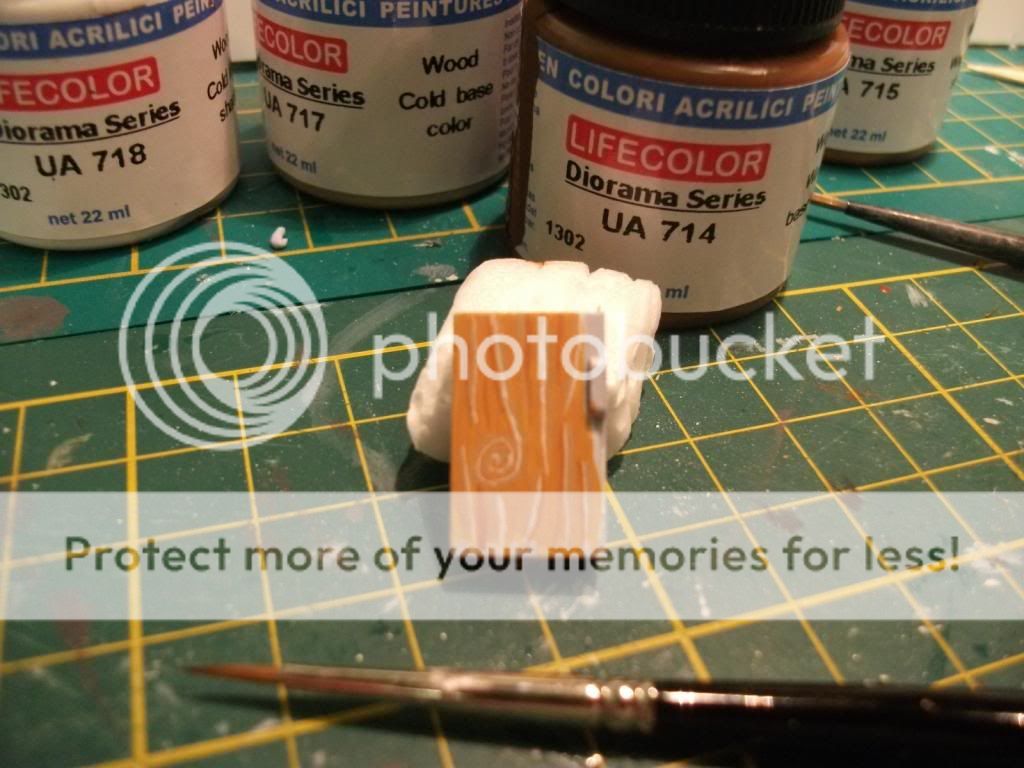
Finally UA - 714 Warm Base Colour was used to break up some of the highlights and make the swirl clearer/ increase it's definition.
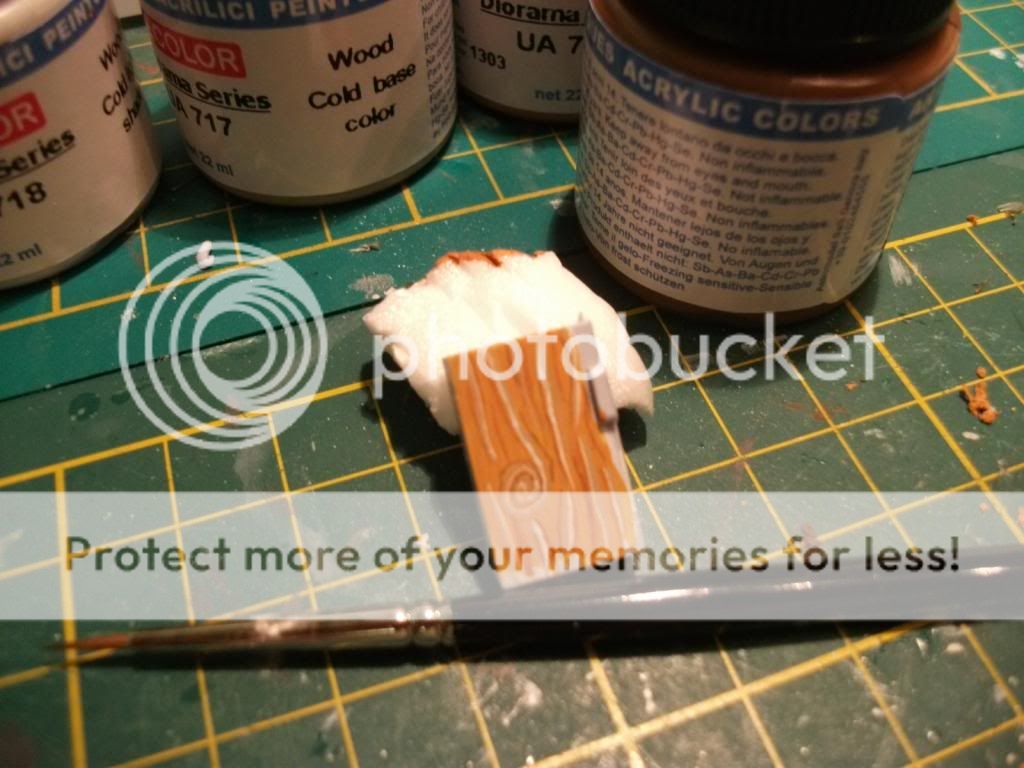
The example I am attempting to depict used treated wood which was varnished but not stained. For this I simply added some UA-716 to a watered down gloss varnish which was applied with smooth strokes.

The final effect - Not as in scale as the oil paint technique but for lighter woods I think it gives more interest.
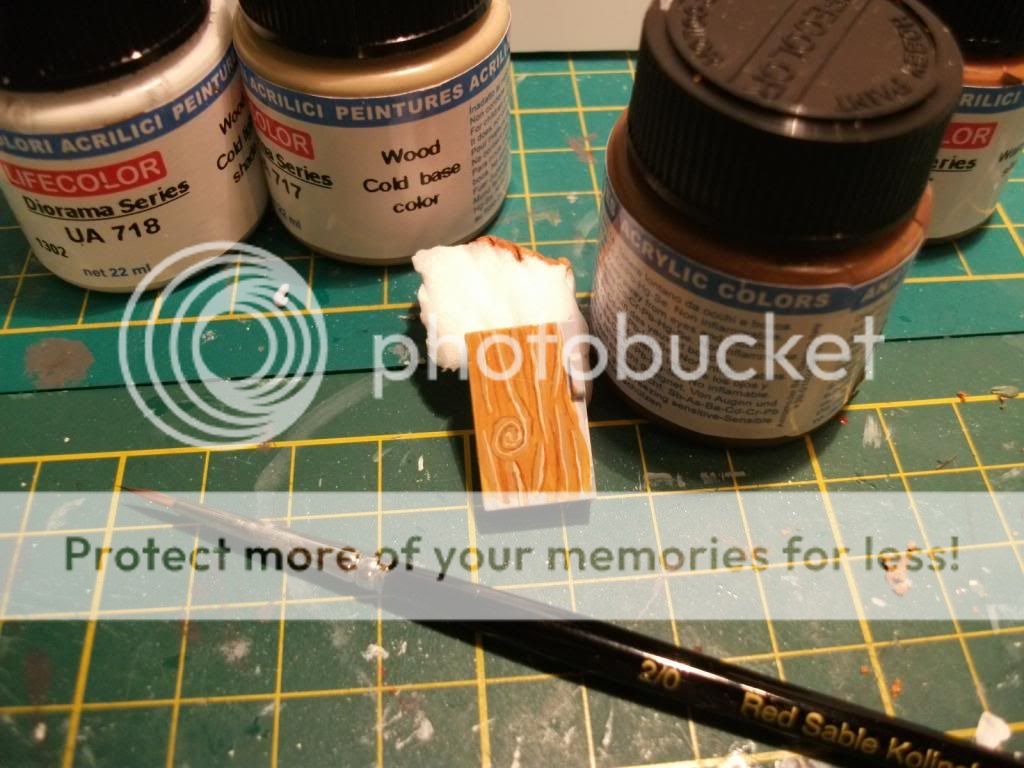
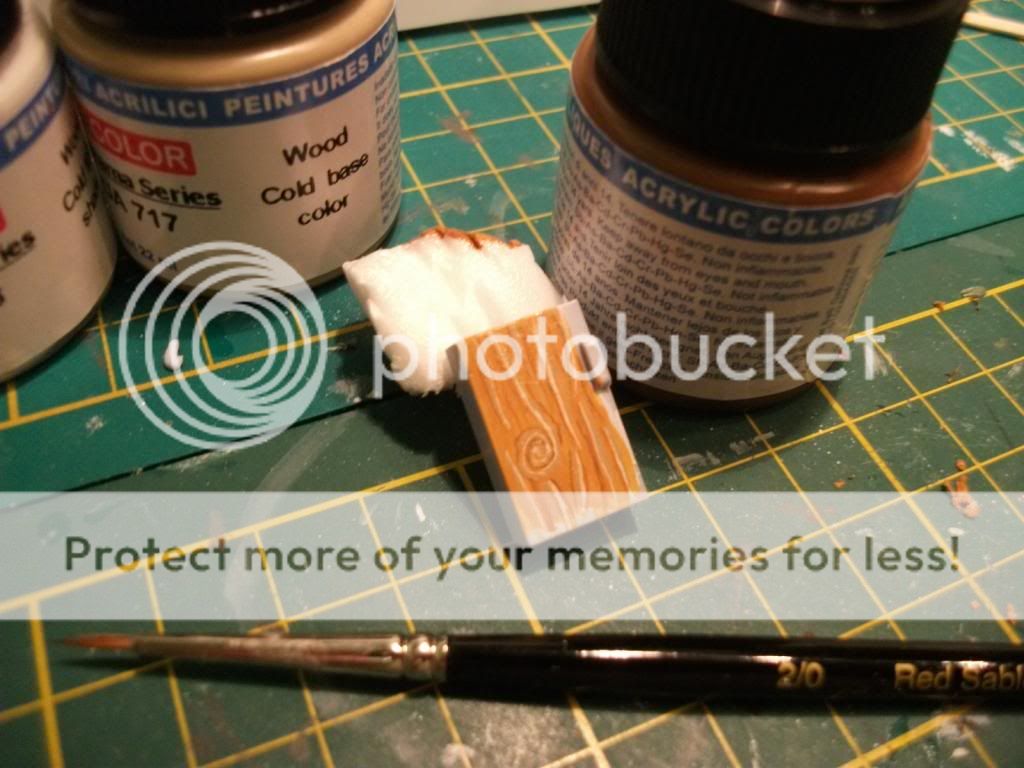
Hope this has been useful.
The same process can be used to achieve any colour and type of wood, simple change the tones and pattern for instance darker wood would contain more strokes of darker colours and less highlighting.
Re: WW1 Knights of the sky - 1/32 Wingnut Wings Snipe Early
Posted: Wed Jan 22, 2014 9:45 pm
by Bissyboat
Coming along nicely.
Re: WW1 Knights of the sky - 1/32 Wingnut Wings Snipe Early
Posted: Wed Jan 22, 2014 10:12 pm
by DC87
Thanks Bissyboat.
Here is one of the excellent Vickers guns.


First time in a long while using PE - unfortunately my usual Superglue cap decided to weld shut so Poundland glue steps in.
Re: WW1 Knights of the sky - 1/32 Wingnut Wings Snipe Early
Posted: Wed Jan 22, 2014 10:28 pm
by Paul
Nice mg dan, it's stuff like that that makes a kit awesome.
Re: WW1 Knights of the sky - 1/32 Wingnut Wings Snipe Early
Posted: Thu Jan 23, 2014 10:59 am
by JayCub
Thank you for sharing your work Dan, some really cool tips very enjoyable and i do like the look of the Vickers gun, the build is coming along nicely.
great photography too.
Tom
Re: WW1 Knights of the sky - 1/32 Wingnut Wings Snipe Early
Posted: Thu Jan 23, 2014 5:56 pm
by Nige201980
that was perfect buddy thank you for taking the time to do this mate really appreciate it Dan
Re: WW1 Knights of the sky - 1/32 Wingnut Wings Snipe Early
Posted: Sat Jan 25, 2014 9:45 pm
by DC87
Both the MG's have been built up and they have been test fitted to the mount as seen below. The fit of the ammo chutes is a little loose but I am confident they will fit like a glove when painted.
Really looking the business with the guns


As I suspected the inevitable disaster has struck as the carpet monster has claimed the built up airspeed indicator - I will spend tomorrow looking for it then scratchbuild a replacement if necessary

Could be worse but a pain nonetheless.
Re: WW1 Knights of the sky - 1/32 Wingnut Wings Snipe Early
Posted: Sun Jan 26, 2014 1:34 pm
by Nige201980
looking great mate love the detail on this build
Re: WW1 Knights of the sky - 1/32 Wingnut Wings Snipe Early
Posted: Mon Jan 27, 2014 10:46 pm
by DC87
I have still been unable to wrestle the airspeed indicator from the mouth of the carpet monster
The lower wing and fuselage have been test fitted, all very nice and snug - I must remember to be careful when snipping the sprue points as the plastic is quite soft.
Here's everything so far together.

Re: WW1 Knights of the sky - 1/32 Wingnut Wings Snipe Early
Posted: Mon Jan 27, 2014 10:50 pm
by Matthew
Very nice
Re: WW1 Knights of the sky - 1/32 Wingnut Wings Snipe Early
Posted: Wed Jan 29, 2014 5:21 pm
by DC87
Thanks Mathew
Now I wasn't going to post until I could give a nice big update but after dry fitting the wings and tail I simply have to say and show that the engineering of the kit is outstanding - what is a very tricky subject to model (biplanes) Wingnut Wings have turned into a stress free joy. Each wing strut end has a unique plug which corresponds with the hole ensuring they can't be wrongly placed and have a positive fit. As you can see the wings are quite thick yet the top wing is supported strongly by the kit struts while maintaining a realistic thin shape on each.
As I'm sure you can tell I am enjoying this kit - it's just so nice to have WW1 modelling made easy

If you where on the fence about one of these kits due to biplane construction - be sure to come down carefully and get one while they are available


More to come this evening hopefully.
Re: WW1 Knights of the sky - 1/32 Wingnut Wings Snipe Early
Posted: Wed Jan 29, 2014 9:57 pm
by Paul
Excellent Dan, looks a great kit


