Page 1 of 2
Tamiya 1/48 Dewoitine D.520
Posted: Fri Jun 07, 2013 6:24 pm
by 5Craven
So what made me chose to do this for the first group build then? Well first off its an unusual subject, there are plenty of French WWI and post war aircraft kits out there but WW2 stuff is almost unheard of. Then the aircraft itself has an interesting history and was used on both sides of the conflict by a variety of air forces. This will also be a build with several firsts for me, first Tamiya aircraft kit, first use of photoetch, first attempt at airbrushing and first use of acrylics as a main paint.
A quick history of the D.520.
Introduced into service in 1939, the D.520 was, in performance broadly similar to the Hurricane MkI, but had a heavier punch with it having a prop hub mounted 20mm cannon. Before the fall of France only 200 aircraft managed to get into front line service, but they claimed 108 kills. Following the fall of France production continued and the D.520 went on to become Vichy France's main fighter aircraft on the Axis side and saw service in Syria, against the RAF & RAAF claiming 31 kills, and in North Africa where they were in combat against US navy and the Royal Fleet Air Arm claiming 44 kills. From December 1942 the remaining D.520's in North Africa became part of the Free French Forces on the Allied side and flew and number of combat patrols before being withdrawn to training duties.
Other axis air forces also used the D.520. After November 1942, when Germany occupied the whole of France, they came into possession of around 310 aircraft. The Luftwaffe retained 130 aircraft to use as advanced trainers, 60 were sent to Italy to be used by the Regia Aeronautica and 120 were sent to Bulgaria. The Italians used the D.520 as an interceptor to counter the USAAF B-24 bombing raids on Naples and it was so successful in this role the acquired a further 30 aircraft from the Luftwaffe. The Bulgarian Air Force also used the D.520 as an interceptor against Allied bombing raids and they saw action against B-17s, B-24s & Handley Page Halifaxs escorted by P-38s & later P-51s.
So with such a colourful history, this is a model which has appeal to modellers of both sides aircraft. Here are the pre-build photos of the kit box, sprues, decals, instructions and the Eduard photoetch.


Re: Tamiya 1/48 Dewoitine D.520
Posted: Fri Jun 07, 2013 6:29 pm
by Paul
Nice entry matey, a lot of firsts for you, if you need any help with anything just ask on the forum

Re: Tamiya 1/48 Dewoitine D.520
Posted: Fri Jun 07, 2013 7:12 pm
by DC87
Can't wait to follow your build. I hadn't heard of this aircraft before reading your post so thank you for teaching me something new, all the best with the first steps.
Re: Tamiya 1/48 Dewoitine D.520
Posted: Fri Jun 07, 2013 7:37 pm
by Lee
Great choice Dave. This is meant to be a nice kit - Looking forward to all your firsts mate

Re: Tamiya 1/48 Dewoitine D.520
Posted: Sat Jun 08, 2013 10:10 pm
by bullgill67
looks a nice kit - best of luck
michael
Re: Tamiya 1/48 Dewoitine D.520
Posted: Sun Jun 09, 2013 4:35 pm
by 5Craven
First installment on the build. I started off trawling the internet for reference photos to get a feel of the aircraft and also to check for any obvious details that it would be easy to include as part of the build. My resources don't run to buying lots of reference books sadly. I am planning on finishing the D.520 as depicted on the box art. I found two useful photos of the cockpit from a museum aircraft as you can see here.

Nice view of the instrument panel also showing a support bar with some sort of padding. This support bar is missing from the kit so I will try to fashion something out of some wire. It also shows that the camo pattern doesn't have a sharp demarcation but is lightly feathered. This is something that would be difficult to represent with a brush so I am glad I am trying to use an airbrush on this one.

View of the details of the seat here. As you can see it is a basic leather over tube frame seat, a glorified deckchair really. The pilot must have been relieved to have that armor plate you can see just behind the seat. The kits seat has molded detail for the frame in the top corners, so I plan on drilling out the excess plastic which should be quick and give a nice extra detail. I may also try to add the darker colour where the seat material is reinforced. It also looks like the interior colour has a hint of dark blue about it (the paint scheme suggests dark grey). Colours can be difficult to make out though and as this is photoed through the canopy I am not sure. I may try adding a touch of blue to the base grey and see what its like, if I don't like it a quick overcoat will be easy.
Finally a quick check on the extra tools required, first for the photoetch. 4" Hold n Fold, PE cutting tile, PE diamond file.

Finally here is a photo of my ancient airbrush and brand new air supply. The sound you will hear in the distance willl be Paul laughing his head off!!


Re: Tamiya 1/48 Dewoitine D.520
Posted: Sun Jun 09, 2013 5:11 pm
by Paul
Great stuff Dave, no laughing at all mate, I use to use a similar set up, and it works well, keeping the propellant bottle cool is the trick though, once that gets ice cold its becomes a pain to use.
Re: Tamiya 1/48 Dewoitine D.520
Posted: Sun Jun 09, 2013 8:13 pm
by Lee
Great stuff Dave...
Please find attached a little pressie for you.....
Re: Tamiya 1/48 Dewoitine D.520
Posted: Sun Jun 09, 2013 9:36 pm
by 5Craven
Thanks for that Lee, all interesting stuff. This is an aircraft that because of circumstances was never really developed. So the base kit can be painted and decaled in many different ways to show the history of the aircraft. The bonus bit being because the subject isn't a well known aircraft you can pick them up very cheaply on well known auction sites.
Re: Tamiya 1/48 Dewoitine D.520
Posted: Wed Jun 12, 2013 1:51 am
by PhildaFish
A fascinating subject for sure! With so many operators using it in so many theatres are you going to use the supplied decals or something else?
Re: Tamiya 1/48 Dewoitine D.520
Posted: Wed Jun 12, 2013 4:26 pm
by 5Craven
PhildaFish wrote:A fascinating subject for sure! With so many operators using it in so many theatres are you going to use the supplied decals or something else?
I am plannng to use the kit decals and do the scheme shown on the box art. I have seen reports that Tamiya decals can be troublesome so I may have to rethink if that proves to be the case. However the decals in this kit are printed by Scalemaster so they may be OK anyway. Before I commit to the final paint scheme I will try a spare from the sheet and see how it reacts. I have some spare bits of kits I can use for that. Hannants do stock alternatives but they are all currently various French aircraft anyway. (But I would probably do a Vichy French scheme then)
Re: Tamiya 1/48 Dewoitine D.520
Posted: Thu Jun 13, 2013 12:01 am
by PhildaFish
Good! As you said, French WWII aircraft are woefully represented in the model market. Bravo sir!
Re: Tamiya 1/48 Dewoitine D.520
Posted: Sat Jun 15, 2013 3:25 pm
by Bagpiper
Nice to see this in the GB. I always like to see people doing things a wee bit different and having a French aircraft is very cool. Looking forward to following this build.
Cheers
Jim
Re: Tamiya 1/48 Dewoitine D.520
Posted: Sun Jun 16, 2013 7:22 pm
by schweinhund227
interesting choice ! I haven't seen too many built before...
Take care and Enjoy the build !
Re: Tamiya 1/48 Dewoitine D.520
Posted: Mon Jun 17, 2013 9:18 pm
by 5Craven
Time for my first update on this build then. First off, working with photoetch! No avoiding this early in the build as the PE is 90% cockpit based stuff so I just had to dive straight into it. Although I normally enjoy talking about how things went in extended and witty prose, for the purposes of this GB I will highlight each point, obstacle, success and failure with equally witty bullet points

.
1. I normally rip into the instruction sheet see what needs to be done and mentally sort out the various sub-assembles and see what has to be painted before you even start. However I now have the PE instruction sheet that DOES NOT link its steps into the kit instructions. Unlike some of you out there I can see this just might lead me astray and end up with the classic 'its all back together but I still have this coiled spring and a 3/8ths Gripley left over!' Quick and easy solution found! I started with PE sheet and then covered over the part to be modified / added to with a Post It note on the main sheet. As the PE builds are done I remove the Post It. This lets me see at a glance if a construction step can be started/completed.
2. Prepping the PE. I cleaned it of any grease by using cotton tips and meths and then primed it with Tamiya Fine White Primer. This proved to be a complete waste of time. The primer flaked off readily when the PE was bent, touched or glued just like any other paint.
3. Bending and gluing PE. The Hold N Fold is fantastic giving clean bends and perfect alignment, assuming you put the part in correctly! Particularly good on doing sidewall boxes. Tamiya diamond file for PE is simple superb! I also invested in the Mr. Glue applicators for the CA, again brilliant little bits of kit you can get just the right amount of CA exactly where you need it and the fine point tool is MUCH finer than toothpicks.
4. Prepping the instrument panel. This had some really nice moulded detail, it seemed a real shame to take a file to it. I had grit my teeth and just do it!
5. OH YES its is true handling tiny PE with CA glue is a complete PITA! Thought I had some nice fine tweezers, I thought wrong! I will have to check out surplus medical fine pointed ones.
6. PE DOESN'T FIT!! Well not always! Despite being the right set for this kit, the instrument panel when lined up to the top of the plastic was too short at the leg-wells as well as too long where it meets the floor. This photo is poorly focused but you can see the white painted plastic behind. I had already filed the long leg down by this stage.

7. Paint will flake off your PE! Probably even if you
think about touching it! However this worked a treat on the instrument panel as when the dry brushing I had applied vanished the base metal underneath appeared. Genuine random wear n tear gentlemen!
8. So PE in the cockpit is well underway with the seat and instrument panel completed, although I still need to do a wash on the seat and touch up missing paint and add some colour to the panel. As you can see I have drilled out the top corners as mentioned earlier and added the leather strengthening trim. I think it looks OK so far.

9. Airbrushed cockpit side walls as well in the base colour although at this stage I had only added one piece of PE. Mixed up the Tamiya colour/thinner in the airbrush cup 50/50 and went for it. Not a huge area to cover so only had a little practice. Paint flow seemed to be a quite coarse control on this brush, quite gentle spray to 'Oh my God I seem to have prematurely over sprayed! Its never happened to me before!' However that may just be me. Final outcome seemed OK as you can see.

Next time, I may get to actually glue some plastic together plus more adventures with PE & airbrush. TTFN!
PS Having just reviewed my post I appear to be writing in bullet paragraphs! Oh well.
Re: Tamiya 1/48 Dewoitine D.520
Posted: Mon Jun 17, 2013 9:21 pm
by Lee
Great start Dave - Doesn't cockpit PE take bloody ages...!!!
Re: Tamiya 1/48 Dewoitine D.520
Posted: Mon Jun 17, 2013 9:47 pm
by bullgill67
great stuff, i love that seat in particular
michael
Re: Tamiya 1/48 Dewoitine D.520
Posted: Mon Jun 17, 2013 11:04 pm
by UKscalemodeller
Ooooh, shiney.
Looks really nice.
Have never wkrked with PE before.
Re: Tamiya 1/48 Dewoitine D.520
Posted: Tue Jun 18, 2013 12:16 am
by Paul
Nice work Dave look forward to seeing more
Re: Tamiya 1/48 Dewoitine D.520
Posted: Wed Jun 26, 2013 11:54 pm
by Bagpiper
Considering the problems you've had with the PE it is looking very nice indeed. It is always good to hear what problems people have as well as the good points so thanks for sharing these with us.
Looking forward to seeing your progress and you're build is coming along very nicely indeed.
Cheers
Jim
Re: Tamiya 1/48 Dewoitine D.520
Posted: Thu Jun 27, 2013 10:09 pm
by 5Craven
A quick update on where I am with this build. I have only made intermittent progress over the last week or so due to family stuff going on, no issues just the normal day to day stuff that takes your time. So what have I managed to get done to date?
1) The bulk of the PE has been done with the remaining bits to be fitted as the final touches once every else is done.

2) I've glued some plastic together at last! The top halves of the wings have been fixed to the bottom half. Some minor seam repairs were fixed using Deluxe Materials Perfect Plastic Putty. Its the first time I have used this product having previuosly used Humbrol Plastic Putty and Milliput. MY GOD ITS FANTASTIC

Easy to apply and excess cleans off nicely, if you have never used it go and buy some NOW I will wait till you come back..... OK now your back, I also applied some small PE detail to the wheel wells.


3) I added some colour to the instrument panel and attached the gun-sight (more gluing yeah!) Then I did an oil wash over the sidewalls and seat with a little Windsor & Newton Lamp Black and Burst Umber in Odourless thinner. The sidewalls were then dry brushed with a light grey and aluminum and the cockpit 'floor' with just aluminum. This has lifted out the details quite nicely, if anything the closeup photos exaggerate the effect to the naked eye it looks good to me.


So the cockpit 'tub' is ready to be glued together and then fixed into the fuselage halves and joined to the wings, I am hoping to have the next few steps done pretty quickly and should have something resembling an aircraft and even ready for painting by the end of the weekend. I will post up some more photos of the build soon.
Re: Tamiya 1/48 Dewoitine D.520
Posted: Thu Jun 27, 2013 10:18 pm
by Nige201980
Looking brill mate
Re: Tamiya 1/48 Dewoitine D.520
Posted: Thu Jun 27, 2013 10:20 pm
by DC87
Great progress. How have you achieved the metal wear, was it with pencils?
Re: Tamiya 1/48 Dewoitine D.520
Posted: Thu Jun 27, 2013 10:29 pm
by 5Craven
DC87 wrote:Great progress. How have you achieved the metal wear, was it with pencils?
The metal wear on the foot pedals and cockpit floor was done by drybrushing with Humbrol enamel no. 11 (Silver/aluminium). On the instrument panel it was a combination of drybrushing no. 11 again plus the paint actually flaking or rubbing off and exposing the bare metal underneath when I attached the PE to the original plastic part. Real wear n' tear by mistake!
Re: Tamiya 1/48 Dewoitine D.520
Posted: Thu Jun 27, 2013 10:57 pm
by DC87
5Craven wrote:The metal wear on the foot pedals and cockpit floor was done by drybrushing with Humbrol enamel no. 11 (Silver/aluminium). On the instrument panel it was a combination of drybrushing no. 11 again plus the paint actually flaking or rubbing off and exposing the bare metal underneath when I attached the PE to the original plastic part. Real wear n' tear by mistake!
Cheers
Re: Tamiya 1/48 Dewoitine D.520
Posted: Thu Jun 27, 2013 10:59 pm
by Paul
DC87 wrote:5Craven wrote:The metal wear on the foot pedals and cockpit floor was done by drybrushing with Humbrol enamel no. 11 (Silver/aluminium). On the instrument panel it was a combination of drybrushing no. 11 again plus the paint actually flaking or rubbing off and exposing the bare metal underneath when I attached the PE to the original plastic part. Real wear n' tear by mistake!
Cheers
Dry brushing is covered in part two of the ism me 109 build that will be uploaded shortly
Re: Tamiya 1/48 Dewoitine D.520
Posted: Thu Jun 27, 2013 11:05 pm
by T3hGuppy
Looking good dude
Re: Tamiya 1/48 Dewoitine D.520
Posted: Sun Jun 30, 2013 4:57 pm
by 5Craven
Well its Sunday afternoon and this build seems to have taken off in a big way in just a few days. Having finished with the cockpit PE and washes I was able to put all the sub assemblies together into a finished tub as you can see here.
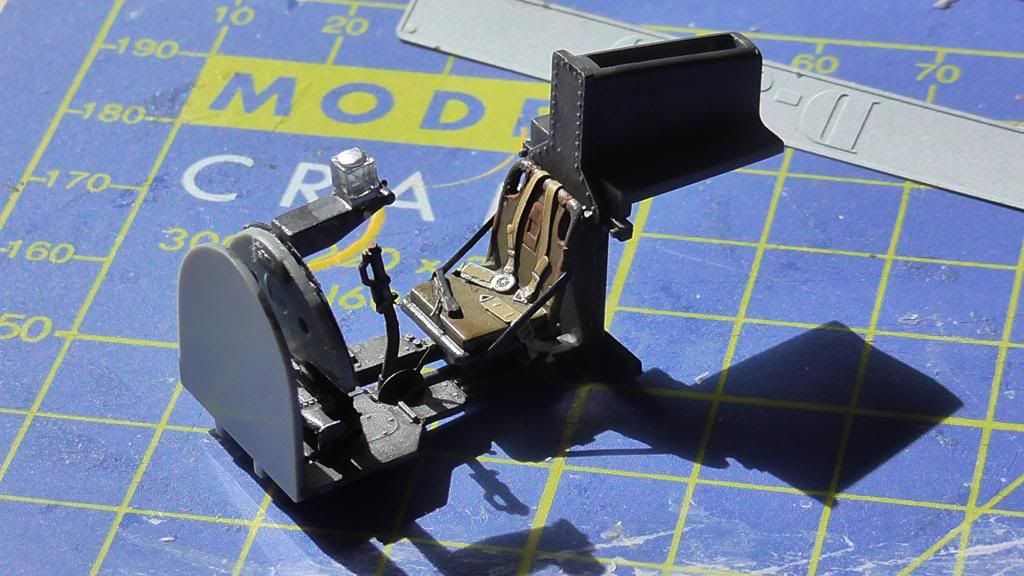
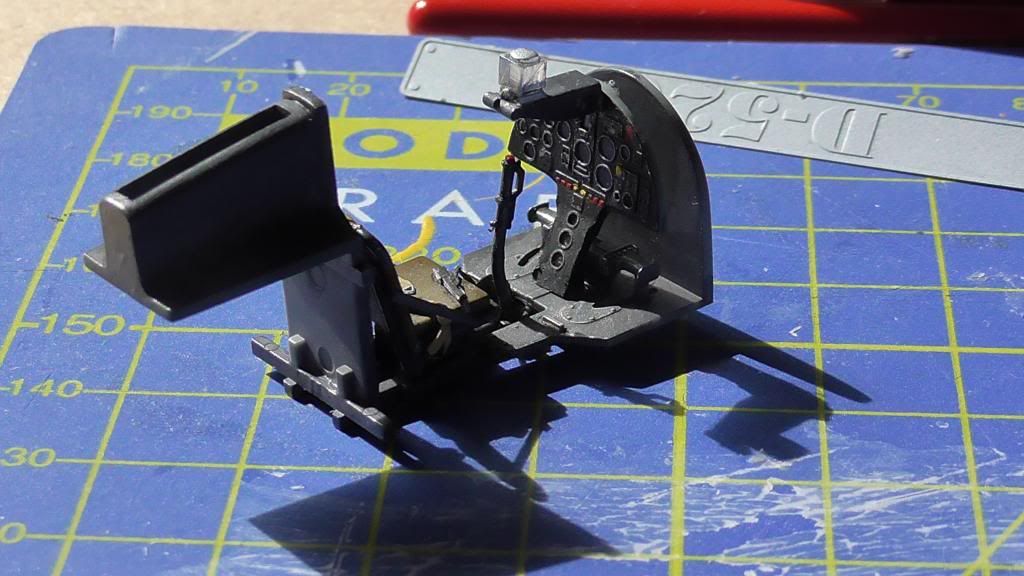
I have also taken a photo of the kit pilot in place to show the overall scale and layout of the cockpit, but I will not be using the figure in the end. Tamiya quality not totally evident on the moulding either.

So now to trap the whole thing in place in the fuselage and glue stuff on. This Tamiya aircraft kit does not have that many parts overall but in general the fit is good and in no time at all I have something resembling the final build.


For some reason the section of fuselage above the headrest/armour area was very fiddly to get just right and any attempt to clamp it just bowed it out of shape. On the underside the oil cooler assembly is still to be fitted as it has to be painted internally prior to assembly.
Next steps are to fill some gaps and sand and polish. Mostly this is minor stuff as the fit is really good overall but there are two areas that are not up to the standard of fit overall as you can see here.


So the next steps are fill and sand, sort out the oil cooler and generally get ready for primer. Other than the oil cooler the only outstanding bits of the kit to add are the undercarriage, radio aerials, prop and the transparent parts. Hope to update you all on progress later in the week.
Re: Tamiya 1/48 Dewoitine D.520
Posted: Sun Jun 30, 2013 5:35 pm
by bullgill67
great progress, stunning job on the cockpit
michael
Re: Tamiya 1/48 Dewoitine D.520
Posted: Sun Jun 30, 2013 6:44 pm
by chief5437
Loving that cockpit! Great detailing.
Re: Tamiya 1/48 Dewoitine D.520
Posted: Mon Jul 01, 2013 2:24 am
by Bagpiper
Love the cockpit. Very nicely done.
Cheers
Jim
Re: Tamiya 1/48 Dewoitine D.520
Posted: Mon Jul 01, 2013 10:09 am
by Lee
Nice work on the pit Dave

Re: Tamiya 1/48 Dewoitine D.520
Posted: Mon Jul 01, 2013 10:18 am
by HobbyModeller
lovely work

Re: Tamiya 1/48 Dewoitine D.520
Posted: Thu Jul 04, 2013 5:26 pm
by 5Craven
So the minor filling and seam works is done but almost inevitably I managed to take off some surface detail.....

The top of the engine cowling at the front is very flat, almost box like so it was very difficult to avoid taking the panel lines out. So on with the rescribing. First off all I broke out the Dyno Tape and lined it up along the existing seam and out to the end of the cowling.

Then using a sharp reverse curve blade resting against the tape as a guide, pulled gently along 3 times. (Fingers carefully crossed) And remove tape to view handywork....


Right rinse and repeat with the rest of the missing lines! Til next time.........
Re: Tamiya 1/48 Dewoitine D.520
Posted: Thu Jul 04, 2013 6:42 pm
by Nige201980
good job mate what blade do you use any chance of a picture please.
Re: Tamiya 1/48 Dewoitine D.520
Posted: Thu Jul 04, 2013 6:54 pm
by bullgill67
nice job on the scribing

michael
Re: Tamiya 1/48 Dewoitine D.520
Posted: Thu Jul 04, 2013 7:22 pm
by 5Craven
Nige201980 wrote:good job mate what blade do you use any chance of a picture please.
I use a A.C.M. no 28 blade pictured.. as my tool of choice.

I use almost no downward pressure as the blade will pull itself into the surface. I find light repeated cuts are the way to go with this.
Re: Tamiya 1/48 Dewoitine D.520
Posted: Thu Jul 04, 2013 7:50 pm
by Nige201980
Ah gotcha thanks
Re: Tamiya 1/48 Dewoitine D.520
Posted: Fri Jul 05, 2013 6:05 pm
by Bagpiper
Never seen that blade before. Nice job on the scribing and the build as a whole is looking very nice.
Cheers
Jim
Re: Tamiya 1/48 Dewoitine D.520
Posted: Sun Jul 07, 2013 5:37 am
by panzerman
Great job on this little known French plane. Magnificent work on the cockpit....very nice detail painting.
Enjoying the build.
Bill.
Re: Tamiya 1/48 Dewoitine D.520
Posted: Sun Jul 07, 2013 8:29 am
by UKscalemodeller
Looking great.
Re: Tamiya 1/48 Dewoitine D.520
Posted: Tue Jul 09, 2013 11:45 am
by chief5437
Thanks for showing the scribing. Great result! That's why I hate filling and sanding so much, I dont have a scribing tool. I tried it once with a normal blade and messed up big time! Lol.
Re: Tamiya 1/48 Dewoitine D.520
Posted: Thu Aug 15, 2013 4:18 pm
by 5Craven
Hi guys finally have got a chance to do a bit more with my GB. I find that sometimes a build can just stall and then it gets really hard to get going again. So why the stall in the first place? Well first off we had the really hot period here in the UK, then the start of the school holidays which means since I live on the coast we get lots of family who "are missing us" paying a visit. Also as I have mentioned elsewhere, I have moved my modelling work area & PC to another part of the house.
All good reasons for the stall you may think but if I am being honest with myself the real reason is I am just coming up to the first major job of airbrushing I have to do and its made me a bit nervous going outside my comfort zone, hence all the displacement activity. Right now having 'fessed up on the record I just going to have to get on with it aren't I? So here are a few final jobs done before the airbrushing starts, first off masking the canopy.

Then fitting it to the aircraft, the sliding part of the canopy is temporarily held in place with blutack, this is so the camo pattern will line up when it is finally fitted in the open position. The frames have also been painted with the interior colour, prior to the outside colour going down.

I have also worked on a few other minor parts as mini sub-assemblies. More displacement activity I think!

First hollowing out the exhausts, then painting the wheels, hubs & shocks and the prop.


Right next step, and I mean it this time, is priming the airframe. With luck all will go well

if not then I fear a

nervous breakdown may well be the outcome!
Re: Tamiya 1/48 Dewoitine D.520
Posted: Thu Aug 15, 2013 10:06 pm
by Nige201980
Looks great so far and as soon as you get started I'm sure you will love doing it the airbrushing I mean best of luck.
Re: Tamiya 1/48 Dewoitine D.520
Posted: Thu Aug 15, 2013 10:12 pm
by wappynutter
Good luck dude......
I'm sure you'll do fine...

Re: Tamiya 1/48 Dewoitine D.520
Posted: Thu Aug 15, 2013 10:14 pm
by Paul
Great stuff, I'm sure you will do fine
Re: Tamiya 1/48 Dewoitine D.520
Posted: Sun Aug 18, 2013 5:46 pm
by 5Craven
The next installment! First the good news, my mental state is still intact and the build is on course. I have manged to, reasonably successfully, apply the primer using my basic airbrush. The only minor issue was that the primer I had was Tamiya Fine White in a spray can. So how to airbrush with that and why bother? Well as part of reading up on airbrushing I found that Brett Green recommended not to use primer straight from the can as it might not go down evenly and leave a substandard surface to paint on. Then then went on to suggest a method to transfer the paint which I have followed. Firstly you attach a flexible straw to the cans spray nozzle and put the other end into a container. I am just using the airbrushes gravity feed bottle straight off. Then cover up using cling film to prevent any spray escaping. You can see the set up below.

Once you have decanted enough paint, you need to leave the container to stand for about 20-30 minutes to allow the propellent gases to bubble out of the solution. Initially they do this quite vigorously as you can see. Good job the cling film is there

I then hooked everything up to the airbrush and went for it, light coats and moving around the model. I am fairly pleased with the outcome and the finish is reasonably even with only very slight variations in the level of coverage.

I am not planning to do any preshading on this build for two reasons, firstly I want to improve my skill level with the air brush first and secondly I don't think this airbrush is good enough for really fine work. I am planning to do a little aluminium chipping effects using maskol so that will be the next step and then the main paint colours.
Re: Tamiya 1/48 Dewoitine D.520
Posted: Sun Aug 18, 2013 5:48 pm
by T3hGuppy
That worked really well.
Hope you had the window open that propellant is not nice stuff.
Re: Tamiya 1/48 Dewoitine D.520
Posted: Sun Aug 18, 2013 6:21 pm
by 5Craven
Re: Tamiya 1/48 Dewoitine D.520
Posted: Sun Aug 18, 2013 6:22 pm
by T3hGuppy


