Page 1 of 1
Tamiya F-16C 148th FW
Posted: Sat Jul 05, 2014 10:28 pm
by Navcom
My P-51B is almost done for the D-Day GB (at least sort of) so I've been planning my next build. I restarted my modeling addiction early this spring after many years away from the hobby by attempting a Hasagawa F-16C with the hopes of making it into a version of the local Air National Guard unit, the 148th FW Bulldogs. Well, while I learned a lot from the experience, the model didn't exactly come together as planned and I wrote it off as a learning experience with the hope of doing one up right some day.
That day is now. I have decided to use the Tamiya 1/48 kit and make an authentic replica of one of the unit's Vipers. As a matter of fact, here's the actual aircraft I will be attempting to duplicate...83162 (the one in the back...photo courtesy of F-16.net)...
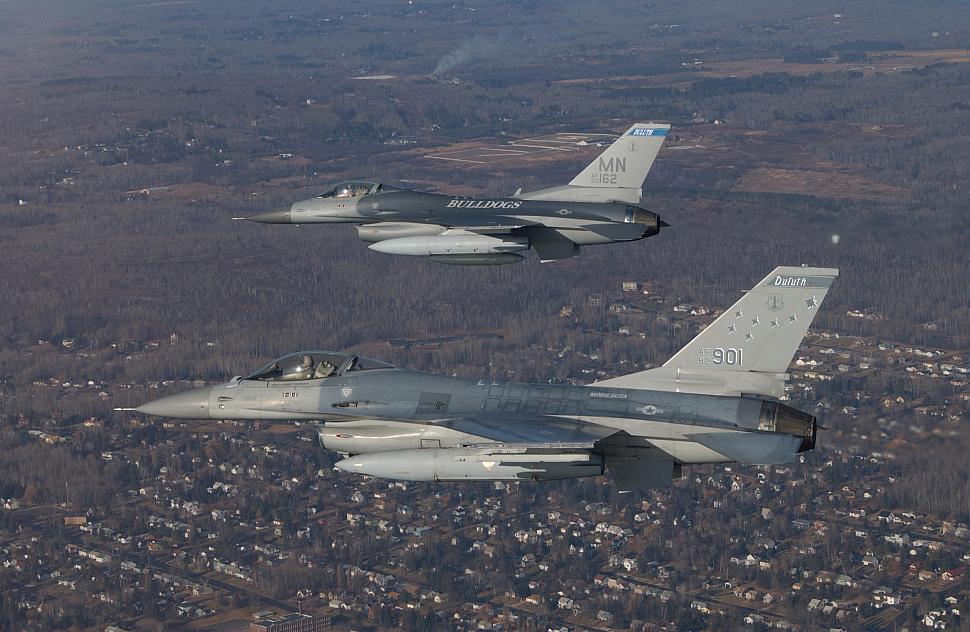

(PD-USGov)
The 148th is an Air Guard unit based in Duluth, MN at the southwestern tip of Lake Superior. In 1990, the Wing replaced their F-4 Phantoms with F-16A Falcons. In 2002, the unit upgraded their "A" versions to the F-16C Block 25 version, which they flew until 2011, when they upgraded to their current platform, the F-16C Block 52.
The aircraft I will be modeling will be the one I'm most familiar with, the Bock 25 they flew from 2002-2011. Here's the kit...

Lot's of sprue going on in this kit! Love it!....

Tamiya gives you the option of the standard canopy or the RCS reduction tinted version...Nice! The 148th Block 25's had the standard canopy but it's still neat to have the option....

The standard markings out of the box...

The decal set I will be using...

I have resin nozzle and cockpit on order as well as PE parts but I'm not sure what I will use yet. Just want to see and hold all my options before making a decision.
I am really looking forward to this build! It's the aircraft that inspired me to get back into modeling and I really want to do this one up right. If it's worthy, I may even build a display case for it. The D-Day build is still top priority but I hope to slowly get going on this one in the next couple weeks.
Re: Tamiya F-16C 148th FW
Posted: Sun Jul 06, 2014 3:19 am
by UKguyInUSA
Nice choice....and Tamiya, too! Enjoy building that baby!

Re: Tamiya F-16C 148th FW
Posted: Sun Jul 06, 2014 7:12 pm
by Goose
You ll have a good time with this babe..tamiya is a quality trade mark!
enjoy
Goose
Re: Tamiya F-16C 148th FW
Posted: Sun Jul 06, 2014 7:20 pm
by Apple
Nice one.
You can also mix up the canopy's
Have glass front and normal back.

Re: Tamiya F-16C 148th FW
Posted: Sun Jul 06, 2014 9:18 pm
by Navcom
Thanks everyone! Yeah, I could mix/match depending on the particular aircraft on the Have Glass. The particular tail that I'm working on had the standard glass...or "have not" as the case may be. LOL!
Re: Tamiya F-16C 148th FW
Posted: Wed Aug 13, 2014 9:39 pm
by Ads24
I've built this kit, and you're in for a treat, it's fantastic. Well, it was for me right up until the decals went on, out of the box they were terrible and pretty much ruined it for me. As you've got aftermarket ones - happy days

Look forward to following this one.
Re: Tamiya F-16C 148th FW
Posted: Thu Aug 14, 2014 2:56 am
by Navcom
Ads24 wrote:I've built this kit, and you're in for a treat, it's fantastic. Well, it was for me right up until the decals went on, out of the box they were terrible and pretty much ruined it for me. As you've got aftermarket ones - happy days
Look forward to following this one.
Thanks! I"m feeling a bit guilty as I haven't touched this kit much. I'm a bit hung up about what to do with the cockpit....out-of-box, photo etched, or resin. I've took the plunge with resin and began cutting the pieces to fit properly. I've also been working on the Tamiya 1/48 Corsair with the 1/32 on deck.

I swore that when I got back into this hobby, I wouldn't buy a bunch of kits without finishing the ones I had first. So much for that plan. I also have a Hellcat and an F-86 in the stash now as well. My winter is gonna be awesome!
Unfortunately the remodel project in our basement has been taking most of my free time. The good news is that when it's done, I'll have a new shop which will have an exhaust hood for the airbrush....granted it's a wood shop, but it will double as a part-time scale model shop as well.
Sheet rock is hung, taped, and mudded.
Re: Tamiya F-16C 148th FW
Posted: Sat Aug 16, 2014 9:10 pm
by Ads24
Navcom wrote:
Thanks! I"m feeling a bit guilty as I haven't touched this kit much. I'm a bit hung up about what to do with the cockpit....out-of-box, photo etched, or resin. I've took the plunge with resin and began cutting the pieces to fit properly. I've also been working on the Tamiya 1/48 Corsair with the 1/32 on deck.
I swore that when I got back into this hobby, I wouldn't buy a bunch of kits without finishing the ones I had first. So much for that plan. I also have a Hellcat and an F-86 in the stash now as well. My winter is gonna be awesome!
Sometimes it pays to give a model a bit of time, I was finding the Trumpeter MiG-23 I'm doing hard work, so did a bit of a 1/72 F-102 to get back into things. The most important thing is that the hobby's fun!
Re: Tamiya F-16C 148th FW
Posted: Mon Sep 21, 2015 2:21 am
by Navcom
WOW! It's literally been over a year since I posted in this thread. And that's exactly how long this kit has been sitting on/around my bench. Time to get back to it and finish this bird once and for all! I actually managed to work ahead a bit before posting updates. I was initially stuck on the cockpit and forged ahead with a resin kit, which looks awesome. I managed to get it painted and weathered a bit (not much). Yeah, there are no belts. I hate belts. I started to put them together, lost interest, and left them off. Artistic license.


I actually used the PE kit instrument panels for the mains. Actually turned out pretty nice. The HUD has been a bit of a sticky wicket as you Brits say...small parts versus big hands. I actually broke off and lost one side after these pix were taken. Not sure what I'm going to do now. I might scratch build one or maybe try to modify the pieces that came with the kit. Either way...not looking forward to that bit.
Fuselage started and partial engine inlet assembled...


Decided to go with the resin kit for the variable exhaust nozzle as well. Glad I did. Much better detail and a blast to work with, even if the exhaust leaves don't want to cooperate...

The resin kit came with a PE rear engine insert, which looks fantastic as well!...

Fuselage is assembled, filled, and pretty much ready for priming now. Just need to finish the HUD and get the canopy installed (which required a seam sand.

)...

The resin exhaust cover was a bit tricky to blend with the fuselage. It was a fair amount smaller and required a pretty good amount of sanding off the fuselage to make a good blend...

I dry-fitted the exhaust nozzle. I really like it. Resin really does add something special. I used a rubber band wound around the barrel of the engine exhaust, and then rolled up and over the exhaust leaves to hold them down during gluing. Worked like a charm!...

That's it for now. So glad to be back modeling again! And the bonus: nothing was dried out or expired!!
Hopefully this week I'll get the canopy on and the priming done. Glad to see this place is still here...best scale modeling forum on the net! Just talking to my wife this morning about how many forums out there are full of spam, trolls, vicious and egotistical users, never-ending soapboxes, and downright hate speech. This place is a gem! Great users and nothing but great model talk!
Re: Tamiya F-16C 148th FW
Posted: Tue Sep 22, 2015 4:16 pm
by Homerlovesbeer
The exhaust came out beautifully. What paint and techniques did u use?
Re: Tamiya F-16C 148th FW
Posted: Tue Sep 22, 2015 6:39 pm
by Navcom
I used an airbrush and both Alclads and Tamiya paints. For the interior tube and the interior nozzle, I started with black Alclad primer and then Alclad steel, but didn't completely cover with the steel so some of the black showed through. Once dry, I gently sprayed streaks of Tamiya white running the length of the tube to simulate the exhaust "corrosion". The nozzle leaves were primed with black Alclad and then painted with a mixture of Alclad aluminum and Alclad exhaust manifold to give it a more "dark bronze" color feel, as that is a typical discoloration. Straight manifold color is too dark so adding the aluminum color made it pretty close to what the real aircraft I'm shooting for looks like. There are several shades that you could paint the nozzle leaves depending on which engine was used and how new/used the parts are on the aircraft. Sometimes a light bronze metallic color that is very polished/shiny is typical for the leaf ring as seen on some aircraft. Mine is not like that but worn more evenly.
I'm still debating on if I should add a bit of weathering as the leaves appear fairly flat. I was thinking just a very light wash of dark dirt to bring out some of the detail and add some contrast. I'm just afraid of overdoing it. If anyone has some ideas, I'm open to any suggestions!
Re: Tamiya F-16C 148th FW
Posted: Wed Sep 23, 2015 12:54 pm
by AussieAaron
Great info Jeff, thanks. I'm just about to finish the cans on a 1/48 F-14 so reading your mix of techniques has really helped me. It's looking great so far. Can't wait to see more!!
Re: Tamiya F-16C 148th FW
Posted: Thu Sep 24, 2015 2:37 am
by Navcom
Got the canopy masked and the first trim layer sprayed. Also sprayed the inner canopy rails as well. The canopy actually has a small strip of trim near the base which is a more brown/tan color. Then the actual base is the same color as the fuselage. I noticed after spraying the rear one that it doesn't have said thin trim color...just fuselage color. No worries...I'll call the brown layer the primer!...

That was a lot more work than I had planned for tonight! Tape just didn't want to cooperate! Glad it's done. Now on to figuring out how to fix the HUD before I glue these things in place.
Off for a few days to celebrate our 25th wedding anniversary! Can't believe it's been that long already!
Re: Tamiya F-16C 148th FW
Posted: Tue Sep 29, 2015 2:18 am
by Navcom
Got the canopy glued on and the missile rails attached. Also put together the external tanks and sidewinders...

Also had to add some build-up filler in just behind the nose as I noticed I didn't get the nose cone perfectly centered...it was slightly low. No biggy...a little fill and sanding will take care of that.
Till later!
Re: Tamiya F-16C 148th FW
Posted: Tue Sep 29, 2015 11:13 am
by qeialto
I've this on my stash, such a beauty that I'm not daring to destroy, you are doing it very well mate!
Re: Tamiya F-16C 148th FW
Posted: Tue Sep 29, 2015 12:13 pm
by Homerlovesbeer
Top work, I've got a. Hasegawa 1:32 in the stash but from what I've read it's not the best kit. Oh well....
Re: Tamiya F-16C 148th FW
Posted: Wed Sep 30, 2015 2:24 am
by Navcom
Got the fuselage mostly finish so now it's time for the first primer pass...

Of course, I say first pass because as is usually the case with my modeling, I find several fills that look bad, a bit more sanding I should've done......and, of course the inevitable missed part! In this case, it was the main gear center spar. WTH! Geez!

I'll let it set overnight, sand down the touch-ups, hit the whole thing with a fine sanding, then do a second primer coat to touch things up. Every day a bit closer!
Re: Tamiya F-16C 148th FW
Posted: Wed Sep 30, 2015 5:50 am
by Homerlovesbeer
I'm on holiday sitting around a pool drinking cocktails.....and I'm still missing getting my models up to speed.
Am I crazy?
Re: Tamiya F-16C 148th FW
Posted: Wed Sep 30, 2015 12:57 pm
by AussieAaron
No you are not crazy! I do exactly the same thing when I'm not in my cave. It's looking great btw Jeff, keep photos coming!
Re: Tamiya F-16C 148th FW
Posted: Wed Sep 30, 2015 1:32 pm
by Navcom
Yes...yes you are crazy. But so are the rest of us!
Re: Tamiya F-16C 148th FW
Posted: Sat Oct 10, 2015 10:55 pm
by Avgas
Looking top class so far. Got this in the stash. I keep opening it up and smelling it then put it carefully back.
Re: Tamiya F-16C 148th FW
Posted: Sun Oct 11, 2015 12:51 am
by mincemeat
It's looking really nice! I always did like the F-16, should I stray from prop aircraft????

Re: Tamiya F-16C 148th FW
Posted: Thu Oct 29, 2015 12:13 am
by Navcom
@mincemeat...yes......yes you should.

Had a Mac meltdown to fix over the last week. Self inflicted. Corrupted the fusion drive but we are back up and running now. Time to update my progress thus far.
First a bit of pre-shading and some masking. Yes, I'm pre-shading. Not overboard but pre-shading none-the-less...

Next, some paint! First the bottom, front quarter, and the vertical stab...


Next, the top...

As you can see, I decided to finish the build with the gear doors closed. I think this bird is going on a stick.
Nose is also painted but I don't have a picture yet. Will include it with the next upload.
Cheers fellas!
Re: Tamiya F-16C 148th FW
Posted: Thu Oct 29, 2015 7:28 am
by qeialto
Great job Mate, I've it on my stash but I'm so scared to start it... looks beatiful
Re: Tamiya F-16C 148th FW
Posted: Thu Oct 29, 2015 8:02 am
by Paul
Great work, these are superb kits

Re: Tamiya F-16C 148th FW
Posted: Thu Oct 29, 2015 4:03 pm
by Navcom
It's a great kit! Better than the Hasagawa version. Detail is fantastic and it goes together really well. @qeialto...get started! You won't be disappointed.
Re: Tamiya F-16C 148th FW
Posted: Thu Oct 29, 2015 8:26 pm
by jbellos1
Re: Tamiya F-16C 148th FW
Posted: Sat Nov 07, 2015 1:34 am
by Navcom
Finally got some decals attached to the Viper...


Definitely wasn't as precise as I'd like. Messed up in a couple spots, such as the "B" in Bulldogs. I investigated whether to try and remove the decal but after trying one on another model, I didn't have the moxy to try. At this stage, a full blown disaster might put me over the top.
And what model aircraft adventure wouldn't be complete without breaking off the nose pitot tube? And of course it's been swallowed by the carpet monster. I've fashioned a new one out of a toothpick but I'll wait till the end to install it. Once bitten, twice shy.
Also primed and semi-glossed the fuel tanks and started the AIM-9's. Gloss white was a very VERY bad choice. I'm going to update them to a light grey...

The weekend's here! Hopefully I will be able to get most of this bird done in the next few days!
Re: Tamiya F-16C 148th FW
Posted: Sat Nov 07, 2015 7:42 pm
by Navcom
Managed to get decals on the external tanks and repaint the AIM-9s. Got everything attached and ready for the final gloss coat to seal it all up before weathering...

I'm not going to weather it very much...just a bit of dark wash and pastel pigmenting to bring out some detail. Then it's just finishing the detail work. I have some gold-titanium paint on order so I can finish the pitot tubes and also have the nav lights painted and ready to install. Still remains to be seen how well my nose-mounted pitot tube hack will come off. Probably the last thing I'll attach as I don't want it breaking off again. If you look closely at the tail in the picture above, you can see that the refueling flood light tube is also bent.

I'm surprised that the body pitot/sensors have survived this long!
Re: Tamiya F-16C 148th FW
Posted: Sun Nov 08, 2015 1:05 am
by Navcom
I present to you the 99.999999% finished 148th FW Minnesota ANG F-16C...


Closeup of the cockpit area...

Closeup of the exhaust and tail...

Tanker view...

Stylized view...

Now just waiting on some paint so I can finish the pitot/AOA sensors and finishing stalling/painting the nose pitot tube. Also have on order a display "stick" to put her on. Once it's all put together, I'll post the final, final picture(s).
This was a very fun aircraft to put together. Tamiya makes a fine F-16! Plus the aftermarket resin and decals were all fantastic! I've actually purchased a second set of decals in the hopes of doing this very aircraft once more to perfection now that I know the model inside and out.
Next up...a Sherman tank! My first armor!
Re: Tamiya F-16C 148th FW
Posted: Thu Nov 12, 2015 3:08 am
by Navcom
Re: Tamiya F-16C 148th FW
Posted: Thu Nov 12, 2015 8:07 am
by qeialto
A beauty, congrats mate, love it!
Re: Tamiya F-16C 148th FW
Posted: Thu Nov 12, 2015 3:15 pm
by Twokidsnosleep
That is a sweet build , you should be proud

Re: Tamiya F-16C 148th FW
Posted: Thu Nov 12, 2015 8:48 pm
by AussieAaron
Awesome result, really great job!!
Re: Tamiya F-16C 148th FW
Posted: Sat Nov 14, 2015 5:36 pm
by mincemeat
Fantastic finish! What's the details on the stand????
Re: Tamiya F-16C 148th FW
Posted: Mon Nov 23, 2015 10:04 pm
by AussieAaron
Love the fact you did it in flight! I've got a Mig-29 coming up which I'm doing the same way!
Re: Tamiya F-16C 148th FW
Posted: Mon Nov 23, 2015 10:18 pm
by Paul
Very nice build
Re: Tamiya F-16C 148th FW
Posted: Mon Nov 23, 2015 10:26 pm
by MikeyKb
Lovely build!!
I agree with Mincemeat, though! What are the details on that stand!? Lovely piece! Did you buy the entire thing, or just the 'stick' and then attach it to a separate base?
Great work!
Re: Tamiya F-16C 148th FW
Posted: Tue Nov 24, 2015 8:39 pm
by Larryrz09
Excellent build! Thanks for sharing.
Re: Tamiya F-16C 148th FW
Posted: Fri Nov 27, 2015 7:01 pm
by Navcom
Thanks everyone! Believe it or not, I have enough decals and a second set of resin bits to make another one of these! Just might have to order the styrene for the stash and make one one the ground.
Re: Tamiya F-16C 148th FW
Posted: Fri Nov 27, 2015 7:20 pm
by Navcom
@MikeyKb and mincemeat...Sorry I didn't respond sooner! Haven't visited the site in awhile! The stand was one I found on Amazon:
It's definitely affordable...not bad for the price either! I drilled a hole in the bottom of the aircraft directly between the main gear doors that would accept the pin from the base...

This location was the optimal center of gravity to balance the jet on for this particular model (I used a pencil with an eraser to hold up the aircraft and test different spots until it balanced). The hole is 1/8 inch diameter (3.2mm). It was a bit tricky as you will note that the hole cut the spar in half. If the gear doors had not been glued to the spar, it would not have worked (when I realized this was the best spot during testing, I swore out loud
). The jet just sits on the base pin. I used blu-tack to keep the jet from moving (that the blue muck you see in the picture)...holds it pretty strong and easy to remove if I need to.
Re: Tamiya F-16C 148th FW
Posted: Sat Nov 28, 2015 12:07 am
by MikeyKb
Navcom wrote:@MikeyKb and mincemeat...Sorry I didn't respond sooner! Haven't visited the site in awhile! The stand was one I found on Amazon:
It's definitely affordable...not bad for the price either! I drilled a hole in the bottom of the aircraft directly between the main gear doors that would accept the pin from the base...
This location was the optimal center of gravity to balance the jet on for this particular model (I used a pencil with an eraser to hold up the aircraft and test different spots until it balanced). The hole is 1/8 inch diameter (3.2mm). It was a bit tricky as you will note that the hole cut the spar in half. If the gear doors had not been glued to the spar, it would not have worked (when I realized this was the best spot during testing, I swore out loud
). The jet just sits on the base pin. I used blu-tack to keep the jet from moving (that the blue muck you see in the picture)...holds it pretty strong and easy to remove if I need to.
Thanks for the info! Lovely base!!
There's an interesting Trumpeter one that's all plexi. Looks like you wouldn't have to make any holes... but also doesn't have the same 'look'
Re: Tamiya F-16C 148th FW
Posted: Sat Nov 28, 2015 12:44 am
by mincemeat
Added to the wishlist for future reference! Thank you! With the right tools I bet you could make that easy peasy and cheap. I see what you're saying, the landing gear doors really hold it together.
Re: Tamiya F-16C 148th FW
Posted: Sun Nov 29, 2015 2:58 am
by Navcom
It would be a piece of cake to make. Can't beat the price though...time is more valuable making models.

