Valentine in the snow - MOCKBA 1941 (1/72nd Armourfast)
Posted: Wed Nov 26, 2014 7:46 am
My first attempt into small scale armour as part of a local club group build and spurred on by ActungPanzers portfolio! The kit was one of the two 1/72nd sprues you get in a box from Armourfast. I didn't know much about the tank but then I found this picture of a Valentine in Russian service in the Battle of Moscow, 1941.

At first glance this looked like a winter camouflage scheme and I proceeded on that assumption. In retrospect this may simply be a green tank covered in snow...
Anyway I like to try new techniques and this gave me an opportunity to have a go at the hairspray method for the camo and an attempt at a snow scene.
The kit is squarely aimed at wargamers so detail is lacking, though still looks the part and is simple to assemble. The tracks and wheels are moulded as one unit, so these were left separate until later in the build.
After assembly I primed with Vallejo grey primer and then tried pre-shading with black for the first time. Not sure what I was supposed to do but assumed one darkened shadows and gullies. Also sprayed the tracks and wheels black.
Then, after much searching and eventually shrugging shoulders I plumped for a green shade of 5 parts Vallejo Model Air dark green (012) and 1 part Vallejo Model Air Camouflage Green (022).
Next up some light weathering using Humbrol washes and powders. Not used to these and there are tide marks. Maybe a coat of future would have avoided these, or maybe more finesse with the brush. (I found the video guides on the Humbrol site to be very helpful.)

Then on to hairspray stage followed by more weathering on top of that. Sprayed everything, including tracks and wheels. Worried if I should have done everything, then saw Hansolo's recent (jaw dropping) work and realised that's ok. All experimental.
The white went on and was left to dry...

then chipping began. A moistened brush was used to loosen areas of interest and then the paint was flaked off. This got me to here.


Then it was time for more weathering. Switched to oils this time. Burnt Umber, Raw Sienna, and Raw Umber were all used to get a mix of washes and streaks. AFVs are a new thing for me, so mainly made random guesses about where to apply the effects. Finally we get to.

Then left that to one side to dry off and started working on the base. I got a photo frame and replaced glass with foam board and built up a base with a gentle rise in the middle. I used polyfilla but it was too wet...

..which I paid for later. What I did try was use of Goache paints to add colour whilst the plaster was wet. This proved quite effective since the colours snaked into each other in quite a natural way. Carrying on with this idea I flicked spots of different colours with the brush to try and build up variation in tone and make it a bit more interesting.

The 'trees' were from twig and butchered sinewy twig/leaf things found outside.
Then the Precision Snow and Ice arrived. Quickly discovered that its very fine and you need to be patient. I used hairspray as the glue medium, though a proper aerosol glue such as photo mount might be better for quickly getting a deep pile. The advantage of hairspray is that it allows you to move stuff about with a damp brush. It also allows you to build up from a very fine layer.
The mistake I initially made, I think, was to use the airbrush to blow the snow around before the hairspray had fully dried. This meant the fine sticky particles clumped up in an unrealistic fashion. So there were a few false starts. Eventually decided to go for a light snow covering so some of the ground still shows through. The advice is to turn the base upside down to get rid of excess powder, but my trees were not fixed well enough for that...
Finally, after some trial and error we have


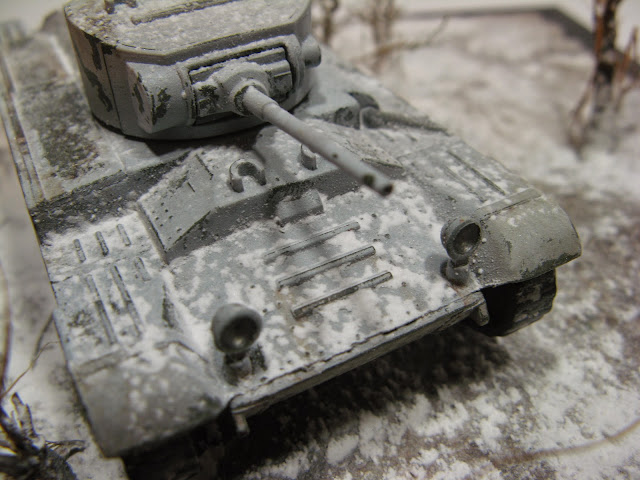
This next pic shows how the snow effects are very fine and can be quite realistic.
In conclusion:
The Armourfast kits go together well and provide a nice little test bed for ideas. It was great to have a simple kit to build quickly so I could focus on trying new techniques. The Precision Ice and Snow is not cheap but is very good.
Thanks for looking
At first glance this looked like a winter camouflage scheme and I proceeded on that assumption. In retrospect this may simply be a green tank covered in snow...
Anyway I like to try new techniques and this gave me an opportunity to have a go at the hairspray method for the camo and an attempt at a snow scene.
The kit is squarely aimed at wargamers so detail is lacking, though still looks the part and is simple to assemble. The tracks and wheels are moulded as one unit, so these were left separate until later in the build.
After assembly I primed with Vallejo grey primer and then tried pre-shading with black for the first time. Not sure what I was supposed to do but assumed one darkened shadows and gullies. Also sprayed the tracks and wheels black.
Then, after much searching and eventually shrugging shoulders I plumped for a green shade of 5 parts Vallejo Model Air dark green (012) and 1 part Vallejo Model Air Camouflage Green (022).
Next up some light weathering using Humbrol washes and powders. Not used to these and there are tide marks. Maybe a coat of future would have avoided these, or maybe more finesse with the brush. (I found the video guides on the Humbrol site to be very helpful.)
Then on to hairspray stage followed by more weathering on top of that. Sprayed everything, including tracks and wheels. Worried if I should have done everything, then saw Hansolo's recent (jaw dropping) work and realised that's ok. All experimental.
The white went on and was left to dry...
then chipping began. A moistened brush was used to loosen areas of interest and then the paint was flaked off. This got me to here.
Then it was time for more weathering. Switched to oils this time. Burnt Umber, Raw Sienna, and Raw Umber were all used to get a mix of washes and streaks. AFVs are a new thing for me, so mainly made random guesses about where to apply the effects. Finally we get to.
Then left that to one side to dry off and started working on the base. I got a photo frame and replaced glass with foam board and built up a base with a gentle rise in the middle. I used polyfilla but it was too wet...
..which I paid for later. What I did try was use of Goache paints to add colour whilst the plaster was wet. This proved quite effective since the colours snaked into each other in quite a natural way. Carrying on with this idea I flicked spots of different colours with the brush to try and build up variation in tone and make it a bit more interesting.
The 'trees' were from twig and butchered sinewy twig/leaf things found outside.
Then the Precision Snow and Ice arrived. Quickly discovered that its very fine and you need to be patient. I used hairspray as the glue medium, though a proper aerosol glue such as photo mount might be better for quickly getting a deep pile. The advantage of hairspray is that it allows you to move stuff about with a damp brush. It also allows you to build up from a very fine layer.
The mistake I initially made, I think, was to use the airbrush to blow the snow around before the hairspray had fully dried. This meant the fine sticky particles clumped up in an unrealistic fashion. So there were a few false starts. Eventually decided to go for a light snow covering so some of the ground still shows through. The advice is to turn the base upside down to get rid of excess powder, but my trees were not fixed well enough for that...
Finally, after some trial and error we have
This next pic shows how the snow effects are very fine and can be quite realistic.
In conclusion:
The Armourfast kits go together well and provide a nice little test bed for ideas. It was great to have a simple kit to build quickly so I could focus on trying new techniques. The Precision Ice and Snow is not cheap but is very good.
Thanks for looking

