Page 1 of 1
Revell 1/72 T-72 M1
Posted: Sun May 17, 2015 7:34 pm
by papatika
Hi all!
This is my very first entry here on ISM. Well, my very first entry at all...

15 years passed by since my last completed kit. New materials, new techniques, new tools... so my goal isn't the first place now. Third would do it...

I am from Hungary, and we do not produce armor since WWII. As ex-member of the Warsaw-pact we own mostly Russian technology. My entry is a 1/72 scale T-72 M1.
Re: Revell 1/72 T-72 M1
Posted: Sun May 17, 2015 8:37 pm
by TommyKillander
Hey papatika,
The T-72 is an awesome tank, very cool choice !

Good luck with the build!

Re: Revell 1/72 T-72 M1
Posted: Sun May 17, 2015 11:46 pm
by chief5437
Re: Revell 1/72 T-72 M1
Posted: Tue May 19, 2015 8:19 am
by papatika
Thank you for your kind words!
The kit itself was released in 2006. Sprue is clean, mold is fine, details are nice, but it is far from being perfect.
For example the inner beveling of the running gears are missing. Some sanding fixed it nicely.
2015-05-17 00.12.35.JPG
My first problem was a "hollow" in the mold of the headlight. Sorry, I don't know how to say it in English.
2015-05-182023.18.22.JPG
I fixed it with Tamiya putty and the head of a pin. The surface is not really smooth, but the back paint will hide it's roughness.
2015-05-18 23.27.58.JPG
Re: Revell 1/72 T-72 M1
Posted: Tue May 19, 2015 8:35 am
by papatika
An other headlight (number 58) will be more challenging because the way it is attached to the sprue. I need to get a drill bit with a width that fits. Or I ruin the rim.
2015-05-18 23.22.14.JPG
The "blade" on the front is out of scale. It has a 1mm width, which would be almost 8 cm IRL. That would would be enough for the frontal armor, too.
2015-05-18 23.47.14.JPG
After some sanding job it looks much better.
2015-05-18 23.57.42.JPG
So, here I am now.
In the meantime I'm researching what color to be used. Revell suggests 68. As much I know there is no official color for our T-72s. Any darker green shade found in the army depo would do it. The tank I want to use as sample has a deep dark shade. I think I have to do some test runs with my airbrush.
See ya!
Re: Revell 1/72 T-72 M1
Posted: Fri May 22, 2015 8:14 am
by Nige201980
Welcome to the show buddy. Looks a good little kit and your off to a good start best of luck with the rest.
Re: Revell 1/72 T-72 M1
Posted: Mon May 25, 2015 9:41 am
by papatika
Thanks Nige!
I spent my last week with building and fixing the turret. There was a lot to do.
Can you point out the differences?
2015-05-19 22.28.34.jpg
2015-05-24 20.27.06.jpg
First of all I filled the joints and gaps with Tamiya putty.
T-72 have cast turrets, but the plastic mold is shiny like glass coat.
I added the missing texture by applying some Tamiya Extra Thin glue and a touch of Tamiya putty, and tapping an old brush into it while it is still wet. Finally I gave it a light sanding to remove unnecessary edges and peeks.
The view port and the sensor behind it were molded as 2 simple block / cube of plastic, which is a bit of shame. I have carved out the 1x1 mm hole for the view port. To fix the sensor I added some indention and a slice of the sprue to rebuild the cover plate.
The wiring of the smoke grenades were completely missing. The missing wires were replaced by some stretched out sprue for the main cables, and some copper wire for the small ones.
Finally I added some knobble to the bends and joints of the main wires.
Here it is how it looks like IRL.
t-72m1_039_of_126.jpg
There are still some missing details, but I'm already satisfied with the current state. I'm curious how it will look like when it is primed.
My next task is to finish the body and prime everything.
See ya next time!
Re: Revell 1/72 T-72 M1
Posted: Mon May 25, 2015 10:32 am
by Dunhill2005
Great start!!!!

Praise and recognition to give this small kit so many details...

Re: Revell 1/72 T-72 M1
Posted: Tue May 26, 2015 6:44 am
by TommyKillander
Great job
Turret looks great after the improvements.
Re: Revell 1/72 T-72 M1
Posted: Wed May 27, 2015 9:01 am
by papatika
Thanks guys!
My final goal is something like this:

But to achieve it I need to solve a big problem: the flatcar.
I have several option:
- I could buy this one in H0 scale, but H0 is 1:87, so probably it would be a bit small.
- 00 scale would be better with it's 1:76 ratio, but it is rare, and haven't found yet an appropriate one.
- There are 1:72 resin kits, but mostly old stuff (WWII and before), and a really high price.
- I could find something else, but I need this diorama!
- Or I can build one for my own from scratch. I was thinking on buying and old, broken, four-axle (?) flatcar to reuse some parts, or just some wheels and bumpers (H0 or 00), some styrene sheets, get some wooden sticks form McCafe for planks, search for reference material... 3 months should be enough...
What do you think?
Re: Revell 1/72 T-72 M1
Posted: Thu May 28, 2015 6:22 am
by papatika
Hi there! A small update comes.
Recently I upgraded the exhaust "pipe". I drilled several holes and then carved out the rest. Finally I added the vertical dividers made of a scrap photo-etch sprue.
2015-05-25 17.04.32.jpg
2015-05-28 06.44.50.jpg
I also detached the machine gun.
2015-05-28 06.45.47.jpg
So, I think now I'm ready for priming! Yeah!

Re: Revell 1/72 T-72 M1
Posted: Wed Jun 10, 2015 9:02 am
by papatika
Good day, everybody!
Just a short update. I have primed it, and added some modulation pattern, shades, highlights. Kind of black-and-white technik. Next step would be the green base color in thin layers to let the color modulation shine through.
I have used the colors of AMMO of Mig Jimenez. There is a grey primer as first layer, and I darkened the grey by adding some black for shades, and lightened with white for highlights using 5-6 different mixtures.
2015-06-10 08.16.33.jpg
2015-06-10 08.18.59.jpg
Re: Revell 1/72 T-72 M1
Posted: Wed Jun 10, 2015 4:28 pm
by Danta2er
I really like the light/dark variance
Re: Revell 1/72 T-72 M1
Posted: Wed Jun 17, 2015 2:04 pm
by papatika
I'm trying to find THE color.
For me the third one seems to be the best, but still not good enough.
2015-06-17 07.19.11.jpg
Here are some sample tank:


Any suggestion how to mix colors to achieve the desired one? Or do you know a similar AMMO / Vallejo / AK / Revell / Tamiya color? Note: it will we sprayed over a gray base.
Re: Revell 1/72 T-72 M1
Posted: Fri Jun 19, 2015 6:25 pm
by TheTroyster
Have to hand it to you man, amazing work - I would have a hard time even seeing a 1/72 scale model!
Re: Revell 1/72 T-72 M1
Posted: Mon Jun 22, 2015 10:32 am
by papatika
Thank you Troyster!
Your Patton look really nice too. I have one on bench since a year, and I have the feeling that I have to finish it.
yesterday was the Fathers' day, and my family was very generous and left me alone to do whatever I wanted to do. Certainly first I had to take out the garbage, cut the lawn, cleanup the garden, fix the pondless waterfall, play with the kids, help in preparing the lunch...

So I had time to mix paints to find the color I'm looking for.
It turned out, that Vallejo's "Military Green" is pretty close. Since my model is in 1:72, it has to be lightened up a bit. For green yellow can be used to get lighter green. My choice was "German Yellow" from Vallejo, because it is so "creamy".
On the image below you can see the colors and their mixtures on a spoon. Upper right is the pure green (0:1). The color below was used to cover the tank. Its a 1:2 mixture of the yellow and the green. I additionally tested the 1:1 mixture too to use it for highlights, but I think it is too bright. Maybe a 3:4 would be better. Will see it.
2015-06-22 00.10.36.jpg
As you can see the lighter and the darker shades of the underlaying gray coat shine nice through, still some more highlights would look nice.
Here is an other picture with a different angle and lighting:
2015-06-22 00.12.28.jpg
Re: Revell 1/72 T-72 M1
Posted: Thu Jun 25, 2015 1:36 pm
by papatika
Hi everybody!
It's time to prepare the "boots", aka tracks.
My plan is to keep the tracks in 2 pieces until the whole tank will be put together. Therefore I glued first only the bottom part, and when it dried the upper part independently.
This kit have some track section molded in one piece, and several independent track links. In such cases you can see several times that the curve of the track is broken, contains a corner where the long track part meets the short one.
To avoid it I assembled the track section on a Tamiya masking tape, added a really tiny amount of Tamiya Extra Thin Cement, and left it for a minute or so to dry. Using the tape I tied it down to the wheels and left it for 3 hours more to completely dry while keeping it's shape.
2015-06-23 18.00.04.jpg
Extra Thin dries fast and seamless if not applied too much. Adding too much would "bleed" through and soften the taped side up ruining the details of the tracks. Correctly used the tracks won't stick to the wheels, the tape helps to keep the correct, nicely curved shape, and after it fully dried it is easy to detach and paint / weather it separately.
On several pictures you can see that the tank itself is nicely painted, but the tracks are used, rusted, dirty... I want to replicate this condition.
I begun with the rust by applying AMMO's Rust Primer, and added other rust colors and pigments from Revell and Humbrol to a variety of rust colors.
After that Revell's steel was drybrushed in a heavy amount. And not just lightly touching the surface. I wanted the iron to cover the most of the surface. The rusty colors are shining nicely through in the resets and deeper parts.
The steel seamed to be too shiny, but my goal was a worn-out, old, rusty track. To buff it I created washes using AK's rubber and track colors, and a light pin-wash with AMMO's chipping color.
Finally some dust was added using AMMO's Light dust.
painting_tracks.jpg
And here is the final result. Sorry for the bad picture quality, I'll crate better ones later.
2015-06-24 23.51.46.jpg
Next is the upper hull and the turret. See you soon!

Re: Revell 1/72 T-72 M1
Posted: Fri Jun 26, 2015 3:27 am
by kiwigav
Excelent build thread mate... lots of info
Re: Revell 1/72 T-72 M1
Posted: Fri Jun 26, 2015 6:43 am
by TommyKillander
Great job on the tracks, it is really difficult to get tracks in that small scale to look realistic, but you succeded I believe.
Keep up the good work !
/Tommy
Re: Revell 1/72 T-72 M1
Posted: Fri Jun 26, 2015 5:17 pm
by TheTroyster
I am so glad you posted this up, I am going to build a Soviet tank and it has these link and Length tracks and the tape is a great idea!
Every time I look at this build, it looks like a 1/35th scale and then I see that turret is not much bigger than a spoon and then realizing how small this 1/72 project is only speaks volumes to your skill level! Looks great!
Troy
Re: Revell 1/72 T-72 M1
Posted: Sun Jun 28, 2015 11:03 pm
by papatika
Thank you kiwigav, TommyKillander and TheTroyster, I'm really happy that you like my build thread, and I hope you enjoy staying and will come back soon...

Guess what happened Friday! The postman arrived and brought me a package from England.

A flat car in OO scale (1:76)!
But there is a small problem with it:

it isn't wide enough

- and a bit too long also...
I could build a wider platform over the existing one, but it would look "funny". So I think I'll keep the boogies and the bumpers, and build the rest from scratch. This is the vision:
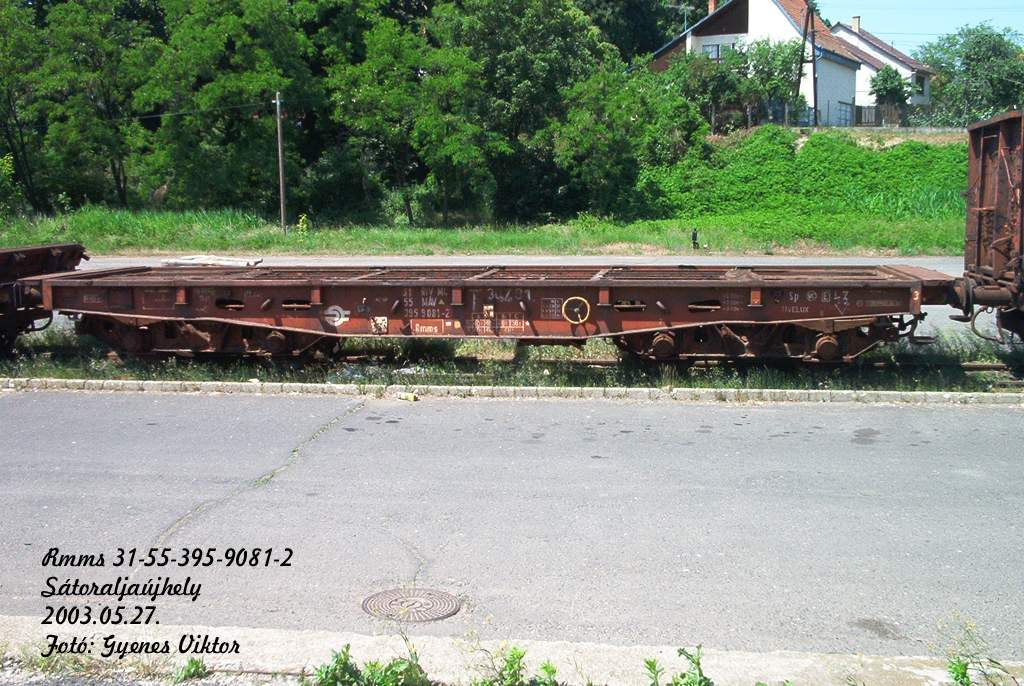
Now I'm looking for details about it's dimensions.
Does anybody have experience in scratchbuilding such flat cars?

Re: Revell 1/72 T-72 M1
Posted: Mon Jun 29, 2015 12:43 pm
by papatika
I should work now, but hell! I'll be on holiday from tomorrow on!

And I found what I was looking for (isn't it beautyful?

):
 http://www.fuvarozas-szallitmanyozas.co ... ener+tipus
Re: Revell 1/72 T-72 M1
Posted: Sat Jul 04, 2015 6:44 pm
by papatika
Ladies and Gentlemen!
I announce the tank to be completed!
I have 2 more month the complete the diorama. Currently I'm not entirely sure that I'll be able to finish it. If so, I always can fall back to this stage, and make a final reveal.
Here it is:

The turret with the cast texture, hand made wiring, viewports:
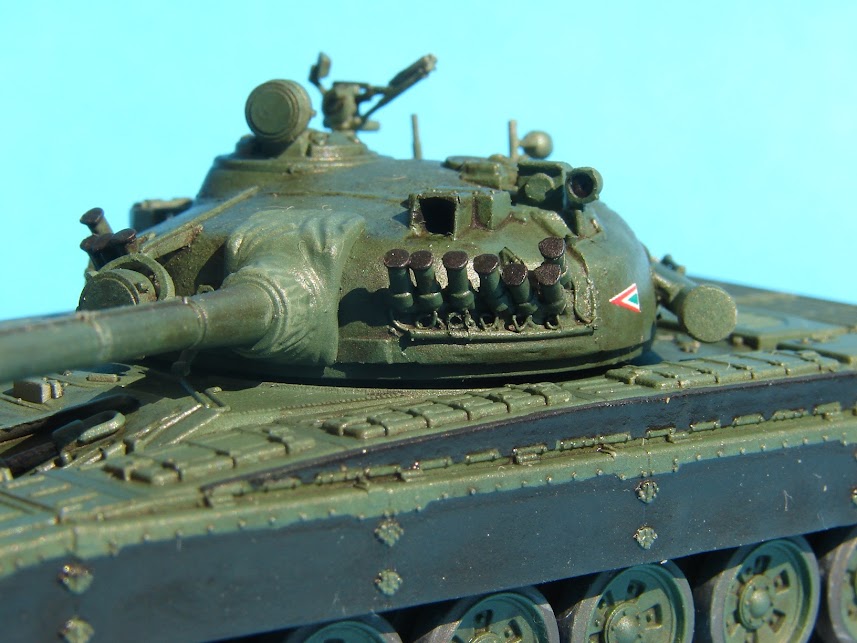
Muzzle-cover (guess what is the material used to imitate fabric*)

(* toilet paper!
)
Upgraded exhaust:

Shining rubber skirts:

And two more:


Now I have to go pack, we are going to a wellness-week. So no modelling for 7 days...

Until then please leave comments and suggestions! Thanks!
Re: Revell 1/72 T-72 M1
Posted: Tue Aug 04, 2015 9:04 am
by papatika
Hi all!
Massive thread update ahead!
I am working on the diorama. I plan to put the tank on a railway flat car, and put some brick wall behind.
Something like this:

I continue the building in 3 parallel sub-processes:
- the flat car
- the brick wall
- the ground and the tracks
So stay tuned, updates are coming!
Re: Revell 1/72 T-72 M1
Posted: Tue Aug 04, 2015 9:42 am
by papatika
BRICK WALL
I want to add the wall in a slight angle to have more visual interest.
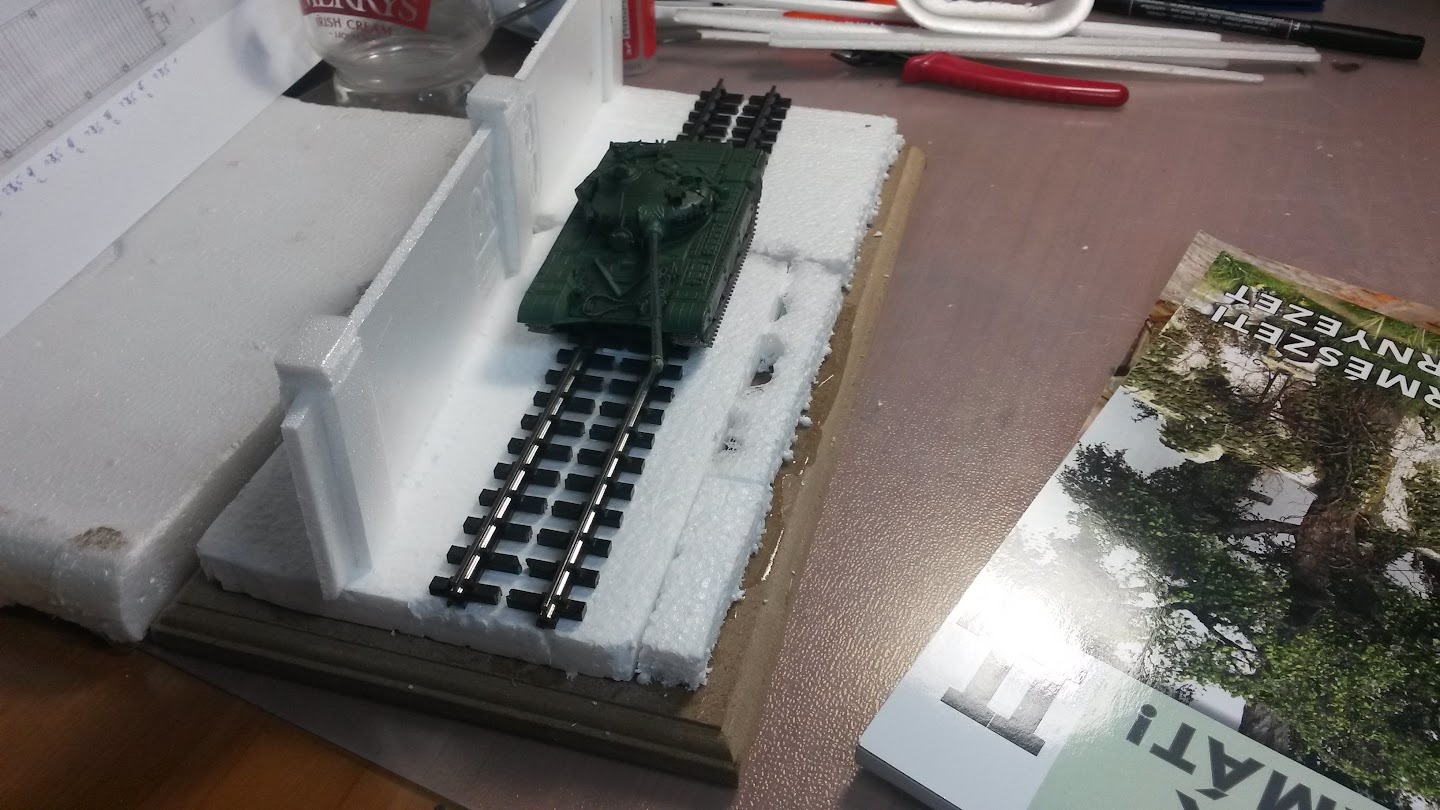
I used polystyrene foam as base. I found the raw material in the kitchen
:
I have covered it with modelling clay. Terracotta color, to have a brick-like color.
The bricks are really small, 1x3 millimeters. So I created a tool using some scrap photo-etch frame and a toothpick. With this a bunch of tiny-little brick could be made, in a pretty random shape. The tool is just pressed into the clay, but not through it, so it won't fall apart.

And it was too much job to shape those brick. Modelling used to be fun, and at the end it wasn't it at all. So I decided to add bricks only to the bottom. The upper part will be covered with plaster, like here:


The clay was fixed to the styrene with highly diluted wood glue. It took a day to get it dry.

Thanks to the wet glue the clay can be modified easily on it's place. The leftover can be stripped down:

For the columns I used a different approach. I glued the clay first, and created the brick only after that.
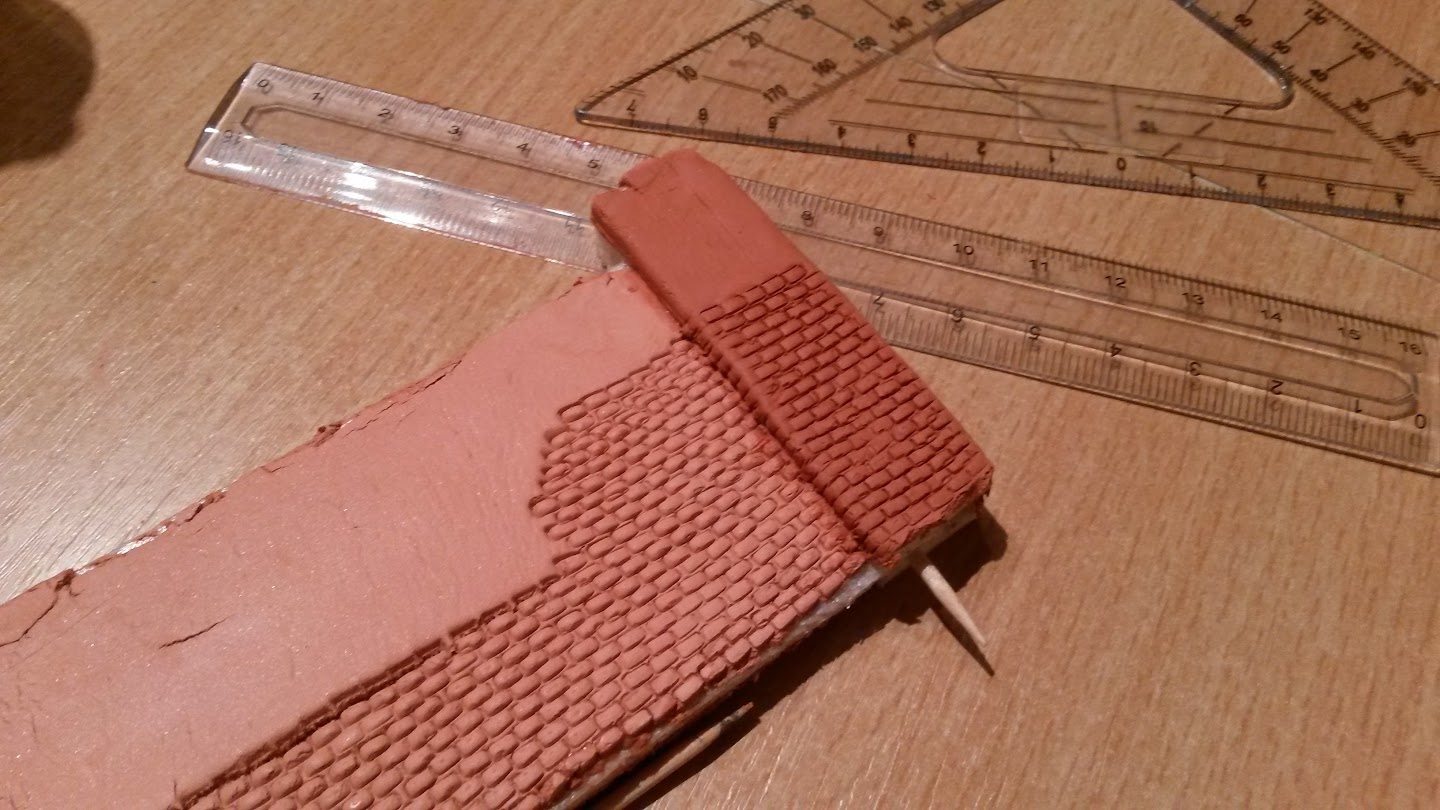
Here I am now with the wall. I need to sand it a bit, give some color variation to the individual bricks, create the plastering, paint it... so there is a lot of stuff to do.
Re: Revell 1/72 T-72 M1
Posted: Tue Aug 04, 2015 10:17 am
by papatika
FLAT CAR
I decided build my own flat car, mainly using Evergreen and Plastruct plastic stripes. For the wooden upper deck I visited McCafé, and "rented" some mixing sticks...
Cut them to length, and glued onto a plastic piece with superglue.
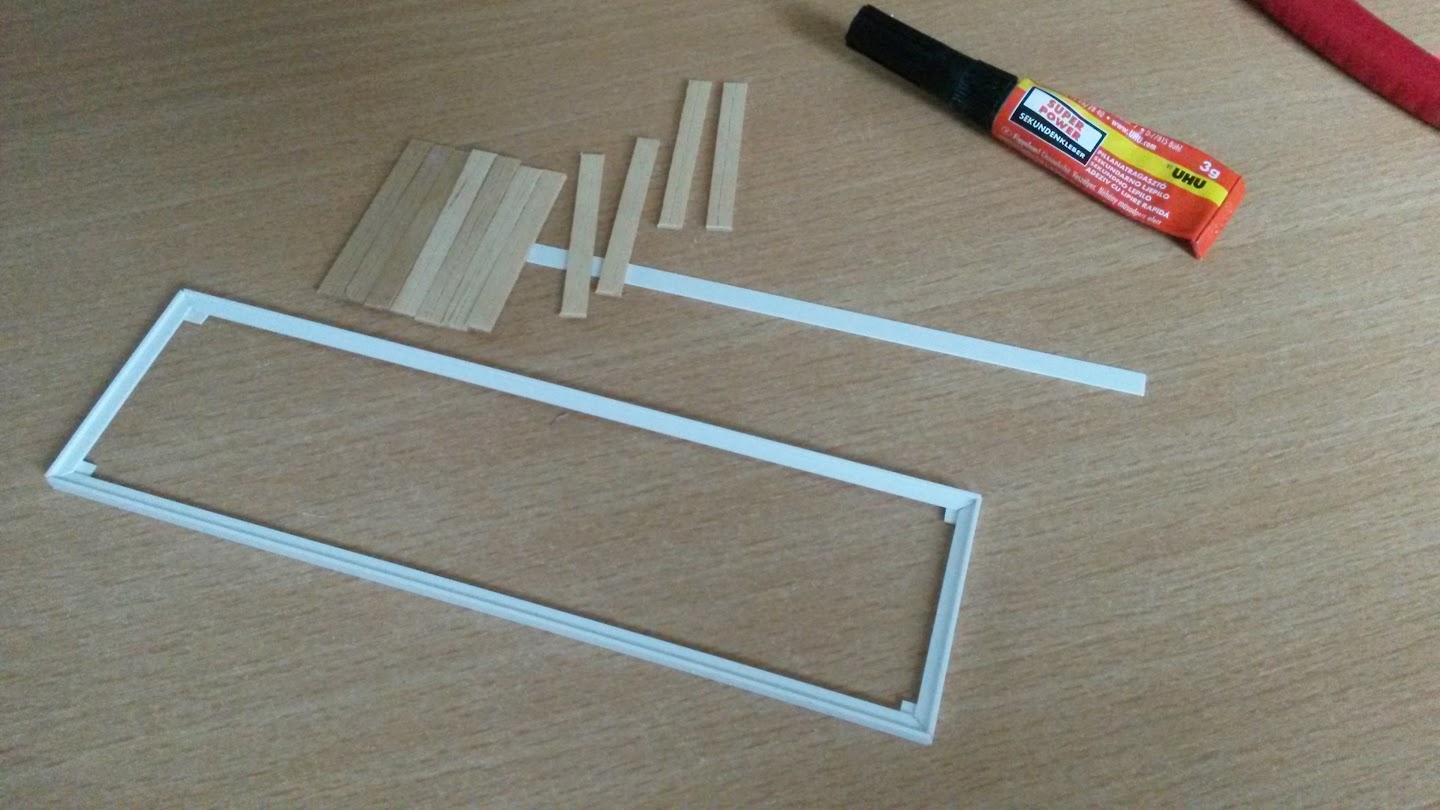
In the same way I built the bottom part.
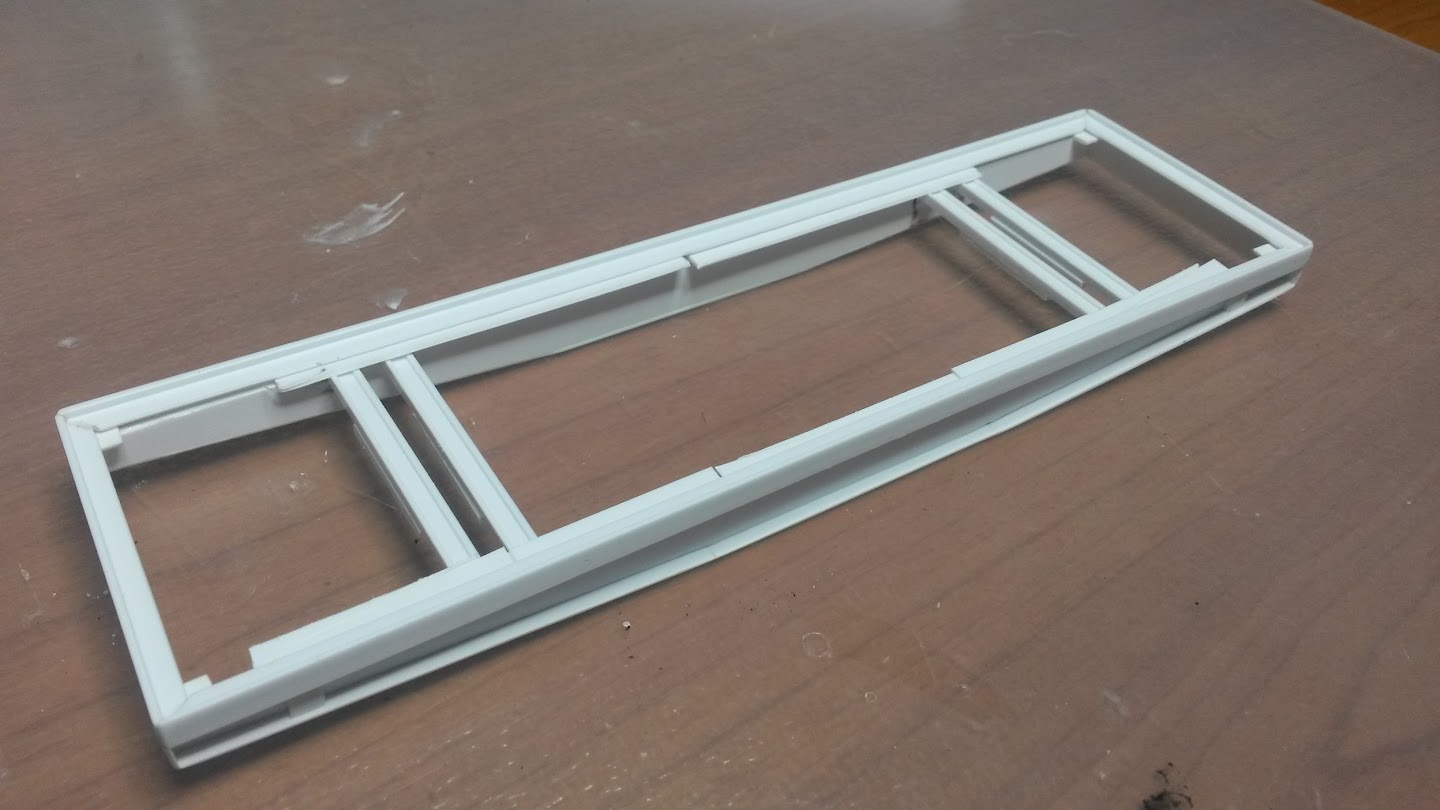

I had to rebuild the boogies, too, they were not wide enough compered to the Hungarian standard. I cut the frame into to piece and glued them together again using styreen and superglue. I also cut the wheels into half, drilled 1.5 mm holes into the axis, added a copper wire, and finally covered it with two-component Milliputty.

This is how it currently looks like:

I already added some more details to the side. It will be primed with a rusty color, and painted with red and black. Currently I'm hunting decals.
Re: Revell 1/72 T-72 M1
Posted: Tue Aug 04, 2015 10:26 am
by papatika
GROUND AND TRACKS
First I wanted to glue the base pieces with superglue. Guys, don't do that. The foam just disappeared.
I added some elevation to the tracks, and cut them to two parts, because it wasn't wide enough according to the Hungarian standards.

Finally I glued some cardboard to create a flat side, and a small edge to hold the stuff I'd like to use as ground cover.

But now I have to wait until the wall is finished. Bushes, grass, gravel, all ready for application.
Re: Revell 1/72 T-72 M1
Posted: Wed Aug 19, 2015 1:40 pm
by papatika
Hi all,
the wall is almost finished. So here is what I've done.
First I painted some bricks randomly with different shades of red, brown, orange and yellow,

and filled the gaps with plaster (gypsum)

The brick walls are usually covered by 2 layers. One is mostly a rough, dark grey material, and it should glue the outer layer to the wall. The other one is flat an painted.
I added kitchen paper towel, moistened in thin wood glue to add the necessary volume, and painted with gray (Revell Steingrau).


The outher layer was created using white modelling clay. I flattened it to get a really thin (0.5 - 1mm) material. The edges were just teared away by hand, and I lifted it up a bit here and there.

To color it I used yellow and brown watercolors. With a brush I applied a decent amount of water to the surface, and just tapped the yellow into it letting the colors to spread in the water randomly. After it dried, I did it again. Then I did the same with a little amount of brown. Finally I moistened only certain areas where I wanted to accumulate dust and streaking grime.
To create the concrete "roof" I glued sand from my kids' sandpit onto a styrene stripe, and saturated with light gray (Revell Hellgrau). The roof was secured with wood glue.

The flatcar was primed with AMMO Rust primer, and some Humbrol Maskol here and there to create rusting later on.

Reds from Revell and Vallejo were used to paint the flatcar. I sprayed it in an angle to have some nice shades.
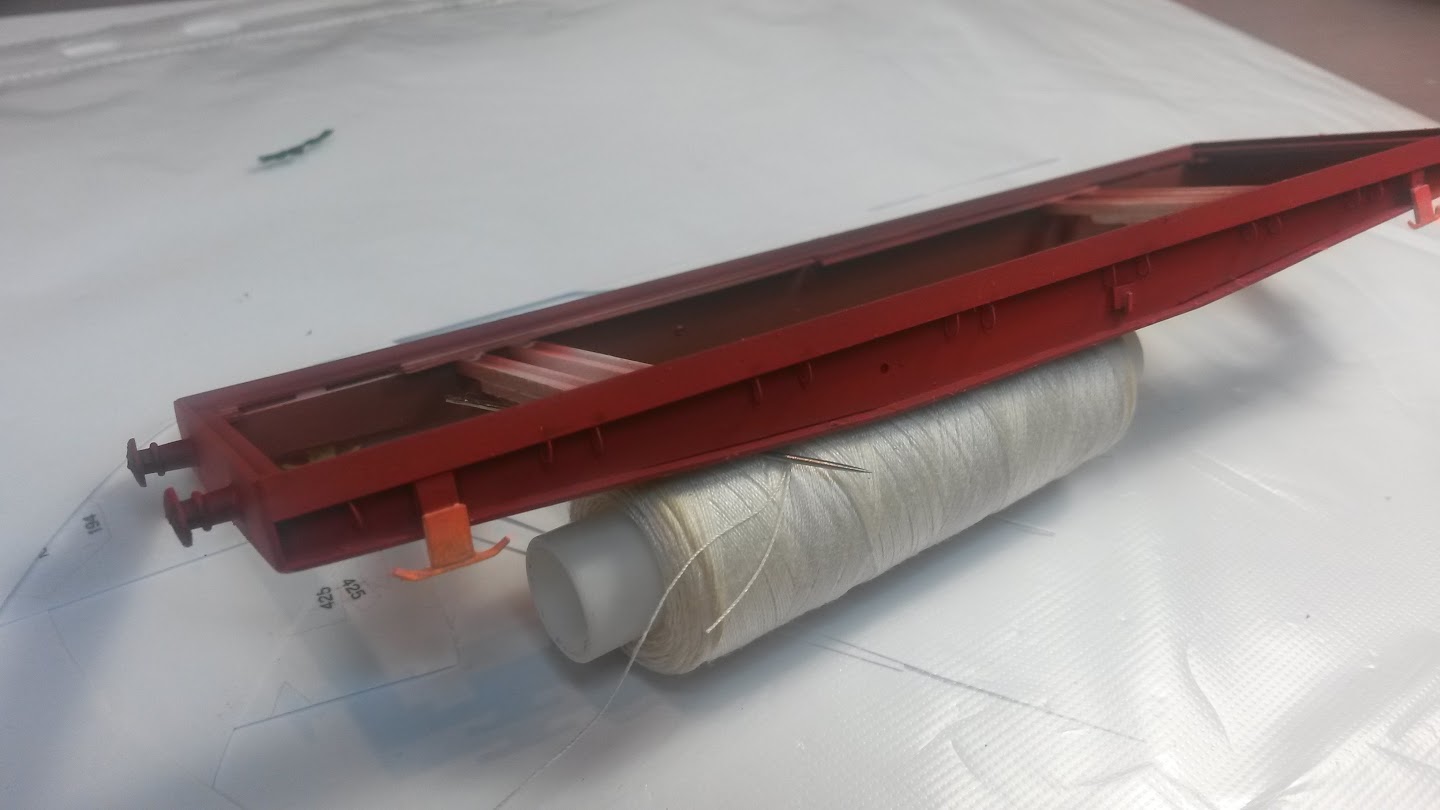
Unfortunately I don't have picture (yet) about the rusting, but it looks great, because when I pulled the Maskol off, it just slipped out without tearing the whole overlaying paint off, so the paint seems to peel off, like in the real life.

Not too much happened to the ground and tracks. I sprayed AMMO Rust primer onto the tracks and sanded its "ridge" to get the steel back. And some earth was applied from our garden with diluted wood glue.

I just can hope you like this thread and you can see the pictures linked from my Google Photo album.
Re: Revell 1/72 T-72 M1
Posted: Wed Aug 19, 2015 5:14 pm
by Danta2er
The wall looks amazing!!
Re: Revell 1/72 T-72 M1
Posted: Wed Aug 19, 2015 6:31 pm
by TommyKillander
The scratchbuilt flat-car and the diorama background looks fantastic!
Great job!

Cheers
Re: Revell 1/72 T-72 M1
Posted: Wed Aug 19, 2015 9:47 pm
by patrickroos
Wow that dio base looks awesome, great work!
Re: Revell 1/72 T-72 M1
Posted: Sat Aug 22, 2015 11:31 am
by papatika
Danta2er wrote:The wall looks amazing!!
patrickroos wrote:Wow that dio base looks awesome, great work!
TommyKillander wrote:The scratchbuilt flat-car and the diorama background looks fantastic!
Great job!
Cheers
Thank you guys! 8 days left, a still a lot to do.
This was the fist time I made a wall by my self, and it turned out to be really nice. I'm very happy with the result. But there is one more thing I'd like to add: a graffiti. I was really afraid, if I screw up the wall, I'll have no time to fix it. So I was pretty nervous. I got the inspiration from a Youtuber, called Scale Model Medic. He made a really cool upgrade on a boxcar:
https://www.youtube.com/watch?v=EefQ07lQD-4.
I wanted to have something, which represents me, and my Homeland country to pass to the GB's topic.
I ended up having my monogram (PLA) in our national colors (red-white-green).
So I planned my graffiti in Gimp, printed in several scales, and checked with would look the best. Then I printed 8 more from the selected one. My wife gave me a transparent strirene sheet she uses for glass paints. The advantage was that I could see through it, so I could position the masks much easyer, no trick were needed like SMM made in his video.
I started with a dark green undercoat, which was used also on the tank itself: Military Green from Vallejo. I think it gives a nice contrast to the wall's yellow.

The next step was the black shadow for the letters, used Matt Black from AMMO

For the letters I wanted to have a nice, bright base, so the white was sprayed all over. (White primer from AMMO)

Vallejo's Carmine Red covers the upper parts of the letters. I positioned the masks a little lower to create a white shine on the top of the letter.
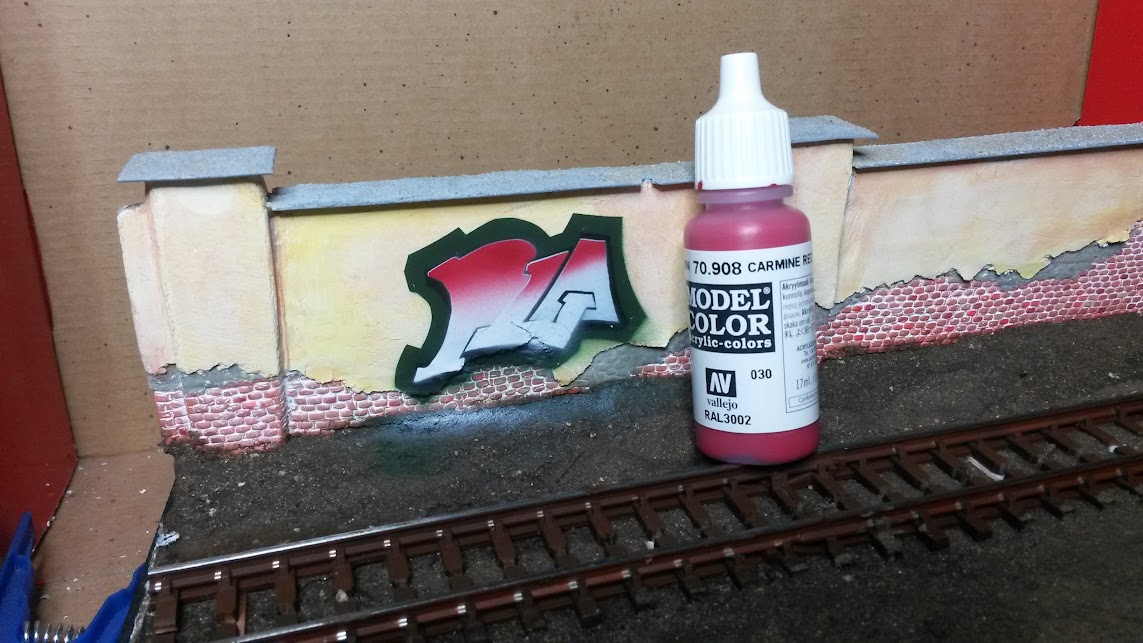
Resedagrün from AMMO gives the green color of the lower part. Again, masks placed a littlebit lower.

Some more details were added by hand (white and black dots with a toothpick, stars using a 5/0 brush), some cleanup on the edges, an the vents of letters P and A.

It looks much better than I expected! But next time I create the graffiti BEFORE I glue the wall to the basement.

I had to put the dio in a vertical position to reach the area I wanted to paint.
I think the wall is ready! Next is to add some vegetation - where I still plan to do something new for me -, and to finish the flatcar.
See you soon!
Re: Revell 1/72 T-72 M1
Posted: Sat Aug 22, 2015 9:18 pm
by TommyKillander
Wow!!!

The grafitti spray-tag is awesome! Great skill and creativity, buddy!
Cheers!
Re: Revell 1/72 T-72 M1
Posted: Wed Aug 26, 2015 7:45 am
by papatika
TommyKillander wrote:Wow!!!
The grafitti spray-tag is awesome! Great skill and creativity, buddy!
Cheers!
Thanks buddy!
Dio is on 99%!
First I added some static grass, but I'm not really happy with the result. If I would have time I would try to redo it.

I used 2 different greens to achieve some variety. But they were mixed up too much, you can hardly see the shades. And looks sooo "unnatural"

This spring during the maintenantce of the nearby playground I collected some fine roots. Using these and by adding some foliage by "Noch" I created some bushes. I do not want to seem conceited, but man! This bush rocks!

I added some more roots to the back of the wall to create a climbing plant.

For leafs I used the seeds of birch. Leafs were primed with Revell Laubgrün, upgraded with B Resedagrün and Dunkelgelb from MIG.

Unfortunatly I didn't have enough seeds to cover the whole plant, so one half is of the plant is dead, dry.

Finally some gravel has been added to the tracks.

The black frame got wavy, covered by earth and grass here and there, this needs to be cleaned up. Maybe in the remaining few days I find some solution to my grass problem. But if I fix the frames, the dio is ready.
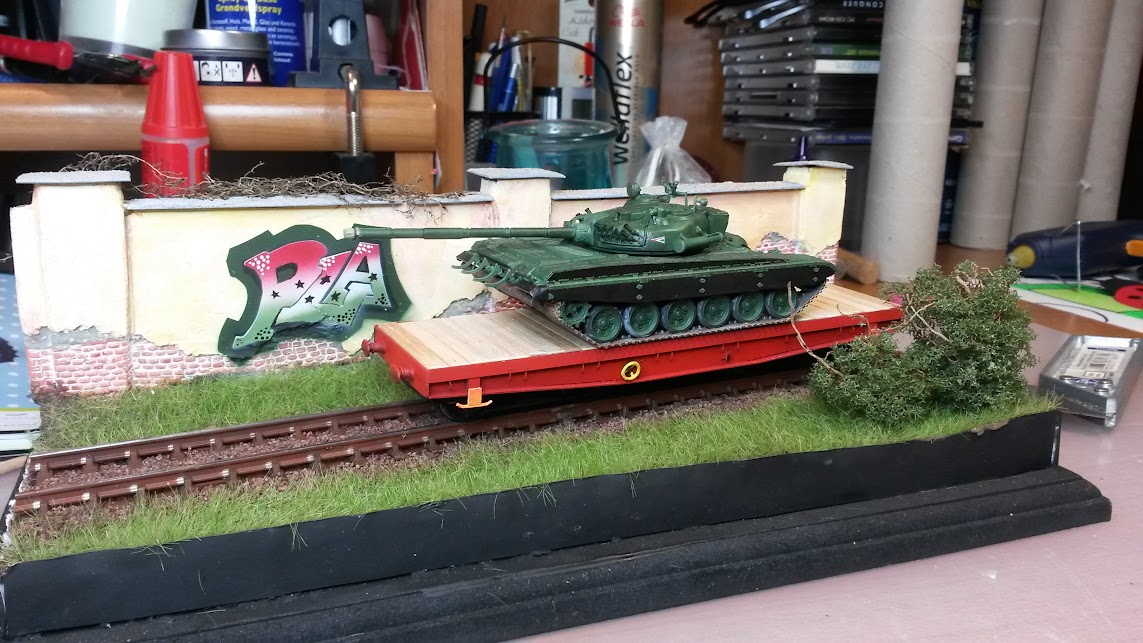
The flatcar needs some weathering, and the T-72 needs to be tied to the flatcar. This is all that remains. There is now a chance to finish this project in time!
Cheers!
Re: Revell 1/72 T-72 M1
Posted: Fri Aug 28, 2015 11:25 pm
by papatika
After 4 month the time has come: this is the last update.
I added some dust to the flat car using MIG and AK products. (Sorry for bad quality picture)

Tesa masking tape was cut to thin stripes and painted blue (Revell Lichtblau). It was glued to the tank and the flat car using superglue.
Finally some dark brown was from MIG on the stripes made them look dirty and worn.

I still have to fix the dio's sides, and make some good photos in daylight. But those will be published on the final reveal. Until then here is the assembled stuff:


You can find all pictures in my
Google Album, and the final reveal
here!

Thany you all for your kind attention!
Cheers!